Cakewalk’s Rapture soft synth has been completely reworked and re-imagined: introducing Rapture Pro.
In my review of Sonar Platinum back in the May 2015 issue of Sound On Sound I noted how Rapture and Dimension, the stalwarts of Sonar’s virtual instrument offerings, were looking a bit dated and tired these days. Within a couple of months Cakewalk announced Rapture Pro, a whole new synth, created as the evolution of Dimension and Rapture and bringing it right up to date. Cakewalk were very insistent that we delayed this review until they fixed a couple of initial release issues, so in the interests of transparency, this is a review of version 2.00.2.541.
Rapture Pro is installed via the Cakewalk Command Center and comes with a library of over 4000 sounds, which takes up around 13GB of space on your hard drive. It also seeks out any Rapture or Dimension Pro library expansion packs you may have installed. There’s a stand–alone mode on Windows (not available on Mac) but otherwise it exists as a VST 3 virtual instrument, and if you’re familiar with its predecessors then you will feel right at home.
Rapture Pro has four different views to let you navigate the depths of its sonic possibilities. At the front is the Browser, listing banks, type and program names. Next is the Instrument view, which gives you control over a handful of parameters within the loaded program designed for performance and simply playing. In the Edit section you’ll find the Mixer, which contains send effects and level control over the elements. Then you have the Element editor itself, which is the source of the synthesis engine. Like the original Dimension Pro and Rapture it uses the concept of ‘Elements’, and each element could be seen as its own synth, based upon a waveform oscillator or a sampled instrument. There are up to six elements available for each program, so you could use it as a six–layer sample instrument or a six oscillator synth. Normally these elements are combined to form a single sound, but you can also address them individually in a multitimbral mode. Before we dig too deep into the synthesis side, let’s first look at the other views in a bit more detail.
Browser
The library is initially formed by three banks: the all-new Rapture Pro library, the factory library from Dimension Pro and a bank of classic sounds from the original Rapture. If you have any other expansion packs installed then they’ll be picked up, as well as any edited library from existing Dimension or Rapture installs.
The new sounds have been sourced from a group of professional musicians, producers and DJs including Dom Kane, Ben Cantil, Andrew Hlynsky and Sound On Sound contributor Craig Anderton. Unfortunately, none of the sounds within Rapture Pro confess to who created them.
 You can browse through the library by bank and category.The sound palette is enormously pleasing. Rapture has always had the sonic ability to cut through mixes and this new library has lost none of its zing. From a large collection of organic and evolving pads, through to speaker rattling basses, cutting leads and banging patterns, the synth side of the library is instantly usable. But this is far from being purely about synthesis because Rapture Pro also has a sample–based side to its personality. From tiny accidentals up to multiple gigabytes of cinematic orchestral sounds you get a wide range of interesting programs to play with. The elements allow you to combine samples with waveform oscillators to generate very individual sounds and are a great tool for the adventurous sound designer.
 The performance interface gives you a convenient panel of knobs to play with.The library has been organised into 20 different instrument types covering all the usual styles, which makes for easy sound selection. When you select the Type, the Info column on the right displays a nicely relevant icon image and then really not very much information at all. It has a ‘Times loaded’ field that gives you some indication of how useful you’ve found that sound, but this box is crying out for a bit more detail. For instance you could have the author of the sound, perhaps a serving suggestion, or you could have a rating or favourites system, but sadly there isn’t one. The naming of the sounds also lacks some consistency: some names are squashed together, like ‘BumperBass’, some have underscores like an old-school file system (‘DK_BA_BigBottom’) and others have regular spacing. However, the search bar in the Info box has no trouble interpreting it and finding the right sound. The other included banks don’t have the icon images or display the sound type in the Info box, even though they are sorted into the same categories as the Rapture Pro bank. If you then reallocate a sound to a category the icon duly appears. I know I’m nit-picking, but this and the inconsistent naming convention makes it feel all a little unfinished. However, the layout and the search box make it very easy to navigate and browse through sounds. A single click on the program loads it up and you’re ready to investigate some parameters.
Instrument
Nestled in the Performance section along with the Browser, the Instrument button reveals a simplified editor panel for the loaded sound. In line with Type, the control panel is nicely rendered to remind you of the sort of sound you’re playing with. You have eight knobs and two X-Y pads that can be assigned to any parameter via the modulation matrix in the Mixer page. Each sound from the Rapture Pro library loads up with a custom panel displaying the most useful controls ready to tweak and ready to play. It’s clean, easy to read, and the controls are very fingerable if using a touch interface (although not multi–touchable), making it perfect for live performance or simple sound tweaking without having to get into the whole messiness of synthesis. The other interesting control is the Vector Mixer, which allows you to simply mix between the six elements by moving a point within a hexagonal plane. This also has a sort of accelerometer built in so you can glide smoothly from point to point — it’s a very playful and useful sound-blending tool.
Mixer
Bringing together the sounds generated by each element, the Mixer contains two send effects and one master insert, a Master EQ, a global step generator and individual mix controls. There are 33 effects ranging from delays, modulation and filters through to reverbs and distortion. Each type of effect is colour-coded, so you know at a glance what sort of effect is loaded. The Master EQ is simple but effective, offering three bands of low–, high– or band–pass equalisation. The Element mixer gives you level and pan controls plus sends to the two effects buses. There’s a switch to let you run the sends in series or parallel and another nice touch is the ability to chain elements to one another so that the output of one can go through the effects section of another.
 The Step Generator can wonderfully inflict movement and rhythm on the sound.The Step Generator in the middle of the mixer provides volume control over the stereo output in a delightfully rhythmic way. There are Depth and Smoothness controls and you can set left and right amps individually (although you can’t seem to link them) and you can vary the number of steps between two and 128 and alter sync resolution from 1/8t to 128t, or if you prefer things less regimented you can turn the sync off and twiddle the frequency knob. Varying the number of steps changes the resolution of the generator rather than the length, which is actually governed by the sync value. It’s essentially a posh gating effect which can introduce pulsing rhythms, evolving envelopes and beats. Putting different presets to left and right channels makes for some interesting effects, but I wish there was a way of linking the two together to save having to set everything twice when you want the whole signal affected in the same way. There is a copy/paste facility to help you put the same values into both sides, but that seems a trifle long-winded.
The other point of interest in the mixer is the Mod Matrix. This is where you can assign a MIDI or internal macro control to any available synth or effect parameter. First you specify a source, which could be any MIDI control, such as pitch–bend or a modulation wheel, or any knob from an external controller, and then specify a destination, which is the parameter you are wanting to map to. The source option also contains all eight Macro knobs and the X-Y vector controls, so if you want to add filter cutoff and resonance to the Instrument performance panel you can do that here. There are 24 slots into which you can map all sorts of things to other things to create a very controllable soundscape.
There are two additional controls: Amount and Smooth. The Smooth knob appears to slow down the transition, so that the higher the Smooth value, the further behind the change is to the turn of the knob, making for a slower, smoother and more legato feel. The Amount value takes a bit of head-scratching. Essentially it gives the range within which the control is operating. So if you map your mod wheel to oscillator pitch and set the amount to zero it won’t actually do anything. Set it to a minus number and it pitch-bends down, set it positive and it pitch-bends up: a little on a low number, a lot on a high number. The available range varies depending on the control, so filter cutoff ranges from 0 to 13,700, sample offset from –44,1000 to 44,1000, and pitch from –4800 to 4800, for example. However, there’s no real indication of what these mean (digging into the manual reveals a full table of information) and it takes an awful lot of mouse dragging to change through tens of thousands of values. Although this gives the savvy user a lot of accuracy and finesse, a simple slider would probably suffice for the rest of us.
The Mod Matrix is undoubtedly a powerful controller tool, but there are a couple of things I find frustrating. Firstly there’s no change to the actual parameter you’re controlling: if you set your Macro knob to control the filter cutoff, the filter cutoff knob in the Element page remains unmoved, and when you move it with your mouse it’s unclear what the relationship is between the two. Secondly, it would be nice if the Macro knob would label itself to reflect the control you’ve chosen. You can use MIDI Learn on any knob or parameter and map controls that way. However, this isn’t reflected in the Mod Matrix, so you could have your mod wheel controlling something in the Matrix and something outside of it. I’m not sure if that’s amazing or confusing. Sadly the Macro knobs are not available in the MIDI Learn option, they can only be set in the Mod Matrix.
The one thing that’s missing from the mixing stage would be some kind of level indication for each element — the only metering is on the master output and so it’s not always obvious which element your sound is coming from.
Synthesis
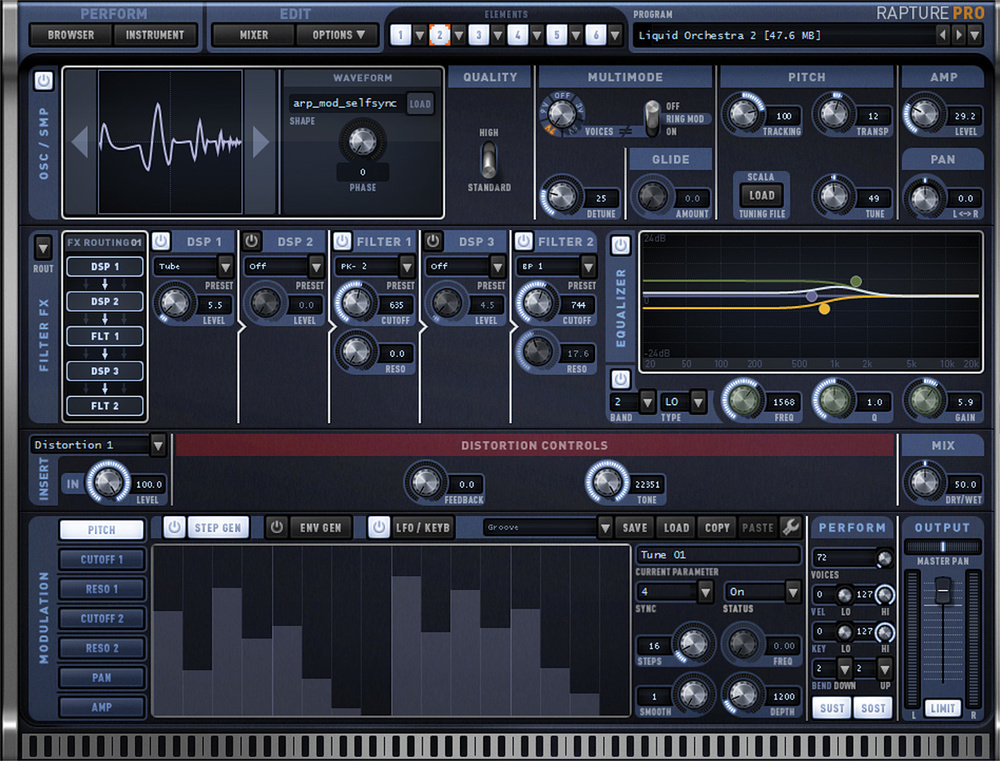
So with all the peripheral mixing, controlling and effecting out the way, let’s get down to the basic synthesis. If you initialise a program you are left with six empty elements. Each element can be based upon a waveform oscillator or a multisample (OSC/SMP), depending on the size of the sample file. Files of less than 3000 samples are treated as oscillators, files larger than 3000 samples are treated as, um, samples. Rapture Pro comes with 121 oscillator waveforms, which it inaccurately refers to as wavetables, and you can step through them using the arrow buttons. You can also load your own in sfz, wav or aiff format. The waveforms range from simple sine, triangle, square and sawtooth through complex versions of the same to samples of instruments and partials, and you can of course load your own.
 The Mixer provides all the modulation possibilities you could ever need.Once you’ve chosen your starting waveform point you have a number of synthesis controls you can apply. It starts off with a Phase knob, followed by a quality switch to define the rendering quality. Then we have the ‘MultiMode’ section, where we find we can add up to four detunable voices (not to be confused with the polyphony voices control), ring modulation and glide/portamento, if the polyphony is set to zero. Next you have a pitch section where you can set the tracking of pitch difference between notes, in cents, as well as transposing and tuning. One bit of unassuming genius is the ‘Scala Tuning File’ button. This allows you to load a custom tuning profile for micro and alternative tunings, of which there are a stunning 4496 to choose from. It could do with a bit more fuss being made about it, some sort of indication of what tuning is loaded, or a visual change to the on–screen keyboard, but as it stands it’s very versatile. Finally you get an amp level and pan control, which is mirrored in the Mixer window.
If you load a multisample instead then you have a few different options. First there’s a slightly mysterious ‘MIDI Input’ box from which you can drag and drop a MIDI file into your DAW (apparently some programs have a MIDI file associated with them which would light up here, though I’m yet to discover one). Next you have a ‘Shift’ knob that transposes samples within the multisample, but keeping the original mapping; I’m not really sure what that means or how it differs from the Transpose knob, but apparently it can be used with Transpose to create timbre variations by using two different tuning methods. Finally you have a 16–/32–bit switch, which toggles between less memory and more CPU, or less CPU but more memory usage. Then you have the pitch and amp sections as before.
 Samples or Sfz files are the basis of an Element.Once you’ve got your basic sound it’s then routed through the Filter FX section, which contains two filters and three drive/distortion/lo–fi-type effects. You have some very handy routing options that change the order of the effects, including running one or two pairs in parallel. In the filter presets you get pretty much everything you can think of, including a particularly pleasing comb filter. The drive effects feature tube with soft and hard clipping, bit reduction, decimating and warping options. What it lacks, I feel, is a preset section for the group of effects — and it would be really great to be able to save that section as a user preset. Next you have a three–band EQ similar to the one in the mixer. Rounding off the effects section is a single insert offering a range of delays, modulation and reverb effects.
At the bottom of the page we get a very interesting Modulation section. You have modulation control over pitch, cutoff/resonance of both filters individually, pan and amplitude. Then you have three modulation sources with the Step Generator, Envelope Generator and LFO. The envelope and LFO work exactly as you’d imagine they would, but it’s the Step Generator that shines here. Assigning step control to the filters is an awful lot of fun and there’s huge scope for creating movement and textures via all three modulation sources. Thankfully you can save presets on the Step and Envelope generators and you can copy and paste settings from one element to another, which is very handy indeed.
The Element page is all polished off with a ‘Perform’ section, which deals with polyphony, key range, velocity range, pitch–bend and sustain pedal control. And that’s it. You have the same page six times over, allowing you to layer up sounds and samples to create the wide and penetrating sounds that Rapture is famous for.
Conclusion
Rapture Pro’s biggest strength lies in the excellent included library and its ability to let you tweak and modulate that to a massive degree. I found the basic synthesis tools to be comprehensive, but it feels like quite a task to be able to generate interesting sounds from scratch. The parameter values can be complex and the connections between them in different modulation paths can be confusing. The layout of the interface is clear, but not beautiful, and the colour scheme tends to fade into itself until all the elements look the same. A bit more colour to differentiate between sections and even elements could brighten it all up a bit. The instrument section and performance controls are excellent and the rendered panel backgrounds are great, but they’re not outstanding in these high-definition days.
The playability of the sounds and the instant sense of fun you get going through the presets is just like the original Rapture. Including the Dimension Pro library greatly enhances the potential sound palette and the expandability options are very welcome. The potential for sound design and creation is all there if you are prepared to put in the time to learn the intricacies of the modulation controls and how elements work with each other, and despite a slightly unfinished quality to the interface there’s an awful lot to keep you busy.
Sample Editing & SFZ
The one thing that’s perhaps missing from this sample–based virtual instrument is any sample editing, by which I mean you can’t alter start, stop or loop points. You can stack up samples to create a multi–layered instrument, but you can only have one sample per element, and setting the key range is not very intuitive. This is where the SoundFont Sfz format comes into play. Sfz is a multisample definition file that allows for very complex sample arrangements and binds together a bunch of samples with layering, dimensions, velocity splits and other parameters into a single instrument. It’s within these definition files that Rapture Pro gets a lot of its depth, particularly in the more orchestral side of Dimension Pro. The Sfz format gives Rapture Pro access to a wide-ranging predefined library, but as a synth it feels slightly frustrating that there’s no provision for editing these multisamples (outside of opening the definition file in Notepad) or creating your own. Since the departure of Camel Audio it seems that Plogue’s sforzando is the only Sfz editor around (www.plogue.com/products/sforzando), which is perhaps something Cakewalk could capitalise on. Anyway, you can load an Sfz multisample into every available element, potentially creating huge sounds. It might also be good to be able to edit a couple of oscillators side by side or to have some kind of overview where you could tile each Element to get a better picture of what’s going on. Or at least be able to highlight and colour Elements differently, as sometimes it’s difficult to see which one you are editing.
Pros
- Vast sound palette.
- Brilliantly zingy.
- Open to sound designers.
- Modulation and Step sections.
- Use your own samples and waveforms.
Cons
- Feels unfinished in places.
- Unclear parameter values.
- Interface is a bit too muted.
Summary
With Rapture Pro Cakewalk have evolved Rapture into a superbly versatile instrument while retaining the sonic charm of the original. Packed full of modulation and layering possibilities it has plenty of depth for the sound designer and a vast library for those who just want to play.
information
Focusrite +44 (0)1494 462246