The AD8000 is a high performance 8‑channel, 24‑bit A‑D converter which can cope with an array of different digital audio formats, either in its basic form or with the addition of one of several optional cards.
Apogee's AD8000 is an 8‑channel, 24‑bit A‑D converter and processor which offers very low noise figures (‑110dB THD + Noise), has a 114dB dynamic range, and a frequency response that's flat from 20Hz to 20kHz, plus or minus 0.025dB. The basic unit has four stereo AES/EBU outputs and one stereo AES/EBU input, plus stereo S/PDIF input and output — and an Apogee Multimedia Bus (AMBus) card is available, for a further eight channels of AES/EBU input. You can install up to four of the optional AMBus cards to provide interfaces for Pro Tools, ADAT or TDIF. In practice, this means that the unit can be used as a format converter to convert from ADAT to TDIF to Pro Tools to AES/EBU — or any combination of these. The ADAT and TDIF AMBus cards also have built‑in Apogee Bit‑Splitting, to allow recording of six channels at 20‑bit resolution or four channels at 24‑bit resolution on to eight 16‑bit digital multitrack tape tracks — for example, on to a Tascam DA88 or Alesis ADAT. This makes the AD8000 ideal for preparing audio masters for the new 5.1 surround and 20‑ or 24‑bit audio formats.
Other options include a stereo 24‑bit DAC card with dual XLR outputs, an 8‑channel 24‑bit DAC card, and a remote microphone pre‑amp controlled from the AD8000. An optional Sample Rate Converter will also be available later this year. This will install in one of the AMBus slots and will allow any sample rate between 32kHz and 54kHz to be fed in and output at 44.1 or 48kHz, via any selected output, whether AMBus or AES. A video sync board is yet another AD8000 option.
Features & Connections
The AD8000 features a low‑jitter master clock, and 'Smart' sync capabilities are provided to automatically sync to word clock, the optional video board, or any digital input. Switchable analogue and digital DC offset removal is provided, and connections are on standard XLRs for analogue I/O and RCA/phono jacks for S/PDIF inputs and outputs. The unit also boasts built‑in UV22 processing, which allows you to convert from 24‑bit down to 16‑bit while preserving low‑level information. Other features include a built‑in test‑tone oscillator and a headphone monitor for any two of the eight channels. This latter feature, which isn't available on Digidesign interface units, was very useful when I was setting up and troubleshooting the system.
The range of connectors on the AD8000 should give you some idea of its flexibility. The back panel offers eight XLRs for balanced analogue line input, with four XLRs carrying four pairs of AES/EBU digital outputs, and one XLR for stereo AES/EBU digital input. There's also a pair of RCA/phono co‑axial connectors for S/PDIF in and out, a BNC for word clock or video sync input, and another for word clock out, plus a 9‑pin comms port and a block of ten DIP switches. These DIP switches let you set various parameters, such as how many consecutive full‑scale samples constitute a digital overload, or whether to use +4 dBu or ‑10 dBV line levels, and you can also enable the DC removal feature for the analogue or digital inputs. If any DC (Direct Current, as opposed to the Alternating Current of the audio) is present on incoming signals, this would normally be passed through to the output signals. If it became necessary to edit this later on, any section of audio without a DC component edited on to one with a DC component would cause a loud click at the edit point.
.") AD8000 rear panel, with the four empty slots for the optional plug‑in cards (right).
AD8000 rear panel, with the four empty slots for the optional plug‑in cards (right).
Front Panel
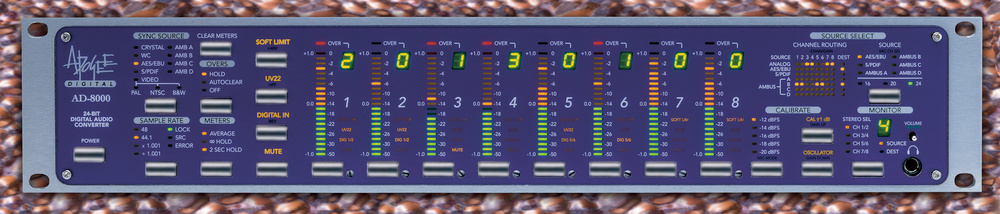
The front panel is where most of the action is. At the far left is a Power on/off switch, and buttons for Sync Source and Sample Rate are situated immediately to the right of this. The Sync Source button selects between the internal Crystal oscillator and external sync sources, including the word clock, AES/EBU and S/PDIF inputs on the back panel. It's also possible to lock to any device which has an active output connected to an AMBus card installed in one of the slots. With the optional Video Sync module installed you also get the option to sync to PAL, NTSC or Monochrome external video sync signals, which are automatically detected and locked to. In this case the AD8000 can also do 'pull‑ups' and 'pull‑downs' to compensate for the speed changes necessary when transferring NTSC video to and from film. For this you can choose to multiply or divide the sample rate by 1.001 using the sample rate button, which also allows you to choose between 44.1 and 48kHz sample rates.
To the right of these controls are three buttons for controlling the meters:
- The Clear Meters button lets you reset the displays to zero.
- The Overs button lets you choose whether to hold the overs indication, auto‑clear the overs, or defeat this function altogether. Choosing Hold or Autoclear causes the 7‑segment 'over' counter displays to keep track of the number of digital overs on each channel, up to a total of nine. More than this number of overs is indicated as a '‑'. Selecting Autoclear causes the displays to hold the last indication, although they will automatically clear when any audio above ‑50dB is detected after 15 seconds of silence.
- The Meters button presents a choice of six metering modes, with various combinations of Peak and Average indication, including two‑second and infinite Peak Hold. The permutations would be rather too long‑winded to write down, but the basic message is that the meters are pretty versatile.
To the right of the meter controls there are four more buttons, as follows:
• Soft Limit: This helps to get more level onto tape without 'overs', and is the same system used on Apogee's popular AD1000 A‑D converters. It can be applied individually to any analogue input channel, or switched on or off for all channels.
- UV22: UV22 encoding can be applied to any analogue input channel or any pair of digital inputs, using the UV22 button in conjunction with the channel buttons. UV22 encodes high‑resolution 24‑ or 20‑bit digital audio into 16‑ or 20‑bit formats, preserving the audio quality and avoiding truncation. If you're recording to a 20‑bit or 16‑bit system, you should use UV22 on all channels. If you know you'll be using UV22 at some later stage in your project — when mixing or mastering, for example — you can set UV22 to a 'low' setting using one of the DIP switches on the back panel. Another DIP switch lets you select the appropriate UV22 setting for either 20‑bit or 16‑bit output.
- Digital In: This button lets you switch between analogue and digital inputs on each channel.
- Mute: mutes any channel. The mute function will send 'digital black' (no sound, with clock) to the selected channels.
Project studios running Pro Tools 24 with an 02R mixer should strongly consider buying one AD8000 and the new Digidesign ADAT interface.
 One of the AD8000's meters in close up.The most striking feature of the front panel, of course, is the central section, which is taken up by the eight meters, each of which features 21 LED segments ranging from 0dB to ‑50dB at the bottom of the range. Above each meter there's a single LED to indicate overs, and to the right at the top of each meter there is an associated 7‑segment display which shows the number of overs, as explained earlier. If you've selected Soft Limit, UV22, Digital In or Mute for any channel, one of the four legends associated with each channel will light up to indicate this status. It's a very sexy interface, in all, with plenty of visual feedback.
To the right of the main display area there are three more groups of controls: Source Select, Calibrate and Monitor. Let's take a look at calibration first. This is a pretty straightforward procedure. You set up a 1kHz tone on your console's output busses at exactly 0VU on its meters, press the 'Cal' button on the AD8000, then choose a headroom setting. Typically, this would be ‑16 for digital multitrack, but if you're using Soft Limit you can go to ‑14 or even ‑12 if you want to get more level on tape. The 7‑segment displays will now indicate by how many dB you are above or below the selected reference level — a '‑' symbol indicates a level 10dB or more above or below. A level that's above is indicated by the 0dBFS LED lighting, while one that's below is indicated by the ‑50dBFS LED lighting. To set the input gain levels, adjust the trim pot on the selected channel until the number indicated in the 7‑segment display reaches 0. At this point the entire range of the meter becomes 2dB, with each segment representing a tenth of a dB. In this mode you tweak each channel so that the middle LED is lit. This allows you to calibrate each channel to within 0.1dB of the selected reference level.
The AD8000 also has a built‑in digital oscillator which you can select by holding the Oscillator button down for at least one second. This generates a sine wave at 1kHz across all eight digital outputs (including all AMBus cards) at the selected headroom setting. The oscillator level can be set to any one of the five different reference levels by repeatedly pressing the Headroom Select button until the setting you want is displayed. This is useful for quickly checking connections and routing, and also for recording an accurate alignment tone at the head of your project tape, to use for setting levels.
The Source Select section at the top right of the front panel features a channel routing matrix display (8x7 LEDs), with the Source button and associated LEDs to indicate the chosen source to the right of this. The matrix displays which sources are feeding each of the eight channels, and this is pretty easy to understand and use: the rows represent the sources and the columns represent the output channel numbers. If the top row is all lit, for example, this indicates that A‑D conversion is taking place from the analogue sources on all channels through the unit. If you then wanted to transfer from a digital source, you'd simply press the Source button, then the Digital In button, and select whichever channels you'd like to transfer from the digital source.There is also a column of LEDs marked 'Dest' in this area, which indicates the AMBus destinations for the channels.
Monitor Controls
The bottom right of the front panel hosts the Monitor controls. The AD8000 has an 18‑bit D‑A converter for monitoring. Briefly pressing the Monitor Select button routes audio from the selected pair of channels or the AES input to three destinations: the S/PDIF output on the back of the unit, the D‑A converter for the front‑panel headphone output, or the optional 24‑bit stereo D‑A card, if you have one installed. You can't mix tracks together, however. There's a handy little volume control, which only affects headphone volume, next to the headphone output, and an associated level display.
The Monitor Select button is used to step through the input selections — 1/2, 3/4, 5/6 and 7/8 — and LEDs will light to indicate the channel pair selected. Pressing the button once more when 7/8 is displayed lights all four LEDs to indicate that the onboard AES input is being fed directly to the headphone D‑A and the optional 2‑channel D‑A card, if installed.
The AD8000 can be put into what Apogee refer to as Destination mode if the Monitor button is depressed for at least one second. This mode is used during recording for overdubbing and confidence monitoring through any recording device connected to an AMBus card, while that device is the output destination of the AD8000. Previously recorded tracks can be monitored, along with tracks currently being recorded. If you hold down the AD8000's Monitor button, the headphone display changes from showing the headphone level to displaying one of letters A, B, C or D, to indicate the AMBus being monitored. You can select one of these by holding down the Monitor button and pressing the headphone volume switch up or down. In this mode, all outputs (AES, S/PDIF, headphone monitor, optional 2‑ or 8‑channel D‑A converters and all installed AMBus cards, other than the one selected by the Destination function) receive audio from the output of the selected card. To make this clearer, note that the eight output channels always go directly to the four AES/EBU XLRs on the back of the unit. Also, the pair that's being monitored, as determined by the headphone select switch, is routed to the S/PDIF connector, and if an AMBus card contains one or more output channels, the digital outputs that are sent to the AES/EBU connections will be sent out on the AMBus card outputs as well.
These comprehensive routing features let you transfer audio from any connected device to any other, which effectively means that the AD8000 can be used as a powerful multi‑channel digital format converter or AES/EBU distribution unit, providing conversion from any interface to all others simultaneously.
The unit sounded extremely good to my ears when recording into Pro Tools 24 or on to my ADAT at 24‑bit resolution in bit‑splitting mode.
Summary
The AD8000's user interface, designed by famous producer and engineer Bob Clearmountain, has certainly been very well thought out, and once I got used to it I began to appreciate just what an excellent job he's done. You can control the stunning array of functions using the front‑panel buttons, but many of the settings can also be controlled from within Pro Tools, making it ideal for use with these systems. The only downside I could find is that it can be a little tricky to set up when using it for the first time. Still, after a few days of working with it (and a couple of calls to Apogee) I got mine working smoothly enough.
Project studios running Pro Tools 24 with an 02R mixer should strongly consider buying one AD8000 and the new Digidesign ADAT interface. This combination allows transfer of 24 tracks of audio digitally to and from the 02R, at a cost for the interfaces of about £5000. The alternative would be three 888|24 or, possibly, three 888 interfaces, but these would work out more expensive. The advantage with the AD8000 is that you get even higher‑quality converters than those used in the 888|24, along with an incredible range of options for interfacing with digital multitracks and other equipment. And the AD8000 is not just for Pro Tools users. At the recent AES convention in Amsterdam, it was announced that the SADiE system would be supporting the AD8000. Steinberg also recommend the AD8000 for use with their forthcoming Nuendo software running on Silicon Graphics computers, via an ADAT interface.
In action the unit sounded extremely good to my ears when recording into Pro Tools 24 or on to my ADAT at 24‑bit resolution in bit‑splitting mode. It also sounded significantly better than my 888 interface, even when I recorded at 16‑bit resolution. Highly recommended!
AMBus Card Options
 The optional ADAT plug‑in card.A TDIF AMBus card is available for interfacing to Tascam machines, and an AES Input AMBus card adds an additional eight channels of AES/EBU inputs. For recording and overdubbing in mono or stereo you won't need this, but if you want to record digitally onto eight tracks at once, via AES/EBU, you will. Apogee have also developed a fibre‑optic system so that a pair of AD8000s can be networked over distances of up to three and half miles using, their new Fiber DX AMBus card (just how big are American studios?).
The demo unit came fitted with both DIGI 8 and ADAT AMbus cards. You can use the DIGI 8 card to interface to Pro Tools, as an alternative to using the Digidesign 888|24, 888 or 882 interfaces and the ADAT card interfaces with any ADAT optical interface. The 20‑bit ADAT‑format machines are supported, but what if you only have a 16‑bit ADAT and you want to record at 20 or 24‑bit resolution? Well, Apogee have thought about this as well. Both the ADAT and the TDIF cards offer Apogee's Bit‑Splitting technology, as mentioned in the main body of the review, to let you record six channels at 20‑bit resolution or four channels at 24‑bit, spreading the data over the eight available 16‑bit tape tracks. For each 24‑bit data stream, 16 bits of data are recorded onto the first of a pair of tape tracks, with the last eight bits being recorded onto the second track of the pair. On replay, these are recombined to form one 24‑bit signal. Two AMBus cards with two ADATs or DA88s would allow recording of up to four stereo pairs simultaneously. And, just in case you were wondering, the 20‑bit mode works similarly and is primarily intended for surround sound mixes.
Prices
| Apogee AD8000 | £4523.75 |
| 8DA 8‑channel 24‑bit DAC | £1175.00 |
| 2DA stereo 24‑bit DAC | £411.25 |
| Video card | £323.12 |
| AES card | £634.50 |
| ADAT, TDIF, Pro Tools, and Fiber DX cards | £411.25 each |
| All prices include VAT. |
Pros
- High‑quality A‑D and D‑A conversion for popular digital audio workstations and digital multitracks.
- Extremely flexible interfacing options.
- Also acts as a digital format converter.
Cons
- Setting up to use the wide range of features and options can be confusing at times.
- Manual needs to be improved to make the unit more accessible to typical users.
- A bit pricey in absolute terms, although still cheaper than alternatives from other manufacturers.
Summary
If you're looking for a better set of converters for your Pro Tools system, ADAT, Tascam DA‑format recorder, Yamaha 02R, or whatever, this unit from Apogee is just what the doctor ordered — you get more interfacing options than you can shake a stick at and it looks great as well!
information
See 'Prices' box.