Is an all-in-one mixer, MIDI controller and audio interface the perfect solution for digital DJs and live laptop artists?
In the last few years, British mixer manufacturers Allen & Heath have earned a great deal of respect in the DJ world with their Xone mixer range. The Xone 62 and 92 mixers are a common sight in clubs, and Native Instruments even modelled the mixer in Traktor DJ Studio 3 on them. Now A&H have designed a mixer directly aimed at DJs who incorporate laptops in their shows.
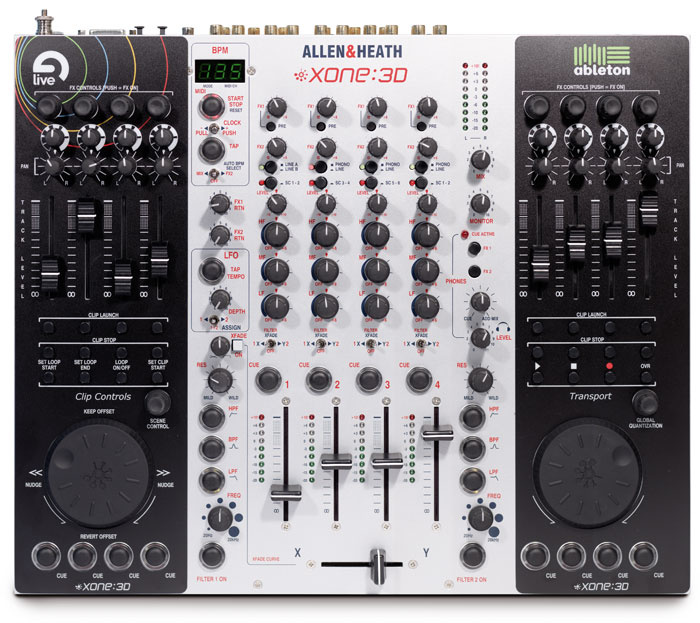
The Xone 3D is a fusion of three separate elements: a standard analogue DJ mixer, a MIDI control surface and an audio interface. The idea is that you can have hands-on control of software (in particular Ableton Live and NI Traktor DJ Studio), feed audio sources from the computer to the audio mixer (and vice versa) and combine these with other sources such as CD players and turntables. Normally, this would involve a separate audio interface, MIDI controller and all the interconnecting cables, but with the Xone 3D, all that's required is a USB cable to connect mixer to laptop.
Delving into the 3D's box I discovered a collection of spare knobs, buttons and fader caps, some solid steel rack ears and two sets of control overlay sheets — one for Live (shown here) and one for Traktor. They're printed on sturdy plastic, and you have to remove all the fader caps to swap them over. This makes them very secure, and they feel like part of the panel, unlike many overlays on other controllers. Obviously, removing fader caps is not something you'd want to do in the middle of a gig, but you're unlikely to want to swap your setup around mid-set.
Although the manual has plenty of information about the sound mixer, there is very little help on how to get started, except for some PC installation instructions. As I was testing on a Mac, I was in the dark. There is a CD, which installs the PC configuration and driver software, and Ableton Live Lite Xone 3D Edition. The Mac installer just has the option of installing Live Lite, as the device is class compliant, meaning that no OS X drivers are necessary. Unfortunately, I had to figure this out by trial and error, as there's no mention of the Mac in the manual at all. Clearly there's some room for improvement here, and A&H are working on more documentation.
The Windows XP configuration utility lets you switch the soundcard side of the 3D between two routing options: four-in/four-out, or two-in/six-out. There is no configuration software for the Mac yet, although it is in development.
The Mixer
The 3D's mixer section is a slight variation on the Xone 92 mixer, but with more inputs available. Each of the four channels has two source switches. The first selects between phono and line inputs, except for channel 1 which has two line inputs and no phono. The other switch selects the signal from the computer, overriding the analogue inputs. The routing of the soundcard outputs to mixer channels is fixed, so channel 1 takes outputs 1&2 from the computer, channel 2 takes outputs 3&4, and so on. Channel 4 also takes outputs 1&2, presumably to give you flexibility if you need to switch between both the line inputs available on channel 1.
The six outputs from the computer (when in use) are also available as RCA line outs on the back panel. As you'd expect, each mixer channel has a switch for routing to either side of the crossfader, or directly to the mix, and Cue buttons for splitting to the headphone out. Trim controls give you ±10dB of input gain, which was enough to handle quiet inputs such as the headphone out of my iPod. Talking of gain, the 3D has tons of it. There's 22dB of output headroom, and the headphone out is ear-splitting: anything above three out of 10 on the knob is in tinnitus territory. Channels from the computer run quite hot, so you need to trim down to avoid clipping.
Sending Audio To Software
Either one or two stereo signals can be sent from the 3D to the computer, depending on which soundcard mode you have selected. The setup utility lets you choose from several sources: the S/PDIF coaxial or optical inputs, the main mix, the FX1 buss, or channel 2's phono input. As the Mac configuration software has not been released yet, my unit was stuck in one-input mode, with FX1 as the source. This mode is ideal for routing any mixer channel through software effects.
I was also keen to try routing in signals from external decks and capturing loops in Live on the fly. Unfortunately our old friend latency throws a bit of a spanner in the works here. Whatever you record in Live is inevitably behind the beat compared to what was already playing, unless you go in and move warp markers. The problem is greatly reduced if you can use very low buffer settings, but this limits how much else you can play back in Live. When used for effects the latency could be a problem depending on the effect type. You can avoid flamming by making the FX1 send pre-fader and pulling the fader, but it will still be out of time.
Outside of live performances, the inputs can be used for some other handy purposes. For a start, the 3D is perfect for digitising vinyl, given that you have your RIAA phono inputs directly hooked into your audio interface. It's also perfect for recording mixes that incorporate various bits of hardware and software.
EQ & Filters
Each channel has a fixed three-band EQ section. Each band can be turned down to nothing, so can be used in place of traditional band kill switches. In addition to the EQs there are two separate filters, with controls laid out on either side of the faders. Channels are routed to the filter via the crossfader assignment switches — any channels assigned to the left side of the crossfader pass through filter 1, and anything assigned to the right goes through filter 2. If you are not mixing with the crossfader, you can turn it off and just use the switches for filter assignment. The filters are switched on using the same nice fat buttons with light rings around them that appear in various other places on the unit. There are frequency and resonance knobs, and three mode buttons for selecting low-pass, band-pass, or high-pass mode. An LFO can be assigned to either or both filters, and features a tap tempo control. You can also sync the LFO to the main tempo clock. The filters are great fun, and have been designed to work with just about whatever you throw at them, while never doing anything so extreme that it could damage a PA or the punters' ears. The filters are the only on-board effects, but you do get two effects sends and returns, labelled FX1 and FX2. Unfortunately, the FX1 pre-fade switches on the review unit had sunk behind the front panel and couldn't be used.
The channel faders feel nice and smooth (unlike the MIDI faders which feel a bit more plasticky) and the crossfader has the luxury of continuously-variable shape control. There are separate outputs and level controls for the main mix, booth monitors and headphones, and you get both mini-jack and quarter-inch headphone outputs (thank you!). The headphone mix can be switched to monitor either of the effect send busses, and there's a knob for blending the main mix into the cans for checking — a godsend if there are no booth monitors. All in all, as an audio mixer the 3D is really nice: it's well specified, simple to use and sounds great.
MIDI Controls
This comes as no surprise as it's based on proven A&H technology; the MIDI control side is where the 3D is covering new ground. The MIDI controls are split into two identical sections located on either side of the analogue mixer. The upper half of each side is arranged into four vertical strips, each with an endless encoder with an integral push button, two pots, a fader, and three small buttons. In the bottom half of each MIDI section you get another rotary encoder, four of the big buttons, and a large jog wheel which you can press down at the four points of the compass for another four switch messages.
Let's get the main problem with the mixer out of the way now: the encoders and pots are too close together. It looks like they could have been spread out more given the panel space, but apparently the designers were constrained by the dimensions of the internal components. As it stands, the encoders and pots are a bit fiddly to use as you can't get your fingers between them, and you end up having to pinch at them from the top.
All the controls transmit a specific MIDI message which can't be changed, so the unit relies on software that can learn or assign controls, which most can these days. Two templates are provided on the CD: a Live song, and a Traktor MIDI map file. Again, there are no further instructions, although A&H are working on it, and NI have put out a help file for Traktor.
Playing Live
The supplied Live song has four audio tracks and a MIDI track. The audio tracks each have different plug-in effects, and the MIDI track has a Simpler patch loaded up with some effects. Clearly this is meant as an example, rather than a direct template. It would probably make sense if there was also a complete template, with eight tracks assigned to all the channels on the 3D. However, chances are you will want to make some changes to the template to suit your own way of working, so you're going to need to put some work in before getting any serious use out of the 3D.
Let's have a look at how the template is set up, as it shows some of the possibilities and has a few assignments that you would definitely want to keep. Obviously, the 3D's MIDI section faders are assigned to the track faders in Live. One thing you notice straight away is that the response is a bit sluggish, especially when you move several faders at once. Surprisingly, you don't seem to notice this too much when you're actually playing a set. The first row of knobs above the faders is mapped to the Panners in Live. In a DJ'ing situation you'll probably get more use out of these if you reassign them to something else. The remaining row of knobs and the encoders at the top are assigned to effects. The encoders work well here, because pushing on them switches in the effect, while turning them controls the most significant parameter.
Easily the most useful control mapped to Live is the Scene Control knob, which is the lone encoder by the left-hand jog wheel. A Scene is a horizontal row of clip slots in Live. Normally, if you want to fire off an entire row of clips, you do this by clicking the associated cell in the Master track. Turning the Scene Control knob moves the scene selection up and down the screen. Pressing the knob down fires off all the clips in the selected scene. You use the same knob to select and trigger individual clips. This is done by highlighting the scene containing the clip you want, then pressing the Clip Launch button for the channel containing the clip. The Clip Launch buttons are in a row directly below the faders, and above a row of Clip Stop buttons.
At the bottom of the panel, the row of big buttons has been assigned to the Cue buttons in Live. At first, this didn't seem that useful, as I was mixing Live against an external CD deck, and previewing using the cue functions of the 3D's analogue mixer. However, if you want to cue up clips before introducing them, you can assign a dedicated Live Cue channel on the desk. To do this I assigned outputs 5&6 as the Cue channel in Live, brought these up on channel 3 on the 3D, and switched this channel permanently to Cue. Now any channels that you cue up in Live (using the controller's buttons) come straight up in the Cue mix on the mixer. You might prefer to reassign the buttons to do something else, although it makes sense to use them for parameters that toggle, as they light up to indicate two different states.
The final row of buttons under the faders has various uses in Live. The ones on the right are assigned to Live 's transport controls, and those on the left are used for setting Loop and Start points in clips. The left-hand buttons are supposed to work in conjunction with the left jog wheel, but I couldn't really get this to work properly. During playback the jog wheel did seem to move the playback position of the selected clip, but it was pretty random. I'd suggest remapping the jog wheels to control other parameters.
MIDI Clock Sync
Running Live is made easier by the inclusion of MIDI Clock output from the 3D. The 3D has its own clock, where the tempo can be set manually, tapped in or detected from an audio source. The auto-detection system can analyse either the main mix or the FX2 buss. The latter option is usually the best, as you can just feed it a single source. The auto-detection works well with loud four-on-the-floor material, but sometimes struggles with breakbeats. It can be slow to respond, and when faced with dramatic changes, it seems to slowly drift toward the correct tempo over about 20 seconds, and then it'll often end up on an offbeat. The best bet is usually to reset it and let it start again, or use the tap function to help it out.
The coolest part of the tempo clock is that it includes a Start/Stop button, which sends MIDI Clock start and stop messages to the software. With Live receiving clock data from the 3D, and in external sync mode, you can start and stop synchronised playback with this button. At first I didn't think this worked, as Live always started out of sync, until I realised that the start message is sent when you release the button.
Another trick up the Xone's sleeve is the Push/Pull lever. This increases or decreases the clock tempo being sent to Live while you hold it in one direction or the other. The longer you hold it, the greater the tempo variance. This is the digital equivalent of putting your finger on the turntable, or giving it a push, in order to get the beats aligned perfectly, and it works really well. Unfortunately none of this works with Traktor at the moment, as it can't sync to an external clock.
NI Traktor
Native Instruments are recommending the Xone 3D on their web site, and have done quite a bit of work getting it running smoothly with Traktor DJ Studio. You'll need version 3.02, but you can't use the latest version (v3.1.1) as there seems to be a bug when assigning outputs to the Xone. Once you've loaded the supplied MIDI Map file in the Traktor Preferences, the outputs will be available any time you run the software. The map is set up for four decks in Traktor, and there are instructions available for how to set up to actually mix four decks in the audio mixer. This is a little convoluted, as you need to use a separate output (the computer's built-in output) for the fourth deck, because there are only three stereo output channels available via USB. It would be much slicker if the 3D offered an eight-out mode.
The Xone's MIDI implementation is more sophisticated in Traktor than Live, as it has multiple layers, accessed by holding modifier buttons. Two strips of controls are dedicated to each of the four Traktor decks, and the jog wheels default to selecting and loading songs from your playlist or track collection. There are then three modifier buttons (Shift, Alt and Scratch) for each deck, which open up new functions dedicated to that deck, and not limited to just two strips of controls. In fact, the dedicated deck functions are spread across all four strips, and duplicated on both sides of the mixer to make things simpler. It takes a while to figure out how it all works, but once you do, the 3D suddenly becomes a very powerful tool.
The faders are assigned to effects, with one fader used to choose the effect, and the other assigned to the main parameter. You have to be careful not to knock the selector fader or you suddenly switch to a new effect. The rest of the buttons and pots are also assigned to control effect parameters. The top rotary encoders' push buttons are used to set loop points and lengths, which works nicely, although I never managed to figure out what turning the encoders does! The main push buttons at the bottom of the panel are again split into pairs for the four decks, one for Play/Cue Play/Cue Pause (depending on the modifier) and the other for selecting the deck.
Most of the functions you need to mix a set are presented in the jog-wheel area. You can select and load tracks, scroll through, scratch, set cue points, and so on. The playback speed for the deck is adjusted with the rotary encoder, or you can adjust the pitch independently by holding Shift at the same time. Sync and Keylock are also assigned in this section. Apart from their main song selection function, the jog wheels have three modes for directly affecting playback. Holding the Scratch button has the same effect as stopping the record with your finger, and the jog wheel then scrubs the audio. The Shift button lets you scan quickly through the track. Finally, holding Alt lets you subtly push or pull the tempo.
In Use
I tried several different scenarios with the 3D and different combinations of software and hardware, combining a CD deck with Live and with Traktor, and using Traktor on its own. If you wanted to use both Live and Traktor, you'd have to rework the control maps so they didn't overlap. I had a go at setting up a map to control Live and Reason from either side of the mixer. This worked quite well, although the 3D is not supported by Reason 's remote-control protocol so you can only make fixed assignments. Also, quite a few controls on the 3D use MIDI Note messages instead of Continuous Controllers, which Reason and a lot of other software can't use for MIDI control.
Another problem was that the MIDI In port didn't work as a conventional MIDI interface, so I still had to use a separate MIDI interface for my keyboard. Apparently a firmware update will change this soon.
Probably the most common way of working will be to mix Live or Traktor with CDs and vinyl. The MIDI Clock functionality makes this particularly easy with Live (see the 'MIDI Clock Sync' box above). Traktor can't sync to an external clock, but most people will use it more like a replacement for traditional decks anyway.
Once you've figured out the control assignments, you can start having a huge amount of fun with the 3D. Despite the frustration of the cramped MIDI knobs, the 3D is addictive, and really does let you run a laptop-and-decks performance from one place. It might seem expensive in the UK, but you are getting a MIDI controller, audio interface and a pro mixer in one package. And the fact that you can do away with audio and MIDI cables between your computer, interface and mixer is brilliant. I can definitely see DJs adding the 3D to their flight case, and anyone who's looking for better ways to use a laptop live should take it for a spin.
Pros
- Three stereo computer outputs available to mix.
- Generous number of MIDI controls.
- Clever control templates.
- Great audio mixer.
- It's easy to record mixes, live sets and vinyl.
- Useful MIDI Clock facilities.
Cons
- MIDI knobs and encoders too close together.
- Latency when routing audio to computer makes real-time loop sampling difficult.
- MIDI note-based control messages not compatible with some software.
- No Mac configuration software as yet.
- No information on how to use templates.
- Pre-fade effect send buttons faulty on the review model.
Summary
As the first DJ mixer to integrate an audio interface and MIDI controller, the Xone 3D successfully frees you from the 'squint and poke' of trying to play live with your laptop's trackpad.
information
£1645 including VAT.
Allen & Heath +44 (0)1326 372070.
+44 (0)1326 377097.