With their strong live–console pedigree, Allen & Heath are hoping to tackle the burgeoning iPad–controlled mixer market.
It’s no surprise that remotely controllable digital live-sound mixers have become so popular so quickly at the less rarified end of the marketplace, as they make it possible to set up for a gig without needing a bulky multicore cable and all the routing and safety issues that implies. I’ve been using one of Mackie’s DL1608 mixers since it was first released so don’t need selling on the concept, but since then we’ve seen the introduction of some very sophisticated, yet still affordable, models from companies such as Behringer, Soundcraft and, of course, Allen & Heath.
Based in the UK, Allen & Heath have their Qu–Pac built in China, as do the majority of their competitors, as this helps maintain a competitive selling price. Its most convenient means of remote control is via Wi–Fi using a dedicated iPad app (the mixer is also compatible with the Qu–You personal monitoring app for iPhone, iPad and iPod Touch). A five–inch, 800x480–pixel front–panel colour touchscreen also gives local access to all its functions. In either case, tabbed pages make for reasonably intuitive navigation. The screen also provides a useful second means of control in case of a catastrophic Wi–Fi failure. Use via Wi–Fi requires the connection of a separate Wi–Fi router to the network Ethernet port.
Unlike some fixed–format digital mixers, this one is also expandable from its standard input count (16 mic/line plus three stereo line), via a dSnake Cat 5 connection that allows up to a maximum of 38 inputs (32 mono plus three stereo line channels). This port is compatible with the AR2412, AR84 and portable AB168 AudioRacks, the last of which was included in the review system, and which has the capacity to handle 16 inputs and eight outputs. The AudioRacks can be used as the stage–box connection point and then connected to a Qu–Pac in a front-of-house mixing position, via a standard Cat 5 cable of up to 120 metres in length. An internal routing page on the mixer is used to set the channel sources, and this must be used for selecting the required dSnake inputs. Until this is done there’s no audio from the box, which had me scratching my head for a while.
Pac It In
Processing for mixing, control and the onboard effects is handled by five ARM DSP chips. The bit depth varies depending on the function, and adequate DSP capacity has been left in hand to allow for future software updates. We’re informed that the EQs use 48–bit processing while the mix bus gets plenty of headroom from a 56–bit accumulator. All this fits into a compact case with a sloping front, a busy connector panel on the rear and a hollow cross section, leaving a space between the control and I/O sections. This presumably helps with cooling and provides extra screening between the analogue and digital sections.
The rear panel houses mic and line inputs for 16 channels, talkback mic and lamp connector points, 10 XLR mix outputs and separate outputs for the main stereo mix. There are also two of the three stereo inputs on individual jacks (the third is on the front panel), an AES3 out XLR, a dSnake Ethercon port, a network port for the Wi–Fi router, and a USB port for connection to a computer. Two further line outs are provided for ‘2trk’ and ‘alt’, these also being stereo and on pairs of jacks. Power comes via an IEC mains socket with a power button alongside. The Qu–Pac has a generous complement of local I/O, which can be augmented with Allen & Heath’s range of stage box expanders via the dSnake Ethernet port.
Button It
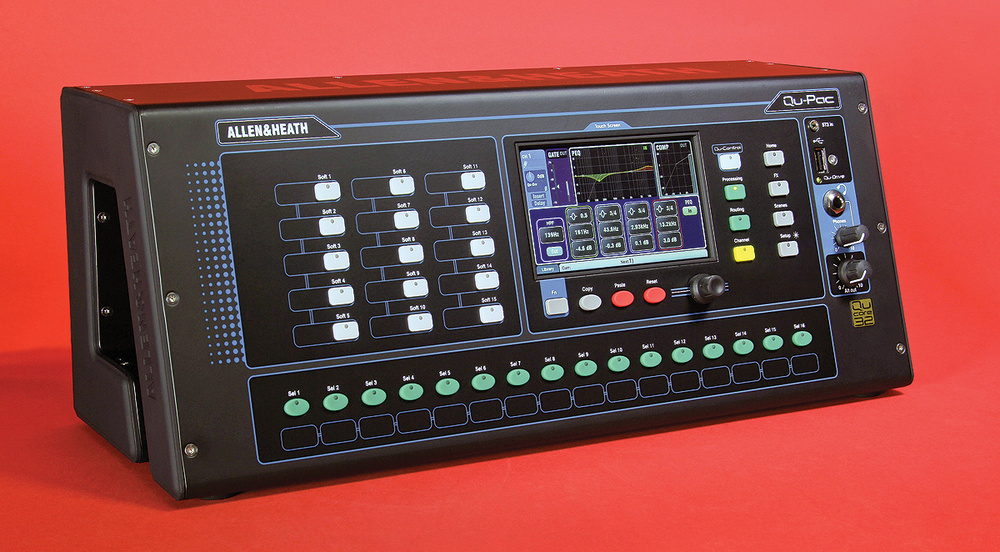
The front panel is built around the touchscreen, with a row of 16 Select buttons at the bottom and 15 assignable ‘Soft’ buttons to the left. Further buttons around the display relate to various setup and operational parameters including Scenes, Routing and Processing. Below the screen are four more buttons for Fn (Function), Copy, Paste and Reset, plus a rotary encoder. While most of the on–screen functions are touch–responsive, fader level can only be adjusted via the encoder, while the Fn key accesses whatever parameter is directly above it on the screen at the time, and in some modes operates as an increment key.
Once a button has been used to access a particular screen, sub screens are then accessed via tabs at the top of the window. Finally, to the right of the front panel is a mini-jack for Stereo In Three, a Qu–Drive USB port, a headphones socket with level control and a level control for the Alt output.
Join The Qu
So, let’s take a quick look at the main points before diving into the details. All 16 mic preamps have remotely adjustable and recallable gain and are based on the Allen & Heath AnalogIQ design. These preamps feature zero–crossing detection to minimise artifacts during gain adjustment, which can be adjusted in 1dB steps. Conversion is 24–bit, and very low latency is claimed. Every input channel features controls for gain trim, polarity, insert capability, gate, ducker, four–band parametric EQ plus HPF, compression and delay. A four–band PEQ, third–octave graphic EQ, compressor and delay may be deployed on each of the main mix outputs.
The mixer topography supports four stereo groups, four DCA fader groups, four mute groups and two matrix outputs. There’s also built–in compatibility with the Allen & Heath ME personal monitor mixing system. The mix outputs are arranged as the main LR mix, four mono mixes and three stereo mixes, which should be more than enough for setting up monitors or zoning feeds.
Effect are an important part of live sound and here we find four separate sends feeding four separate engines, where a comprehensive library of effect types and settings is included. The algorithms are taken from the iLive Pro touring range and include emulations of respected hardware reverbs, gated reverbs, delays, all the usual modulation effects and a few more besides. These effects have the flexibility to be updated in future firmware releases. All four effects returns are stereo and include a four–band parametric equaliser.
A ducker is available on every channel or stereo group to automatically reduce the level of one signal in the presence of another — typically to duck the music when an announcement is made. An on–screen switch selects the channel insert point as either Ducker or FX. Ducker settings may be shared across multiple channels using Gang mode, which may be useful in certain conference applications where the chairman wants to have the final word.
 The Qu–Drive USB port facilitates multitrack recording direct to a USB disk.Responding to the demand to enable live recordings to be made at gigs, the Qu–Pac supports multitrack recording and playback of up to 32 channels onto the user’s own computer and DAW, or onto a suitably fast USB drive plugged directly into the Qu–Drive port. No drivers are needed for use with Mac OS, though Windows users will need to download the necessary drivers. I used Logic Pro running on Mac OS Yosemite for these tests, and once I’d found the global switch to access the rear–panel USB input rather than the Qu–Drive USB input it all worked without a hitch. The mixer shows up in the available audio devices list like any other interface. The Home screen on the main unit includes a Qu–Drive tab that provides drive formatting facilities and basic transport controls for recording and playback. Separate controls are provided to facilitate stereo recording of the main (or selected other) outputs, and a two–track USB return can be routed to the third stereo input for stereo WAV playback. Note that the sample rate is fixed at 48kHz.
Pac To The Future
Allen & Heath have clearly designed this mixer to be as versatile as possible, with potential uses ranging from gigging bands to shows to installations requiring different feeds to different zones. Though the operational paradigm is similar to other digital mixers, insomuch as the main LR mix, the monitor sends, buses and so on are arranged in layers, it takes some time to get familiar with where all the various controls and decision points are located. There is a paper ‘getting started’ manual just a few pages long, but all the detailed stuff has to be accessed via the Allen & Heath web site, much of it currently arranged as separate documents. An integrated manual is apparently in the pipeline, however, and setting up the Wi–Fi connection proved to be trivially simple using my Apple Airport router box.
While my focus is on live music mixing, the installation market will appreciate Qu–Control. This feature allows the installer to set up a custom assignable screen to present only the essential controls needed for basic operation. Permissions can be set to avoid inappropriate adjustment of other parameters. This is ideal if you have multi–zone music in a club or other establishment and the operator needs access only to the zone levels, for example.
Up to five custom screens can be created, where each screen has 15 locations arranged as three rows with five columns. The administrator can then choose to populate the screen with mutes, level controls or on/off assignments selected from a function list. A ‘radio button’ option allows the activation of one button to deactivate the others for ‘one at a time’ actions. Qu–Control settings are stored to a USB device as part of the show file, but are not stored in Scene memories.
It adds a little to the angle of the learning curve that the app display and the screen display on the hardware box itself aren’t the same, and that some of the features accessible from the mixer can’t be accessed from the iPad, and vice versa. For example, you can access channels on the hardware and then adjust the levels one at a time using a data encoder, but there’s no equivalent of the app’s multi–channel, multi–fader screen. You also need to know where to look to select the channel source, which can be one of three things: the USB input, the dSnake input or the local mic/line inputs. A further choice then lets you select whether the USB input is from a USB drive connected to the front panel Qu–Drive port or from a computer connected to the rear–panel USB socket. Note that the front–panel Qu–Drive USB port may also be used to save mixer setup/show and scene information to a memory stick.
 Almost all of the mixer’s parameters can be adjusted using the touchscreen and buttons on the unit itself.Clearly, to have any practical control over a live show you’d need an iPad and the app, wherein the main LR mix view (under the Processing tab) shows the faders at the bottom of the page with input level meters running up the side of each. Double-tap a fader to select it, or just use it normally without changing the channel selection. You can scroll through the faders if they won’t all fit on one page, and the main fader for the layer is always shown to the right of the page. When you touch a fader cap, the slider track illuminates in amber to show that you’ve got a hold on it, then you can move it. You can also move your finger to one side once a control is selected so that you can observe its movement without your hand being in the way. A P/AFL button is located below the fader for interrogating channels without affecting the FOH feed.
Channel on and horizontal pan controls are also visible in the fader area, though the top half of the screen changes its content depending on what function you select using the buttons running down the top left of the screen. These access the channel input stage, including remote gain control, phantom power switching, and polarity. You can also access the ducker, gate, parametric EQ and compressor parameters using the function select buttons.
A Library button provides access to presets for any of the above processes. At the bottom-left of the screen is another row of buttons for switching views between inputs, mix, effects, DCAs, SoftKeys or three custom views, where you can use the settings page to create your own views that show you only what you need to see. If you need to remove something from a custom screen, just flick it upwards and it will turn red and vanish.
When the effects tab is selected, all four effects send and return masters are shown and the library then gives access to either the effects options or the associated parametric EQ. The currently selected effect type shows up in the top half of the screen where its key parameters may be adjusted and, in the case of delays, there are right and left tap-tempo buttons. It should be noted that the effects, especially the reverbs, are of excellent quality and rival those of many dedicated stand–alone effects processors. The plates are my go–to live–sound reverbs. As you’d expect you can set up different send levels for each channel in each of the various mix layers.
To the right of the screen is a vertical row of buttons that access the various layers of the mixer from the main LR mix to the four effects sends, the four stereo groups, four mono monitor mixes and three stereo monitor mixes. There’s also a P/AFL meter.
The main Qu–Pac unit features a row of assignable buttons, which is ideal for setting up mute groups and so forth. Four of these are set up by default but the rest are empty. My immediate thought was that it would be very handy to have a couple of these available in the menu bar at the top of the app screen, as that would enable me to set up an effects return mute group without having to create a custom screen with an effects mute group.
 The AB168 connects to the Qu–Pac via an Ethernet cable, adding eight outputs and 16 inputs, with remote-controlled preamps.As any live engineer knows, a singer who is apparently just about to start a song is very likely to suddenly start talking to the audience, and if you can’t find the effect kill button in less than a quarter of a second you’re the one who looks bad. A practical way around this is to assign an effects DCA to the last position on all three custom views, so it’s always there when you are mixing.
Navigating to the Metering icon at the top of the page brings up an overview of all the meter activity for the console, with a real–time spectrum analyser at the bottom of the screen. There’s also a built–in signal generator. Moving on to Memories for Shows and Scenes provides the expected ability to save, recall and name mixer setups. In a typical live situation I generally create one default scene and then wing it from there, but for a show that’s going to be repeated, such as a long–running musical or a theatre show, Shows and Scenes are an absolutely essential way of working.
Impressions
As with any sophisticated mixer, it takes time to get familiar with where to find everything and indeed to assimilate the terminology, which can vary a little between manufacturers. It took me a while to find all the routing and settings options needed to get the mixer working the way I wanted it to, but once that is done, and ideally saved, the basic operation is fairly straightforward as long as you have an iPad and the app. Even so, you need to get familiar with quickly navigating your way around any digital mixer as there’s no time for head scratching during a performance. I wouldn’t attempt to mix a music gig from the Qu–Pac screen unless the show and scenes were already programmed, though it is more than adequate for many installation requirements and it makes a useful backup in case your iPad dies. Talking of which, a separate USB charging point would have made a nice addition to keep your iPad topped up.
I did come across certain niggles, such as the iPad screen being a tad slow to respond when scrolling through the faders the first time I opened a layer — fader positions seemed to update a second or so later and in some cases various channel buttons were being added as I watched. Once that layer has been viewed once, though, the display seems to remain stable. And though the app screens are clean to look at with a sense of being well organised, I think that more use could be made of colour to remind you of what layer you are working on.
That said, the Qu–Pac is a hugely flexible mixer, it sounds excellent, and the effects are worthy of particular note. I like the way it can be expanded at a later date by adding an AB168 or other compatible expander, and of course remotely controlled mic gains are a great improvement on those mixers that don’t have them. Having built–in multitrack recording is also a big plus.
I must also point out that the competition is hotting up in this area, so nobody scores a slam dunk. It’s all about weighing up what features you need, taking into account the type and quality of effects, then making an informed choice.
Alternatives
The alternatives that are most comparable in terms of price and capability are the Mackie DL32R, Behringer X32 Rack, Soundcraft’s Ui mixer series and QSC’s TouchMix.
AB168 Rack
The compact and gratifyingly robust AB168 is equipped with 16 mic preamps, all capable of providing phantom power (with a separate phantom power indicator LED for each input), and it is tough enough to be used in much the same way as a traditional stage box if required. Depending on how you organise the routing, it can add up to 16 channels to the existing mixer, or it can simply act as a remote replacement for the existing 16 channels. Rubber corner moulding adds extra protection, though there’s also a rackmounting kit if you need it.
Eight line–level outputs are available on XLRs, for feeding FOH and monitor speakers (the specific mix assignments must be carried out in the main mixer). Allen & Heath’s dSnake protocol is supported to allow connection to both the Qu and GLD mixer ranges, and a second EtherCon Expander port allows daisy–chaining to another AB168 box or to an ME personal mixing system. Usefully, the AB168 auto-updates its firmware to synchronise with the host system, so you don’t come unstuck having forgotten to ensure everything is running the same version (though you do have to ensure the iPad app and mixer are of the same software version). A military-style bar handle adorns one end of the case, and there are flashing amber LEDs next to the EtherCon ports to confirm that a connection has been established.
Pros
- Robust.
- Plenty of physical I/O with the option to expand.
- Live recording capability.
- Excellent effects.
Cons
- Some time is needed to become familiar with the less obvious functions of the units.
Summary
A flexible, compact mixer that offers first–class effects and excellent sound quality.
information
Audio–Technica +44 (0)113 277 1441
American Music & Sound +1 800 431 2609