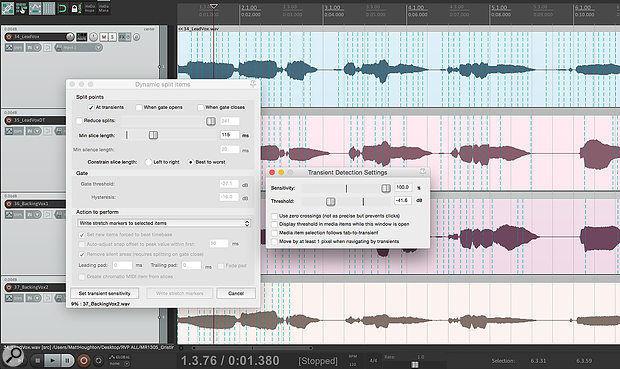
 Reaper’s Dynamic Split facility can generate most of your Stretch Markers automatically.
Reaper’s Stretch Markers feature intelligent linking, which can ease the burden of manual vocal alignment.
In recent issues of SOS I wrote some in-depth Synchro Arts Revoice Pro workshops. This and the same company’s VocAlign enable you to time-align vocal parts automatically. There’s no doubt these are the most efficient means of aligning vocals, but you lucky Reaper users already have access to the next best thing: Reaper’s Stretch Markers allow you to achieve similar results in semi-automatic fashion, and while they require what’s not quite such an automatic and slick an approach as Revoice Pro, they can make your vocal edits a whole lot more efficient.
The Basics
Essentially, what we’re trying to achieve is to tighten the timing of, say, a stack of backing vocal parts and lead vocal doubles, each of which is singing the same words at the same time (though not necessarily to the same melody). We don’t want to do this by quantising the parts to the grid because that will sacrifice all the feel and the result will sound fake. Rather, we want to align lots of parts to one master part (or, in Revoice Pro terminology, ‘Guide’) while retaining its feel.
Reaper’s Stretch Markers allow you to warp any audio part: place three markers and drag the middle one to move it, and the audio within the outer markers will stretch on one side of the middle marker, and compress on the other. So far, then, it’s just like any other DAW. Where Reaper departs from the norm is in its ability to intelligently link markers across the currently selected tracks.
Take a vocal part and a double track of the same part (or a backing vocal singing the same words in the same time — if it’s a different melody, that’s not a problem). Don’t use an actual duplicate part, though, as we need some timing discrepancies to correct! Put each part on its own track. Using the default key commands, hitting Shift-W will add a Stretch Marker at the play head position (a marker will be added at this point for all currently selected tracks). An alternative, and my preference, is to use the Action ‘Item: Add Stretch Marker at mouse position’. There’s no default key command or Mouse Modifier for this, so I assigned it to both Ctrl+Option+M (I knew I’d remember M for Marker!) and Ctrl+Option-click (which is marginally faster but I thought I’d probably forget it!), which weren’t assigned to anything else. Either command allows me to place my marker at precisely the point I wish, using the waveform as a visual guide.
 With your Stretch Markers generated, select all tracks and drag a marker on one track past the corresponding one on another to ‘catch’ it, so they can be moved in tandem.
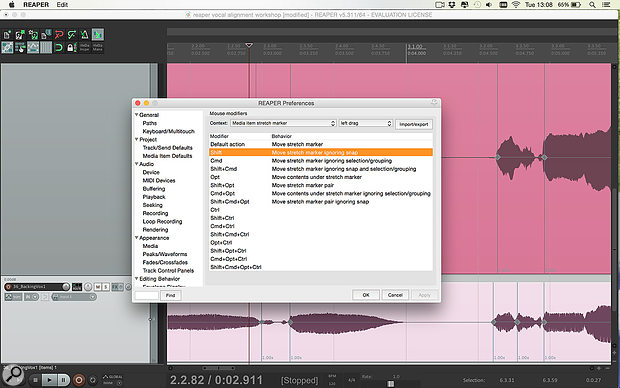
Add markers around the first few syllables of the first part, then do the same for the second part, just so you have something to test this process on. Now, making sure the clips on both tracks are selected, drag one of the Stretch Markers on the second track past the corresponding marker on the first track. Notice how the first track’s marker was automatically picked up as you went past. Neat, huh? The two markers are now linked: as long as both tracks are selected, drag one marker and the corresponding one will move too. You can do the same with a third part, a fourth and so on — no matter how many tracks you select, the markers can be linked in this way. If you need to move one track’s marker independently of the others, just hold Cmd while you click and drag. (You can find the Windows equivalent shortcut by opening the Preferences and looking at the Mouse Modifiers).
 As with everything in Reaper, it’s worth checking out what functions can be controlled via the Mouse Modifiers.
Semi Automatic
Neat as this trick is, I decided to try and figure out a way to automate more of the alignment process. One of the most time-consuming aspects of the technique I’ve described thus far is the creation of all the Stretch Markers, particularly if you have to repeat the process for several tracks for a whole song. In an attempt to speed this up, I tried Reaper’s Dynamic Split facility (‘Actions: Dynamic split items...’, triggered by default by the D key). Despite the name, this not only allows you to split events but also to create Stretch Markers at each transient.
For some material, the Dynamic Split works really well — on a doubled male rap part, it pretty much identified each and every syllable — but for others, particularly where there are swells in volume during a word (often the case in both lead and backing vocals!), it’s more hit and miss. I found that on some material it always gave me too few or too many markers, regardless of how I set the transient sensitivity. It’s also worth noting that the gate-detection options aren’t really a viable alternative here. But while this isn’t a perfect detection system, it’s nonetheless useful.
But you can at least get this algorithm to identify most of the words on the material in question. For what it’s worth, I find it saves me more time if I generate more markers than I need, rather than too few, as I can easily tidy things up as I go through the clips to perform the alignment.
When you’ve struck the best compromise here, go to the Dynamic Split Items dialogue box and, in the Action To Perform subsection, select ‘Write stretch markers to selected items’ from the drop-down menu. The results won’t be perfect, but many of the markers you need will have been identified and placed at or near where you need them.
To remove spurious markers, simply select a range containing them and apply the Action ‘Item: Remove all Stretch Markers in time selection’. You’ll probably want to give that one a shortcut — I used Ctrl+Option+Backspace, which was previously unassigned. And if the markers haven’t been placed quite at the beginning of a word, you can move the markers into place easily enough using the (somewhat bizarrely named) ‘Move Stretch Marker preserving left-hand rate’ command, which I’ve assigned to Ctrl-drag.
Between these commands and the shortcut we created earlier to add markers at the mouse cursor, you should now be able to go through the tracks from left to right fairly rapidly, moving the markers to align your audio and adding/removing markers as you go. It’s certainly a lot quicker than editing each and every track’s timing!
A Stretch Too Far?
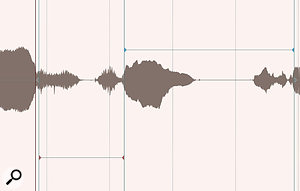
 When dragging Stretch Markers, the colour of the markers (red, blue or grey) denotes whether the audio has been stretched, compressed or left intact.One little issue with this approach is that it’s very easy to stretch your master part by mistake. And as that’s likely to be the most important part (the main lead vocal, perhaps), that’s hardly ideal. Still, it’s easy to see when you’ve done that, because when you drag a Stretch Marker, you’ll see a line appear on the segment of audio that’s being stretched/compressed. If the segment is being compressed, the markers either side turn red, when stretched they’re blue, and when there’s no change, they’re grey. Keep an eye out for that — if you stretch your Guide inadvertently, make sure its markers are grey and you won’t go far wrong. But if you’re concerned about compromising the quality of your master part by applying any unnecessary algorithms (don’t be: it sounds fine to my ears), you can copy the Guide to another track, and use the (muted) duplicate as the reference for your markers, leaving the original part untouched.
While there’s still more work involved than with Revoice Pro or VocAlign (either of which I recommend investigating if you do this sort of work regularly), the whole process is much less daunting in practice than a lengthy description like this might lead you to believe! To show you what I mean, I’ve created a video to accompany this tutorial.


