 Using the Strip Silence feature in Pro Tools to 'clean up' a vocal take. Here, the default settings divide my vocal region into three...
The Strip Silence window in Pro Tools allows you to automate complex edits that would take hours to do by hand...
I'll kick off this month's Pro Tools workshop by looking at Strip Silence, a sometimes overlooked feature that can be used to tidy up all sorts of material in a semi-automated fashion. Simply put, Strip Silence enables you to cut out all the gaps in an audio region, and do it non-destructively too! It is great, for example, for carving up drum tracks, allowing you to set them up onto the grid so that when you change the tempo in Ticks mode, all the hits stay in their correct places. Other uses for Strip Silence include cutting up vocals or dialogue.
The Strip Silence window has four slider controls on it. The Strip Threshold control determines how quiet a piece of audio has to be before Strip Silence will consider it to be 'silence'. The Minimum Strip Duration control will determine the shortest amount of silence that is deemed to be worth removing, while Region Start Pad and Region End Pad allow you to put some space at the start and end of the new regions so that there is no risk of clipped starts or truncated decays. In addition, the Rename button allows you to rename the new regions, add suffixes and renumber them too.
 ...increasing the Threshold value to -36dB causes more areas to be detected as silence, including some wanted audio.
Let's run through a typical example of using Strip Silence. To start with, you must select a region or regions that you want to use Strip Silence on. In the example shown in the screenshots, I'm using a solo vocal track. Open the Strip Silence window from the Windows menu or use the shortcut Command+U (Mac) or Ctrl+U (Windows). The Strip Silence window will open, defaulting to the settings you last used, and borders will appear on the selected regions to show which sections will be stripped out if Strip Silence is applied with these settings.
 Bringing the Strip Threshold back down to -38dB gets the balance right.
In the example case, three regions will be created. Changing the settings will produce different results: in our example, if the Threshold is increased from -44dB to -36dB, the first and last regions are divided in two, which is what I want in this situation, but the tail of the middle one is cut short. Reducing the threshold by 2dB to -38dB resolves this problem.
 Adjusting the Region Start Pad values allows me to avoid unnatural chopping at the start of each region...
Using the Region Start and End Pad controls, you can adjust the amount of silence that is kept intact either side of the wanted audio. When I zoom into the last three regions, you can see how adjusting the Region Start Pad up to 358 milliseconds includes some silence at the start of the first and second regions, and more importantly, leaves intact a breath at the start of the third. Likewise, by increasing the Region End Pad value, the space between the end of the audio and the region boundary can be adjusted so that the audio decays naturally.
 Increasing the Region End Pad value to 415ms, the space between the end of the audio and the region boundary can be adjusted so that the audio decays naturally.
 The multiple regions created by Strip Silence can be named according to criteria you specify.Now we can look at renaming the new regions. As you see from the first screenshot, the original region was called Vocal_02-07; click on the Rename button and the Rename Selected Regions window will open. You can then choose a new name that will be applied to all the new regions. In this case I've chosen 'vocal new'. Then you can set how the new regions will be numbered. Setting the Number Of Places to 2, for example, means that two-digit numbers will be appended to the name to distinguish all the new regions. We can set what number these two-digit numbers will start from; in this case, starting from 1 will mean that the first region will be called 'vocal new 01'. You can also add a suffix that will be added after the name and number, in this case the word 'test', with a space before it so that it appears separate from the number. When you are happy, click on the OK button to dismiss the Rename Selected Regions window.
Click on the Strip button to execute the Strip Silence. You can always use the Undo option if you aren't happy, and you can use the Rename button again to change the way the new regions are named. Finally, when you are happy with everything, close the Strip Silence window, click away to deselect the new regions and there you have it.
 The results of our example Strip Silence.
Handy Tips
This month, I've also discovered a couple of little-known Pro Tools hints that are worth sharing...
* Deleting and selecting groups
Have you ever wondered if there is any way to delete a group or groups in one 'action', rather than having to go and deselect all groups you want to keep, one by one, then choosing Delete Groups to delete the remaining selected groups? Well there nearly is, and it is one of those tips that is so obvious I could have kicked myself when I found it!
In this simple example, we have a Session with four groups where I want to delete the group 'vox 1 to 3'. The trick is to use Option-click (Mac) or Alt-click (Windows) on any of the items on the list. This will deselect all the groups in one go. Click on the group that you want to delete to highlight it. Select Delete Group from the Group Menu by clicking on the Edit Groups title bar and choose Delete Group. You will then get a dialogue box explaining that this process is 'undoable'. If you are happy, click on the Delete button and the selected group will be deleted. Finally, Option-click (Mac) or Alt-click (Windows) on any of the items in the list to reactivate all your groups again. Here, I have set up a Memory Location that doesn't actually relate to any position in my Session, but changes the pre- and post-roll settings when recalled.
It's not quite a single action, but it is a lot quicker than having to deselect and reselect each group one at a time!
* Memory Locations have more uses!
Memory Locations have many uses beyond marking points on your Session timeline, and in particular, are a great way to customise different track views that you can jump to quickly. To create a new Memory Location, choose a number and then do one of two things depending which option you have selected in Numeric Pad Mode in the Operations tab of Pro Tools Preferences. If you have Classic selected, as I do, then to create a Memory Location, type a number then press Enter, both on the numeric keypad rather than the main keyboard; for instance, pressing '9' followed by Enter will create a Memory Location numbered 9.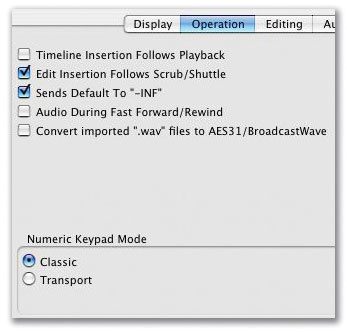
Alternatively, if you have Transport selected as your Numeric Pad Mode, type '.' (full stop), then a number, then Enter — again, all on the numeric keypad. Either way, a New Memory Location window will open. Choose None under Time Properties, then give it a Name (in this case I want to have a setting for a four-bar pre-roll which I have already set in the Transport window) Then tick the Pre/Post Roll box so this particular Memory Location will remember that and nothing else. You can also add any comments you want, before finally clicking OK to store the Location.
Now, when I recall Memory Location 9 it changes the pre-roll and post-roll settings to what I had selected (in this case, a four-bar pre-roll and no post-roll). You can recall a Memory Location by typing the number followed by '.' (full stop) if you are in Classic mode, or '.' then the number, then another '.' if you are in Transport mode. Alternatively you can select your chosen Memory Location by clicking on it in the Memory Locations window. Note that if you hover the mouse, the Comments info appears in a separate floating box!
There are up to 200 Memory Locations available, and they can be used for saving settings for all sorts of things including Track Heights, Track Show/Hide combinations and Zoom settings, although I hardly use this last option, since there are five dedicated Zoom buttons on the Edit Window.
* Fine-tune automation problems
Since updating to Pro Tools 6.9cs1, the fine trim function when using the Command key (Mac) or Ctrl (Windows) to trim automation by 0.1dB increments no longer functions with the Grabber tool, although it still works OK when using the Trimmer tool and also when using the Smart Tool. The reason for this is that Digidesign have changed the way this all works in version 6.9 with the new Constrain New Breakpoints to Next or Previous Automation Value feature.
To make fine adjustments now with the Grabber tool, click on the breakpoint first and then hold down the Command key (Mac) or Ctrl (Windows). If you want to use the Shift key to time constrain your breakpoint move, hold down the Shift key first, then click the breakpoint and finally add the Command key (Mac) or Ctrl (Windows).
Strip Silence, Fades & Snare Drums
Recently I've been finding plenty of uses for Pro Tools ' Strip Silence feature, and I thought I'd add my ha'pennyworth to Mike's introduction.
First, it might be worth mentioning a tip that can come in useful when you're using Strip Silence on an audio part that has audible background noise. The Region Start Pad and Region End Pad sliders allow you to leave a 'safety zone' when stripping silence from such a part, but if you do so, you will hear the background noise suddenly kick in at the start of each 'stripped' region and drop out at the end. To deal with this, try selecting all the regions (they will be selected by default immediately after you have carried out your Strip Silence) and pressing Command+F (Ctrl+F on a PC). This should allow you to specify a batch fade that will be applied to the start and end of all selected regions.
Second, as Mike mentioned, Strip Silence is a very useful tool when you need to fix up dodgy timing — not just on drum tracks, but on anything where gaps can be detected. I've found that it works very well for dividing bass parts up into separate notes.
Third, and perhaps most importantly, the adjustable Strip Threshold parameter allows you to use Strip Silence in many situations where a gate would traditionally be employed, and to my mind, it's usually preferable to using a gate plug-in. The classic example is where you have hi-hat spill on your snare mic (and who doesn't?). You could eliminate this by putting a gate plug-in across the snare track, but I often find that this is too crude: frequently, it's impossible to set up a gate in such a way as to catch all the snare hits without letting through some unwanted loud hi-hat hits, especially if the snare part contains ghost notes and so forth. What's more, it's often difficult to set a gate's fixed release time in such a way as to let through as much of the snare 'ring' as possible without catching the front of the ensuing hi-hat hits; and unless you have a gate with lookahead functionality, it might not open fast enough to let snare transients through cleanly.
The beauty of Strip Silence in this context is that you can see the results, and edit them for every individual hit if necessary. The Start and End Pad sliders mean you can retain both the transient and as much of the 'ring' as possible. Sam Inglis


