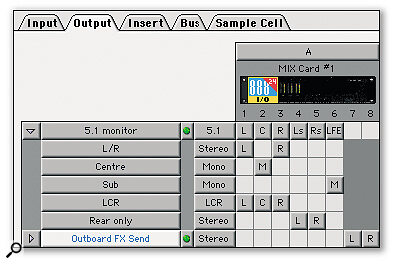
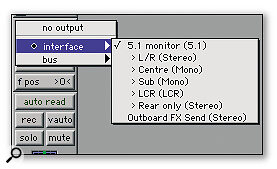
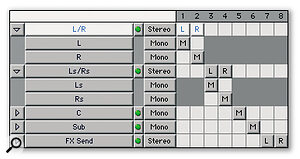
 A versatile 5.1 surround output routing structure.
For MIX TDM users, the latest Pro Tools software offers a tailor‑made way of mixing in surround. But those with older TDM setups or LE‑based systems can do surround too, with some lateral thinking...
I'm taking a break from my 'MIDI app to Pro Tools Transfer' series this month, in order to devote more space to two of the newest areas of Pro Tools: I/O Setup, and surround mixing. Version 5.1 introduced a completely revamped system for setting up the fundamental signal routing of the Pro Tools mixer. This tends to cause a fair bit of head‑scratching when you first move up from 5.0 or earlier.
The new I/O Setup page provides the necessary framework for Pro Tools' handling of multi‑channel tracks and surround mixing. If you're not familar with how surround works, take a look at Hugh Robjohns' in‑depth explanation of surround systems in the last few issues of SOS (starting August 2001) — then read on to find out how Pro Tools handles multi‑channel mixing. It's worth noting that while all Pro Tools systems running v5.1 software now have the I/O Setup page and stereo tracks, only MIX hardware supports the full Surround Mixer. (For some guidelines on how to mix in surround using LE, or earlier TDM systems, see later on in this article.)
New Routing For TDM Mix Systems
![]() Mono track with sends providing routing to Surround, Centre and Sub channels.
Mono track with sends providing routing to Surround, Centre and Sub channels. The output section of a mono track belonging to a Session containing the I/O Setup shown in the previous screen. With this configuration, you can route tracks directly to certain speaker combinations, or use the full surround path and pan from there.
Prior to PT 5.1, there were just two choices regarding how the program's mixer would route audio. This choice was made in Preferences, and was a toggle between 'Direct Outputs' mode and 'Stereo Mix' mode. In other words, Pro Tools either behaved like a tape machine, with each track being discretely routed to a hardware output, or it functioned as a virtual studio based around a versatile — but fundamentally stereo (x:x:2) — mixer.
All audio tracks were separate mono channels, while aux inputs (input channels and submix groups) and master faders could be mono or stereo. In Stereo Mix mode, each track's main output was routed to a stereo output or buss, and aux sends could be either mono or stereo. Apart from the lack of dedicated stereo audio tracks (now addressed in all flavours of PT 5.1), this system worked great for mono or stereo mixes, so was perfectly adequate for most music, radio or TV projects. However, the mixer architecture is not well suited to surround mixing, so various workarounds were employed. Enter Pro Tools 5.1, with its new routing architecture.
The I/O Setup page serves two functions: grouping inputs, outputs, inserts and busses together into what PT calls Paths; and giving them names. The types of groupings available for these Paths are standardised formats, namely mono, stereo, LCRS (Dolby Surround), 5.1, and so on. So, for example, if you were mixing in stereo you might assign outputs 1&2 of your audio interfaces to a stereo path and call it 'Main Mix Out'. These outputs may also belong to another Path (a Sub‑Path in PT 5.1‑speak), so you might have a mono Sub‑Path going to each of outputs 1&2 as well. With the setup described, a mono track could now either be routed directly L or R via the mono Paths (the track will have no pan control), or routed to the stereo Path and positioned with a standard stereo panner. Hopefully, you can see how this system can be extended (within MIX systems) to surround routing. Typically, with a 5.1 format mix, you would have the first six outputs of your interfaces assigned to a six‑channel Path, representing the L, C (Centre), R, Ls (Left surround), Rs (Right surround) and Sub speakers.
Again, these outputs can also belong to Sub‑Paths — for example, a stereo Path going to just the L/R speakers, and a mono going to the Centre. In this example, our mono track could now either be sent directly Centre, sent L/R and panned in stereo, or sent to the 5.1 Path and placed anywhere in the room.
So how does Pro Tools know what to do with our mono track that we're sending to a 6‑channel output Path? Well, this is what the new surround panners do. Just as a standard stereo pan‑pot provides a visually relevant way to vary how a signal is split between two outputs, a surround panner controls how a signal is shared amongst three or more outputs. Pro Tools' surround panners provide two main parameters: a position cursor and a Divergence control. Roughly these equate to a sound's direction and width. On screen, the positional cursor appears as a dot within a square area representing the listening environment. As you might expect, the position of the dot determines where the sound will appear to emanate from, within the room (OK, it's not quite that simple, but this isn't a general surround mixing article!). The value of the second parameter, Divergence, determines how much the sound spreads into neighbouring speakers (the higher the Divergence setting, the narrower the spread). As an example, if the positional cursor is placed in the top left‑hand corner, with maximum Divergence, the sound will only come from the front‑left speaker. As you increase Divergence, the blue square within the panner gets larger, which looks counter‑intuitive, as it would be easy to interpret this as a representation of the sound's spread.
If the panner you're using is for a Path that contains a sub‑woofer (Low Frequency Effects) channel, the amount sent to this is set with a separate fader. Finally, when there is a centre channel you'll get a control to attenuate its level.
As initially confusing as the I/O Setup seems (it was to me, anyway!), chances are that most of us are going to be using the basic stereo mix template and getting on with things in much the same way as we always have. Even so, it's worth going back and having another look, because you never know when you might find yourself in a situation that requires surround. Most people have not had a chance to play much with surround, due to the simple fact that they don't have enough speakers. I'd recommend a visit to www.dolby.com to check out their new technology for playing back surround mixes over headphones. How cool is that!?
Surround Mixing In LE & Earlier TDM Systems
 A mono track routed to the 5.1 path, along with its surround panner. The green dot represents position, while the blue outline indicates spread to other speakers (spread is inversely proportional to the area covered by the outline)
 I/O Setup Window, showing a good old‑fashioned stereo outputs routing
The Pro Tools 5.1 purpose‑built surround mixer is only available in conjunction with MIX TDM hardware. If you are using Pro Tools LE, or an earlier TDM system, it is still possible to mix for surround — it's just not so convenient and requires a little forethought. The workaround is the same in Pro Tools as it would be with any stereo mixer, although if you're using a non‑MIX TDM system there are some plug‑ins to make things a little easier. The problem that needs addressing, of course, is that each track's main output can only be sent to a mono or stereo output. The solution is to use sends, as well as the main output, to route tracks to the additional outputs. In fact, this method is quite simple, and largely effective for the majority of sound placement in the surround field.
The first thing to do is configure an I/O Setup for your needs and wire up your monitors accordingly. My suggested routings for 5.1 and LCRS (Left, Centre, Right, Surround) formats are shown in the screenshots below.
These output orders not only make life easier within the confines of the stereo mixer, they also mean that outputs 1&2 remain the L/R stereo pair, removing the need for repatching when working in stereo
The next task is to set up the mixer to take advantage of the extra routing. The mixer channel in the screenshot is a mono track with 5.1 routing capability, to give you the basic idea. The main output of the track is set to outputs 1&2 (L/R). The first send is stereo and goes to outputs 3&4 (Ls/Rs), while the second and third sends are mono and go to outputs 5 and 6: C and S respectively. The main fader controls overall (and main L/R) level, while the send level sliders adjust how much of the signal is bled off to the centre, sub and surround speakers.
Depending on what you wish to do with a track, you may need to rearrange this setup. For example, if you wish to send something to the centre only, it makes more sense to route it directly there from the main output section. If you later decide to widen the signal slightly to the L/R pair, you can add a send to outputs 1&2. As you can see, it's a bit of a bodge, but it works. The main limitation to working like this is that it's difficult to automate moving sounds within the surround soundfield, as this involves changing combinations of the fader and send levels.
As I mentioned before, there are some plug‑ins for non‑MIX TDM systems (not LE, unfortunately) that are designed specifically to make working in this manner easier. If you're mixing in Dolby Surround, the Dolby Surround plug‑in is a very powerful addition to your system. Not only does it provide a surround panner that makes it easy to automate moving sound effects, it also includes the full encode and decode matrices. This means that you can monitor the mix correctly, and can also create your own finished LtRt masters. (LtRt is the composite stereo signal that contains the matrixed information to reconstitute five‑channel Surround — see Hugh Robjohns' series, as mentioned earlier, for more info about this.) For those mixing in the 5.1 format, a company called Kind of Loud have written Smart Pan Pro, a joystick‑style surround panner that works behind the scenes to replace the fiddly multiple‑sends business (in much the same way as the built‑in panner in PT 5.1 MIX). They also make a surround reverb plug‑in that will take a mono or stereo input and return a multi‑channel output that simulates various spaces.
Quick Tips
 Suggested 5.1 I/O Setup output routing for surround mixing in non‑MIX systems.
Most users are aware that you can spot a region to the edit insertion point by control‑clicking on the region with the Grabber. However, if you want to spot a multi‑region selection to a point it's a bit more complicated, and is in fact only possible with TDM systems. First, with the Object Grabber, select the collection of regions to be spotted. Now click the Unlink Time and Edit Selections button (just under the Edit Mode buttons). Locate the point you wish to spot to in the time ruler (if you drop the cursor in a track you'll lose your region selections). Finally, hit the key (key command for Sync Start to Play).
Just as you can now open multiple plug‑in windows by shift‑clicking them, so you can do the same for send parameter windows. This is especially useful when using the technique for surround mixing in non‑MIX systems described elsewhere in this column. By opening all the surround send faders for a track, you can quickly set up the track's level, placement and spread within the surround soundfield.
Be very careful with the new Write on Stop automation function. This stays on until you disable it, so it's really easy to accidentally blow away lots of automation data. Also, be aware that, in version 5.1, if you switch on a 'Write on Stop' button, it will stay on even if you close the Session and open a new one. This has been changed in 5.1.1.


