 The main studio workstation desk in Midge Ure's personal studio, showing the positioning of Paul's five home-made acoustic panels.
This month, the SOS team help out with the acoustics at Ultravox and Band Aid star Midge Ure's personal studio.
This month found us at the home of Midge Ure who, since his Ultravox days, has owned some pretty serious studio facilities, but has now opted for a simpler DAW system running Logic or Pro Tools, depending on the needs of the project. Most of his classic synths have been made redundant and today he works predominantly with soft synths and samplers augmented mainly by hardware such as his Roland JV2080, Kurzweil K2500R, and Proteus 2000. The system uses MOTU 828 audio interfaces and an AMT8 MIDI Interface.
Around two years ago he set up his studio in a modest-sized, lightweight office building sited in the garden of his home near Bath. This proved particularly challenging from an acoustics point of view as all the internal surfaces are either glass or highly reflective PVC or metal panels. Our task was to get the room sounding good without spoiling the cosmetics, the predominant colour scheme being green and cream.
Midge had an NHT Pro monitor system comprising two satellite speakers and a small subwoofer, where he'd set up the subwoofer on a shelf under his very substantial studio desk. This shelf had a back and a top, forming a three-sided cavity which I felt was likely to give resonance problems, so Technical Editor Hugh Robjohns and I decided to try to find a better position for the subwoofer on the floor somewhere behind the desk.
As it turned out, this was one of the hottest days of the year, and we'd also taken along New Media Manager Paul Gilby to shoot some video footage for the SOS web site. By the time he'd got some lights up, Hugh and I felt like extras from The Incredible Melting Man (there must be a movie by that name somewhere!). Nevertheless, we spent a very pleasant day in Midge's garden, and he even went out to buy us a deli lunch and cold drinks. In fact this visit was an SOS first, because, on account of the heat, we didn't even open the customary packet of chocolate Hobnobs, and by the end of the day they'd fused into one mega-size Hobnob and were only finished off during the writing up of this project! We did, however, discuss with Midge the possibility that in his native Scotland they might go down well deep fried!
Acoustics Tweaks
Acoustic symmetry is always desirable in any studio system, but Midge's building had full-height windows all down the left-hand side and a solid lightweight wall to the right with a further all-glass area at the back of the room. He'd put up slatted blinds, which certainly helped keep down (or at least scatter) high-frequency reflections, but the room was still noticeably lively and rather too reflective for accurate mixing or for miking up voices and instruments. As he wanted to be able to record his vocals from his working position, we had to come up with a solution which would allow this, but which wouldn't kill the light, airy feel of the room.

Because of the colour scheme we couldn't use the usual choice of acoustic foam, so we decided to combine some purpose-built traps with lightweight ceiling treatment comprising standard 30mm Rockwool insulation slab in cream-coloured bags that were kindly provided by the US firm Ready Traps. They'd already sent us some of their four-inch-thick bags to review, so we knew they'd work fine, and they were kind enough to ship us a number of thinner bags at short notice that would take the 30mm slabs. Because of weight loading issues, we didn't think it would be a good idea to use the standard four-inch bags.
Essentially, these Ready Traps are thin fabric bags with concealed zippers, and they are supplied with plastic corner pieces to give the Rockwool a decent shape. The bags take standard sizes of rigid Rockwool cavity-wall insulation slab, and although the US uses imperial 2 x 4-foot panels, the marginally smaller European size of 1200 x 600mm fits OK, because the fabric has a certain amount of stretch. We used the Rockwool panels which are available in packs of five from Wickes in the UK for around £36 per pack — Wickes seem to be one of the few DIY chains to stock them.
. Once the matting was in place, a brass mounting bracket could be screwed into the frame through the matting (bottom).") For side-wall acoustic treatment, Paul constructed a wooden frame around a slab of high-density Rockwool cavity-wall insulation, and then pinned Auralex barrier matting to the back of the frame's top support to increase low-end absorption (top). Once the matting was in place, a brass mounting bracket could be screwed into the frame through the matting (bottom).
For side-wall acoustic treatment, Paul constructed a wooden frame around a slab of high-density Rockwool cavity-wall insulation, and then pinned Auralex barrier matting to the back of the frame's top support to increase low-end absorption (top). Once the matting was in place, a brass mounting bracket could be screwed into the frame through the matting (bottom).For the wall directly behind the monitors, we built three traps, each comprising a simple wooden frame around 80mm deep with a single slab of 1200 x 600 x 30mm Rockwool slab fixed inside it, secured by means of lengths of scrap wood pinned either side. The frame was painted green using some paint left over from Midge's office building assembly, and the fronts were covered with unbleached cotton dust sheet, as suggested by Max Hodges, well-known SOS Web Forum moderator and acoustics guru. This material is acoustically suitable, very cheap, and happened to be a decent colour match for Midge's cream office walls. We simply stapled this in place, stretching it as much as we could in the process, then pinned some pine beading over the edges to improve the appearance. Much of this was done at home to save time on the day.
 The completed acoustic treatment units were hung from battens fixed between the office building's wall supports, allowing a small air gap between the trap and the wall.
In the back of each trap, we hung a sheet of Auralex barrier matt, a heavy flexible material that helps with low-frequency absorption. This was fixed only by its top edge and left to hang freely. The traps were then hung from a wooden crosspiece that we screwed to the existing wall uprights in the office so that there was a space of a couple of inches between the rear of each trap and the lightweight wall behind it. A second crosspiece supported the bottom of each trap, and brass keyhole plates were used to hang the traps from the upper crosspiece so that they could easily be lifted off if required. Because of the lightweight nature of the building construction, we felt that we wouldn't need a lot of bass trapping, as much of the low-frequency energy would pass right through to the outside.
Hanging Ceiling Traps
For the side walls and ceiling we opted to use the Ready Traps bags, but rather than use them just as they came, we cut some quarter-inch pine tongue-and-groove panel (nice and cheap!) into 30mm strips and put these down the long sides of the Rockwool slabs to help fill out the bags slightly and to stop them sagging under their own weight. The bags come with moulded polythene corner pieces that are large enough to go over these wooden strips, and for the ceiling panel we also put in a couple of horizontal wooden slats so that we could screw in some metal eyes from which to hang them. Again there was room under the plastic corner piece for the slat. Clear tape was used to hold the plastic corners in place while we fitted the bags, and we put another band of tape around the centre of each panel to support the Rockwool and to pull in the two side strips.
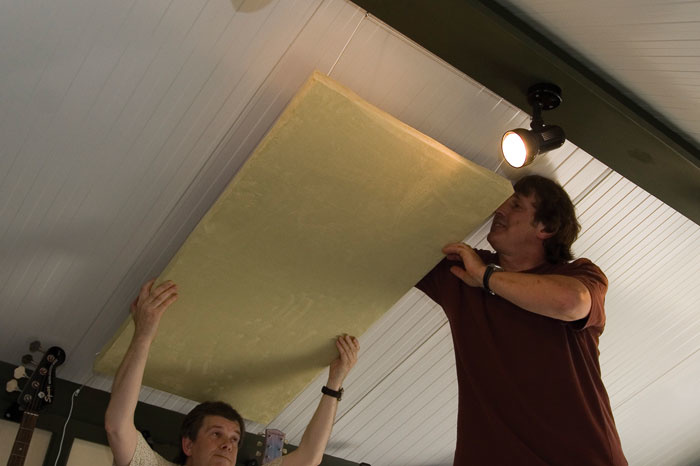
 Further acoustic panels were suspended from a beam at the ceiling's apex, using nylon cord. Initially it proved almost impossible to tighten the cords sufficiently to achieve a decent cosmetic effect. Paul's solution to this was to loop some cable ties around the support cords before the panel was tied into place, and then to tighten them up to increase the tension in the nylon cords suitably.
 The finished ceiling treatment.The bags have four straps sewn into the back panel to suspend the traps, but, because the fabric is slightly stretchy and the European Rockwool slabs are slightly undersized compared to their American counterparts, we have found that it's hard to hang the traps close to the wall using the straps. The advantage of the wooden strips is that you can mount the panels much closer to the wall, and they are more rigid.
Fitting the bags proved to be very easy, but it's best if you use three people, one to hold up the closed end of the bag and two to slide the open end down over the panel. It is important not to let the outside of the bag come in contact with the Rockwool, as the fibres tend to stick. One trick we've used in the past is to put a plastic bin liner over the Rockwool, slide the bag over, then pull out the plastic bag before zipping up the trap. Bin bags are quite smooth and slippery, which helps the Ready Trap bag slide over the Rockwool, and also ensures the bag can't come into contact with the Rockwool. In this instance, though, even with the extra thickness of the wooden side strips, we found it very easy to slide the bags on directly, provided that someone held the top out of the way of the Rockwool. Once bagged up, we simply screwed metal eyes through each plastic corner piece and into the wooden slat below it.
We'd had several different ideas about fixing the ceiling traps, but, as usual, the simplest turned out to be best. The office ceiling went up to an apex, with a central timber hiding the lighting wiring and supporting the light fittings, so we fixed more eye screws into the side of this timber and also into the wooden supports at the top of each side wall. Woven nylon cord was passed through the eyes in the panels, then through the fixed eyes, before being pulled as tight as possible prior to being tied off. In an ideal world this would hold the panels parallel to the sloping ceiling about five or six inches away from it, but of course you can never pull the cord tight enough.
However, we had a cunning plan! Before tightening the cord, we fixed some plastic cable ties between the two strands of cord passing behind the panel, and left them loose. Once the cord was as tight as we could get it and tied off, we simply tightened up the cable ties to pull the cords together behind the traps until the desired tension was achieved. This also stopped the panels sliding down the cords, so we were able to position them centrally between the wall and roof apex fixings.
Final Adjustments
For the side walls, we hung a further pair of vertical Ready Trap 'bagged' panels from loops of nylon cord and used screw-in hooks to position these midway between the speakers and the mixing chair. These were easy enough to take down if Midge wanted to enjoy the view, but he seemed happy with where they were. We had two bags and a few Rockwool panels left over, so we filled the two bags to create movable traps that could be leant against the rear wall when not needed and which could be hung from mic stands to form portable absorbers when recording vocals. Midge had just bought an SE Reflexion Filter, which he found improved things when he was singing from his mixing position using his SE Gemini tube mic. However the Reflexion Filter tends to work even better if you can kill any reflections coming from behind the singer's head, and our movable panels would be ideal for this.

 In order to find the correct position for the subwoofer in Midge's studio, Paul tried the trick of placing the subwoofer in the listening position then crawling around the back of the studio desk to find where the playback bass response is most even.The room sounded significantly drier once we'd put up the panels, so now we turned our attention to the monitoring. Midge was sure he'd just slid the subwoofer onto its shelf, but when we tried to take it out, it was about 5mm too high to clear a lip on the top of the desk compartment where he'd put it. There was simply no way it was going to come out that way, despite Hugh's best efforts scrabbling about under the table, and we couldn't see any easy way to dismantle part of the desk. Fortunately, the compartment was connected to the side sections that held the rackmount gear, and by removing equipment from one side rack we were able to slide the subwoofer along and lift it out through the rack opening.
Before trying to find the best place for it, we used some Auralex Mo Pads to get the satellite speakers at the correct height and angle, as they were currently sitting directly on the downward-sloping desktop, which meant they were aiming too low. The Mo Pads also provide a useful amount of decoupling from the desk surface.
Once we were happy with the speaker placement, we set about working out the best place for the subwoofer based on a tip given to us by Steve Fisher, SCV's Genelec specialist. The subwoofer is temporarily placed in the position of the engineer's chair, then a volunteer (me in this case!) crawls around the back of the mixing desk looking for the spot where the bass coming through the monitors sounds most even. This turned out to be close to the rear wall just off centre, so we sited the subwoofer there, connected it up, and played some more test tracks.
As the room was constructed with lightweight walls, there wasn't much of a problem with standing waves anyway, but by placing the subwoofer on the floor we had removed the desk resonances and vibrations, making the bass-end seem much better controlled, with none of the obvious resonances that had been there before. The stereo imaging was also markedly better, thanks to the ceiling and side-wall absorbers. Finally, we slid the desk slightly closer to the front wall to get the mixing chair away from the exact centre of the room, which is always a problem spot for judging bass.
The combination of the tweaked monitoring and the basic acoustic treatment made a huge difference to the room, which was clearly never designed with any acoustic applications in mind — I guess most people use them as offices or as executive sheds for their train sets!
Midge's Comments
 Midge Ure: "The difference the treatment in the studio has made is amazing! I'm doing a duet with a German band called X-perience, and they sent an AIFF file by email for me to record my vocals over. I emailed my recordings back to them, they mixed, and it sounds great.
"Everything I have said about recording and environments stands up now. You don't have to spend fortunes on recording. A good mic, a clean signal path and a bit of sound deadening, and you can produce world-class results."