
Acoustic problems and mains hum were making Aniff's studio difficult to use, so the SOS team stepped in to help.
Aniff Akinola has been working in music for around 20 years and has enjoyed a certain amount of commercial success with his productions, including collaborations with artists such as the late Kirsty McColl, Steve Hillage, Ian Brown, The Beloved, A Guy Called Gerald, Urban Cookie and Backyard Dog. During that time he's run two independent record labels, been signed as an artist to four major labels, and been involved in the creation of three top-20 hits. He's currently signed as a writer to BMG Publishing. As if this weren't enough, Aniff is currently working part time at Manchester's Sound Control music store.
He called us in because he wasn't happy with the monitoring environment in his studio, located on the top floor of his Old Trafford home. Prior to our arrival, he'd bought a pair of Genelec 8040As and a monstrous Genelec 7070 subwoofer — along with a pack of Primacoustic room-treatment foam. The subwoofer was serious overkill for the size of room, but it was a bargain secondhand buy, and Genelec equipment is always easy to set up in almost any combination. Our job was to help him optimise his monitoring environment, sort out his subwoofer placement and balance, and fit the foam where it would do most good.
When we arrived, Aniff had set up his Genelecs on stands behind a pair of Quiklok studio desks on which he'd placed his Yamaha NS10s plus a pair of flat-screen monitors for use with his Apple Logic/G5 studio setup. His G5 is fitted with both TC Powercore and Universal Audio UAD1 DSP expanders and he uses a Rode Classic 2 as his main recording mic. To keep the Genelecs clear of the NS10s, he'd had to set them very wide apart, which was less than ideal from a stereo-imaging point of view, and he'd also reported some hum problems with his NS10s, which were driven from an old Quad 405 MkII amplifier. He'd parked the subwoofer almost exactly halfway along the left wall of the room, and the desks were a couple of feet from the front wall to make space for a large MDF box that housed his Mac G5 and a PC. This arrangement resulted in the listening position being almost exactly in the centre of the room.
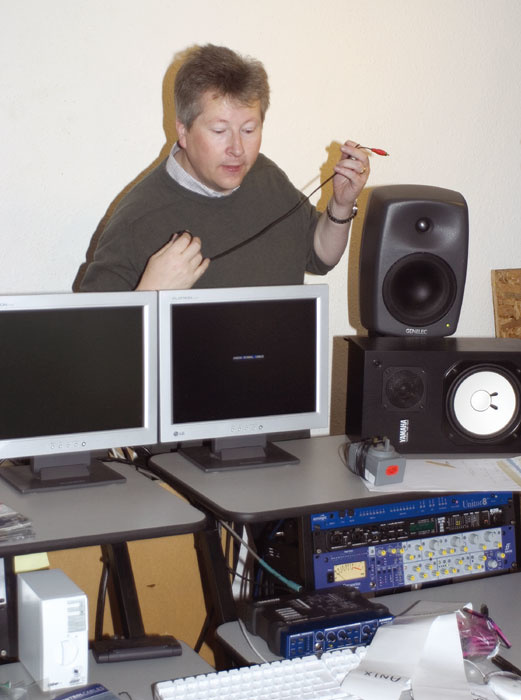
 also needed a little repositioning.") Here you can see Aniff's setup as Paul & Hugh found it on their arrival, and this configuration was causing several problems. For a start, the Genelec monitors were too far apart, compromising the stereo imaging at the monitoring position. The central monitoring position wasn't helping the bass response, and the subwoofer (to the left of the desk in the lower picture) also needed a little repositioning.
Here you can see Aniff's setup as Paul & Hugh found it on their arrival, and this configuration was causing several problems. For a start, the Genelec monitors were too far apart, compromising the stereo imaging at the monitoring position. The central monitoring position wasn't helping the bass response, and the subwoofer (to the left of the desk in the lower picture) also needed a little repositioning.
The wiring behind the desk resembled the pit of snakes from an Indiana Jones film, and a rather lost-looking Samson C*Control was perched hopefully on the desk with no cables yet attached to it. A MOTU 828 MkII handled the audio interfacing, and a Focusrite ISA430 front end was connected to the S/PDIF input of the MOTU when required. One of the few hardware synths to survive Aniff's transition to software was a Roland JV2080 fitted with a number of expansion cards, though Aniff also has an Akai MPC4000 that he likes very much.
Preliminary Listening & Subwoofer Placement
 As usual, our first job (after attending to the tea and chocolate biscuits) was to listen to the monitoring system exactly as it was. Initially, this was done using the MOTU 828 MkII's volume control, but this proved frustrating to control, and the resolution fell off at low volume settings. So Hugh quickly set about patching in the Samson C*Control instead, with the MOTU monitoring outputs set at full level to achieve the best D-A resolution, and with Aniff's CD player hooked up to one of the two-track inputs so that he could play back CDs without re-patching.
As expected, the stereo imaging was less than ideal, because of the wide speaker spacing, the very reflective side walls, and the relatively large amount of clutter in front of and between the monitors on the desk — in fact it was so bad that we could detect very little difference when we pressed the C*Control's Mono button! The bass end also seemed rather too loud and lumpy. We reckoned that the imaging would be improved by moving the speakers and by putting up the Primacoustic foam Aniff had bought, so Hugh set about adjusting the subwoofer while Aniff and I made a trip to the local B&Q to buy some fixings for the MDF panels on which we'd decided to stick the foam. Monitoring tests proved frustrating working directly from the outputs of Aniff's MOTU 828 MkII audio interface, so Hugh quickly plugged up Aniff's new Samson C*Control monitoring controller to make switching and level control easier. The next step was to make sure that the Genelec monitors were suitably set up, and this involved experimenting with the subwoofer positioning, level, and phase.
As there was a fair bit of gluing and lifting to do, Aniff conscripted his friend Ben from Manchester's branch of Sound Control to help out.
If the subwoofer isn't in the right position in the room and relative to the listener, the level of differently pitched bass notes can vary enormously, so Hugh and Ben used the old trick of lifting the sub into the place where the engineer's chair normally goes, then crawling around on the floor alongside the walls listening for the spots where the bass sounded most even. There were a couple of places which seemed quite good, and one turned out to be not far from where the sub had been located in the first place — it just needed moving forward by a foot or so, which got it away from the 'dead centre of the wall' position, which is usually less than optimal.
Having located the ideal place, the subwoofer was dragged back over and then the DIP switches that control the relative phase were checked to get the best crossover response with the 8040s. Finally a listening test was performed to establish the correct bass balance. It was necessary to drop the sub level by around 2dB from its original setting to get a subjectively sensible bass balance, though this wasn't easy to judge, as Aniff's collection of predominantly drum & bass music seemed to vary rather a lot when it came to bass content. Hugh managed to find some more 'known quantity' pop albums and we eventually agreed on a setting that was a happy medium.
 Aniff held a vacuum cleaner to catch the dust while Paul drilled holes for mounting the acoustic-foam panel he'd just put together. Once the hole was drilled, it was fitted with a wall plug to accept the mounting screw. A picture bracket was then screwed to the back of the panel so that it could be fitted to the wall screw's head.
Killing Undesirable Sonic Reflections
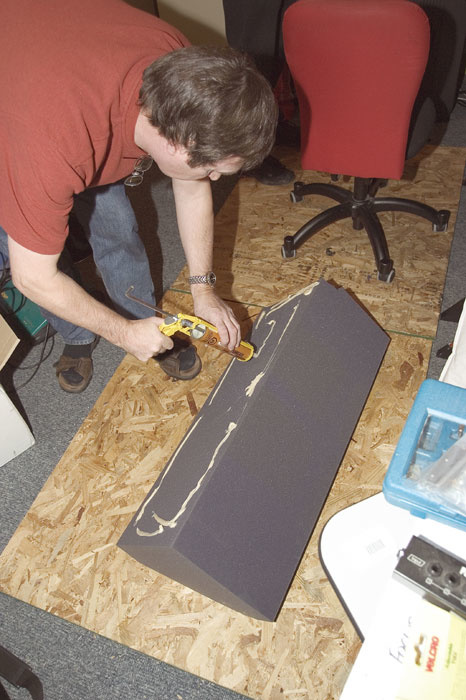
 Aniff decided to fix the Primacoustic foam to MDF panels so that they could be moved around if necessary and when redecorating the room. As luck would have it, we were able to make up a pattern of foam blocks that exactly fitted the 2 x 4-foot MDF panels he had bought.
Using a panel adhesive and a mastic gun, we fixed up four identical panels to be used in pairs on the side walls to tighten up the imaging and kill flutter echoes. A further panel was used directly behind the monitors as a horizontal absorber, with four thick foam blocks overhanging the panel at either end. The remaining foam blocks were fixed to a sheet of MDF and placed on the rear wall, though some additional rear-wall absorption would be beneficial.
Aniff said that he planned to get a settee to put at the back of the room, so that should also help kill reflections. In addition, we discussed the idea of hanging a couple of single duvets across the angled part of the ceiling coming down to the back wall, which Aniff said he'd try to do later on. Following a quick trip to B&Q, Paul constructed an acoustic panel using a sheet of MDF, some adhesive, and elements of a Primacoustic foam room-treatment kit.
We fixed the panels to walls using brass picture-hanging plates screwed to the backs of the panels. These simply slotted over screws in the walls that were fixed using plastic wall plugs in the traditional way.
The two triangular foam bass traps that were included in the Primacoustic kit were glued between the front wall and the ceiling. Fortunately, bass trapping wasn't a serious issue in this room, as there was a panelled chimney breast in the front right corner, a door enclosing the hot water system in the front left corner, a wooden entrance door (back left) and a window (back right), all of which soaked up bass quite effectively and in a well-balanced way.
Once we had the panels in place, we experimented with the speaker positioning. Although the side panels had certainly improved the stereo imaging a little, it was still way below that which we expected from these Genelec speakers — and the NS10s sitting on the desk shelf produced a far better stereo image. Although it is generally better to place speakers on dedicated stands, rather than on the desk, in this case we found that with the Genelecs on stands behind the desk the clutter on the desk shelves (NS10s and LCD monitors) wrecked the imaging completely.
 So, we eventually ended up with the NS10s directly to the sides of the two computer screens, then the Genelecs placed on the top shelves next to these, so the stands were no longer required. Fortunately, the Isopod stands that are supplied with the new Genelec speakers are very good at helping to isolate vibrations to and from the desk, and the stereo imaging was now perfectly good. Aniff was worried that the NS10s might not sound right, as they were now standing vertically, but this is the way they are actually intended to be used. Mounting them on their sides is a convenience issue (to help lower their profile when mounted on a big desk meterbridge, obscuring the main soffit-mounted monitors) and narrows the sweet spot very noticeably.
We have noticed before that there can be a bass suck-out near the centre of a square room and, because the two desks were a fair distance from the wall, Aniff's chair was dangerously close to this dead spot. In fact, this centre-room 'hole' became very noticeable as you stood up or sat down. The solution was to remove the computer box from behind the desk to allow us to move the two desks closer to the wall. This improved things considerably, and the monitoring balance, especially at the bass end, was far more acceptable in this new location.
 In an attempt to even out the room's bass response, some foam bass traps were also installed directly into the room's corners using adhesive.
Ideally, we should have used balanced cables between the 828 MkII and the C*Control, and also between the C*Control and the Genelecs. However, Aniff didn't have any spare balanced cables, so we had to make do with unbalanced cables between the MOTU and Samson boxes as a temporary solution, with a promise that he'd change them as soon as he could. The main speaker output from the C*Control used balanced cables to the Genelec subwoofer and from there back to the 8040s.
Curing An NS10 Hum
Having sorted out the main monitoring, we turned our attention to the humming NS10s. There was, indeed, a constant low-level hum, and we first assumed this was a ground-loop problem, as the Quad amp's inputs are unbalanced. However, disconnecting the inputs didn't change the hum level or quality at all, and neither did shorting the tip and ring of the phono connectors — if shorting the inputs had killed the hum, then the hum may have been getting in at the inputs.
This all pointed to a problem in the amp itself — possibly faulty power-supply smoothing capacitors — and would require the services of a good repair centre. However, there was also a second possibility. The amp had been modified at some stage to install an input level control, and it was possible that the wiring for this was picking up a stray hum field within the amplifier. Either way, Quad Electroacoustics maintain a very good repair service, so we suggested Aniff contact them to have the amp overhauled.
The speaker leads to the NS10s were also enormously long, which was pointless and could only reduce the sound quality, so Hugh quickly shortened the cables and we then hooked up the Quad amp inputs fed from the Monitor B output of the C*Control. The Samson has facilities to balance the levels of the two main pairs of speaker outputs, so that switching from the Genelecs to the NS10s maintained nominally the same level.
 The finished setup, with the monitor controller plugged up, the desk and monitors repositioned, all the acoustic treatment in place, and the hoover safely back under the stairs...
Tidying Up The Wiring
 While we were at it, we decided to have a go at tidying up Aniff's mains wiring. To get the mains connections off the floor, we bought some new six-way mains distribution blocks and taped these to narrow planks of wood that would fit between the upright legs at the rear of the Quicklok desks. Ordinary brass hooks were screwed into the ends of these, then they were simply hooked onto Velcro straps fastened around the rear desk legs, just above one of the horizontal supports to stop them sliding down. We did this on both desks, which gave us four sets of six-way distribution boards around 18 inches from the ground, and we also had enough Velcro straps left to help tidy up the cabling.
To minimise the risk of ground loops and to offer the maximum protection for the equipment, we ran all the distribution boards back to a central surge-protected distribution board plugged into a wall socket. This meant the whole setup was running from a single power point with the mains cabling in a 'star' configuration. Running everything from a single wall socket wasn't a problem, as the overall power consumption was fairly small. Aniff had labelled all his mains adaptors and plugs, so it didn't take long to get everything up and running again.
 much easier. Because the six-way plugboards were connected to a single surge-protected plugboard in a 'star' configuration, this setup also had the effect of reducing the level of mains hum in the system.") Aniff's nest of adaptors and mains plugs were cluttering up the floor underneath the main desk, so the SOS team improvised a long suspended mains connection strip using a piece of wood and several six-way plugboards. This cleared the cables off the floor, making access behind the desk (for re-patching or cleaning) much easier. Because the six-way plugboards were connected to a single surge-protected plugboard in a 'star' configuration, this setup also had the effect of reducing the level of mains hum in the system.
Aniff's nest of adaptors and mains plugs were cluttering up the floor underneath the main desk, so the SOS team improvised a long suspended mains connection strip using a piece of wood and several six-way plugboards. This cleared the cables off the floor, making access behind the desk (for re-patching or cleaning) much easier. Because the six-way plugboards were connected to a single surge-protected plugboard in a 'star' configuration, this setup also had the effect of reducing the level of mains hum in the system.
The result was a hum-free system (with the exception of the low-level hum on the NS10s from the suspect power amplifier) and, although the wiring was still far from being a work of art, at least it meant you could get a vacuum cleaner under the desks without encountering piles of cables! As we'd made a fair bit of mess sorting out his system, I tested this by vacuuming the room in readiness for our photos! By the way, please don't tell my wife that I know how to do this...
With the desks shuffled back, the C*Control repositioned centrally below the dual LCD screens, and the surplus cabling removed, the whole setup was better both ergonomically and sonically. The stereo imaging was actually very good, and the level of bass end seemed appropriate.
 Before he and Hugh headed for home, Paul used a propane-powered soldering iron he'd picked up at B&Q that morning to show Aniff how to go about basic soldering.
Last-minute Soldering Tips
Our final task was to try to teach Aniff to solder using a propane-powered soldering iron we'd picked up at B&Q. I demonstrated the basics by replacing a stereo jack plug on his headphones, and I pointed out that the iron shouldn't be used to carry solder to the job. Instead, you heat the two parts to be joined separately and feed solder onto them to tin them. Then, the two tinned parts are brought together, heated again and more solder fed onto the joint as required, until the solder flows freely across the joint. At this point, the heat is removed and the joint held still until the solder has cooled. Aniff tried this on a couple of scraps of mains wire and seemed to be getting the hang of it by the time we were ready to go, though he had to be reminded to keep the heat on the joint and not dab at it with the iron. It only takes a few minutes of practice to learn to solder, and it is a hugely valuable skill, especially if you need to repair cables or make up custom connections.
As the sun set over the sleepy suburbs of Manchester, Hugh punched the route home into his trusty GPS navigator, and we headed for that perpetual car park that is the M6!
Aniff's Comments
"I still can't get over how different the room sounds just when I walk in, never mind when I'm playing music! I have now got the quilts for the rear ceiling and will put them up in the next couple of days. I've also put in a bypass switch for the sub for when I'm working late at night. Now it's time to go and practice my soldering!"
