We take a distance-learning approach this month, to help US reader Jody Whitesides improve the sound of his home studio.
 Jody's studio after the Studio SOS, complete with wall and ceiling absorbers... not to mention the comfortable new sofa to keep his clients happy.US-based reader Jody Whitesides built his home studio by converting the garage when he first bought his house, and having a sister who is an architect really helped when it came to soundproofing the studio from the outside world. But while that side of the project was clearly a success, Jody never gave much thought to acoustic treatment, and simply put up some soundboard and Auralex tiles all the way around the room up to about half the wall height, believing that cutting down on high-end slapback/echo would be all that was needed. Jody had worked in this room for a few years but he always felt that his vocal booth (also heavily treated with foam) tended to produce boxy-sounding results. Furthermore, he'd noticed that his mixes translated well to some environments but not so well to others.
Jody recently started to focus on his acoustic problems after hearing a mix he'd spent painstaking time on sounding rather washed out and unfocused when played over a friend's sound system. This prompted him to look at issues of Sound On Sound and ask other friends how to check the room. He did the sine-sweep test we've described in the past and was shocked to hear how many holes and bumps there were at the bass end. Finally, he emailed us...
Of course, it wasn't really practical for us to fly over to the US with our luggage full of acoustic products, but we offered to help out by working remotely, using measurements, descriptions and photographs as our guide. As you'll see later in this article, this approach turned out to be surprisingly successful — although it was rather frustrating not being able to judge the results on site with our own ears.
Studio Tour
Jody explained that the original room was almost square, at 17 feet x 17.5 feet, though an area of that measuring 8 x 5 feet was occupied by the vocal booth. The ceiling angles up from eight feet at the walls to roughly 10 feet at the highest point, while the walls also have some corner angles that Jody designed in when the room was first converted. He fixed soundboard directly on the walls, extending roughly four feet up each wall all the way around the room and in the vocal booth. On top of that he fixed Auralex sound foam, again all the way around the room.
The studio is based around an eight-core Mac Pro with a 30-inch cinema display, running Logic Studio with Waves and Native Instruments plug-ins, and the Spectrasonics Stylus RMX 'groove' instrument. His MOTU 2408 MkIII audio interface is soon to be replaced by an Apogee Symphony system, and he has a good range of outboard gear including a Groove Tubes Vipre preamp, an Avalon 737SP preamp, a Line 6 Bass Pod Pro, a Universal Audio UAD1 DSP card, Genelec 1029a monitors, a Presonus Monitor Station monitor controller, and a host of guitars and a few amps. Last, but by no means least, there's Jody's collection of Neumann and Sennheiser microphones.
Trap & Diffuser Construction
The eight-foot-tall corner bass traps were made of two-inch-thick 2 x 4 feet slabs of Owens Corning 705 series glass-fibre. Two pieces were stuck together to give a four-inch depth of glass-fibre, and the overall trap size is a hefty 4 x 8 feet. The frame is made from birch, backed by weed blocker fabric from Home Depot — a porous black fabric that's capable of letting water (and air) pass through it — which helps prevent fibres and dust from spreading into the room. This is inexpensive and you can find it at any garden centre. The fronts of the traps were covered with a muslin cotton fabric, stretched and stapled to the frame to improve the appearance.
 Cardboard-tube moulds were used to make effective and aesthetically-pleasing diffusers in both the control room and vocal booth.The three ceiling corner traps were made from one layer of two-inch 2 x 4 feet slabs of Owens Corning 705, with a layer of two-inch 2 x 4 feet 703 glued to the front. A skin of one-millimeter thick plastic drop sheet was fixed to the front of that. These were also backed with the weed block fabric and covered with dyed muslin cotton fabric.
The three vocal booth panels used a single layer of two-inch 2 x 4 feet 703 glass-fibre, fixed in a wooden frame, with the same weed block and muslin cotton fabric covering. The 'mirror point' panels followed the same general frame construction.
Jody's ceiling trap was made from two layers of two-inch 2 x4 feet 703 glass-fibre. He screwed two 2 x 4 feet traps together side by side and hung them from the ceiling. The corner wall to ceiling trap used one layer of two inch 2 x 4 feet 703. These were both constructed along the same lines as the other traps.
A further trap above the listening area on the angled section of the ceiling was made from one layer of two-inch 2 x 4 feet 705 in a wooden frame and with the same fabrics as the other traps.
The diffusers were constructed from concrete cylinder forms — a stiff cardboard-tube mould that's normally used to create concrete columns — but the cardboard tubes used at the centre of carpet rolls could easily be used in a similar way. The cylinder forms come in varying sizes (measuring eight, 10 and 12 inches in diameter). Jody's design used two of each size, and he cut them in half using a utility knife before gluing them to pieces of the sound board. The tubes were then covered with more muslin cotton fabric and filled with cotton wadding to help damp the cardboard, and also to absorb sound entering either end of the structure.
Diagnosis
From Jody's description of the problems, my first impression was that the boxiness was being caused by over-absorption of mid and high frequencies, which would not be helped by having all the foam concentrated in the lower half of the room — so I suggested to Jody that he take this all down and start again, which he bravely agreed to do. Similarly, the vocal booth was suffering from treatment that only worked in the upper half of the frequency spectrum, which, combined with a lack of high-frequency reflections to balance the sound, was making his vocal recordings sound boxy. What was needed was carefully distributed mid-/high-frequency absorption, combined with bass trapping. At the same time, it is important not to over-treat a room, as that can lead back to a boxy sound where the hard-to-absorb lower-mid and bass frequencies predominate. I suggested DIY traps based on Rockwood or glass-fibre of the type we've used in previous Studio SOS articles. Not only are they easy to construct but they also use readily available materials.
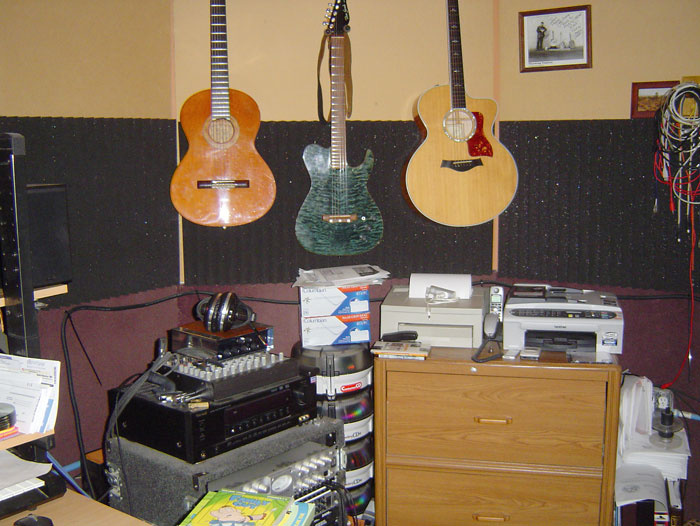
 These pictures show Jody's studio before the treatment. Although the room had originally been designed with soundproofing in mind, there'd been practically no attention paid to acoustic treatment.I also advised that, with the trapping completed, Jody would benefit from putting his Genelec speakers on rigid stands rather than shelves. This would have been the ideal scenario, but if shelf-mounting proved to be the only viable option I advised that good isolation pads, such as Auralex MoPads (or perhaps the more costly and more massive Primeacoustic Recoil Stabilizers) would help tighten up the low end. I then reminded Jody that it was essential the computer monitor didn't get in the way of the speakers — something that can not only mask the sound coming from the speakers, but also cause unwanted refections. Finally, I suggested that it might also further improve vocal recording to put an absorber (the sE Reflexion Filter, or one of the several commercial alternatives) behind the microphone.
Though mineral wool and glass-fibre are common building materials, Jody told us that he had to place a special order for the necessary Owens Corning 703 or 705 series glass-fibre, as his local hardware store didn't keep it in stock. After discussing the construction of basic absorbers, Jody decided to go for a mix of 703 and 705 (703 is recommended for mid- and high-frequency absorbers, and the heavier 705 for bass traps).
I suggested that some bass trapping would also be necessary, ideally fixed across corners, and Jody chose to really go to town in this department: "I decided to make my really big bass traps using several layers of 705 glass-fibre, so I purchased two boxes of 705 and three boxes of 703 to build the mid-/high-frequency absorbers. I started with a huge eight-foot-long trap and over the course of a week I eventually got a whole bunch made. I had a little help from two friends, Chris Carter and Chris Hellstrom, who both gave me additional links to videos and pointers on building this type of trap." See the box below for more detail on the construction of these traps.
The mid/high absorber design we'd suggested was the simple 'glass-fibre in a frame' design that we've used before, where the frame is covered with acoustically transparent fabric, which contains the fibres and improves appearance but lets soundwaves through to the absorber. In a typical room you'd cover no more than 25 to 30 percent of the wall surfaces with this type of trap (often rather less, in fact). The most important places to treat are the 'mirror points' on the side walls, and sometimes on the ceiling, where the sound from the monitors reflects back to the mixing position.
"My friend Chris Hellstrom came over," Jody explains, "and helped me with the 'mirror point' placement for some of the 703 traps, which resulted in traps being placed on both side walls just forward of the monitoring position, with two more directly behind each monitor. I added a further trap behind the computer monitor, just to make it look more even and to provide a little extra absorption."
On Reflection: Jody's Reaction
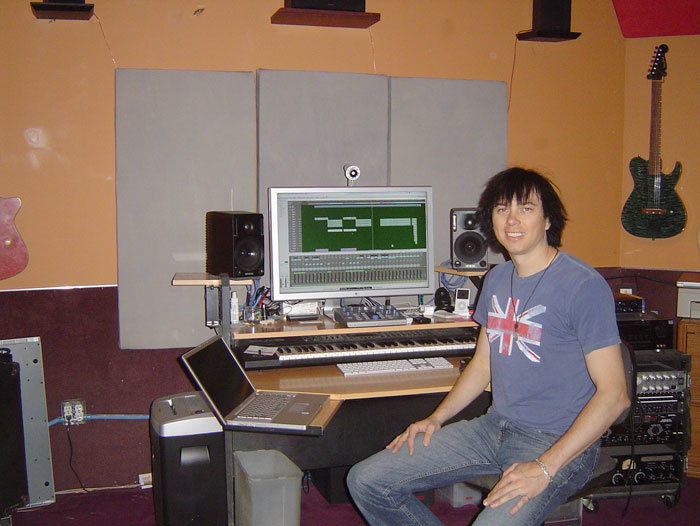 SOS reader Jody Whitesides in his revamped studio.
"After the first vocal take I did with the new treatment in place I had to stop and let out a shout of happiness. The client wondered what I was so happy about, so I explained that the vocal finally sounded like it should, with a much more 'alive' sound — not boxy, and very even. I've also done some intense listening to CDs that I'm very familiar with and have been able to hear more in these mixes than I've ever noticed before. I've done yet another sine-sweep of the room, and all the serious holes and bumps that I had in the spectrum are now much improved! Inevitably there are still some humps and bumps but nothing too bad or way out of whack, like the room was before. I can also hear the stereo field much better now so those side absorbers have really improved the imaging from my monitors. I can hear the bass, and where it needs to be, and already I've pulled up the mix on the song I mentioned earlier and have been able to make improvements to it. All very exciting.
"I use my room for a lot of recording and editing, and for work I do with co-writers. I also record and produce other artists, so improving the sound was the next logical step towards attaining the high quality that I've been struggling to achieve. The improvements are astounding, and all the suggestions made by Paul have been extremely helpful. I've been sitting here listening to music with a smile on my face, knowing that I can now create a much better mix with less effort. That is a major step forward in my book.
"Currently I'm in the midst of production on 50 new songs and I'm about to head out on tour for my current CD, so 2008 is shaping up to be a great year. It's even better now, thanks to the help from SOS."
Vocal Booth
Several 703 traps were placed in the back of Jody's vocal booth, and he put a small amount of the Auralex foam on the ceiling above the singer's area, as well as above the mic, to reduce reflections from above. Further corner traps were built for the angled areas in the main room, using 705 fronted with the 703, with a very thin layer of plastic on the front (one-millimetre-thick painter's drop plastic). This design is one Jody happened upon doing his own research: the glass-fibre helps absorb the low end, but the plastic sheet on top provides some high-end reflectivity to stop the room getting too bass heavy. He also constructed a trap on the ceiling where the four ceiling angles come together, and put a piece of 705 at the ceiling mirror-point.
Jody initially asked me about the use of diffusers in the vocal booth. It was a fair question, but I told him that I felt the room was too small for diffusion to really work. Jody decided that diffusers would look good anyway, and they'd certainly provide some useful high-frequency reflection and scattering, which would help to counter the bass-heavy sound of the space. The construction of these diffusers is described in the box elsewhere in this article, and they were placed both in the vocal booth and along the rear wall of the control room.
Face-lift
Having done so much work on the acoustics, Jody also took the opportunity to give the studio a bit of a face-lift: "I rearranged some of the furniture in the studio, including a filing cabinet and a nice sofa I purchased for clients to sit on (and for additional bass trapping!). Although I didn't discuss speaker location with Paul, I mounted my surround speakers on the walls, working on the principle that this should produce results similar to what you'd hear in a typical theatre-type arrangement. Guitar hangers and cable hangers had to be moved to accommodate the traps, and the the main desk was moved to the exact centre of the wall, as per Paul's suggestion. I repositioned the monitors to make an equilateral triangle for the listening position and picked up a Presonus Monitor Station to make it easier to control my monitor levels and to provide talkback to the vocal booth. Now that it is all done I feel like I have a new room!"
Remote Control
 This was an unusual project as I had to work entirely from photographs, drawings and Jody's own observations, so my approach to this Studio SOS was more empirical than calculated. It was clear from Jody's initial description that removing the existing treatment and fitting some basic absorbers would bring about a big improvement, and I'm very pleased with his reaction to the finished project. Because we based the trap designs on glass-fibre, the cost was pretty modest and the construction techniques reasonably straightforward. Although it was impossible to predict the exact improvement that adding bass trapping would produce, it is very difficult to add too much bass trapping to a room, so Jody did the right thing by trapping as many corners as he could. Contrary to instinct, bass trapping doesn't reduce the amount of bass you hear in a room but rather evens out the modal humps and bumps that occur in any untreated room: you don't lose bass end with heavy trapping. Credit must go to Jody, not only for all the hard work he put in but also for researching trap design, rather than relying on me to fill in all the details. His diffusers look the part and should improve the sound in the control room. Even though they won't do much diffusing in the vocal booth, they'll help reflect a bit of high end back into the space.
Though this project took some months and many emails to complete, I'm very pleased with the outcome. I'd like to thank Jody for trusting us with his studio design, though it's a bit frustrating not being able to hear the results for ourselves — and, of course, the biggest down side is that we only got a photo of a packet of Hob Nobs!