 Photo: Blake Lewis at Stewis Media
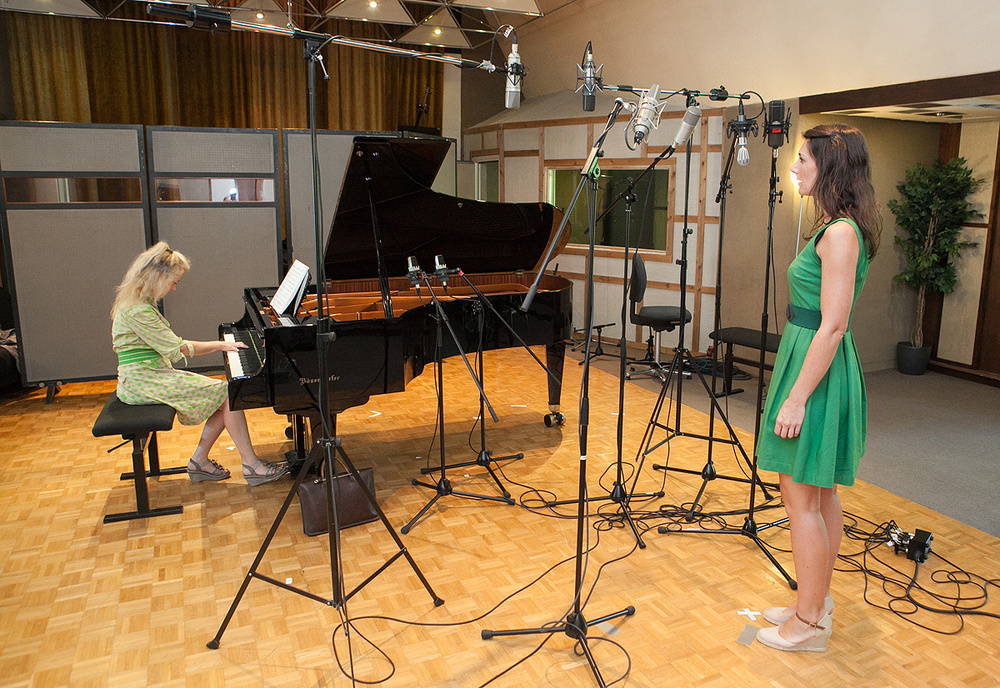
Recording a mezzo-soprano with piano accompaniment presents a unique set of challenges for our in-house engineer.
One thing that small-studio engineers often forget when recording acoustic ensembles is that there’s no rule that says performers have to set up as they normally would on stage. This is particularly true when you’re trying to capture a solo instrument with piano accompaniment, where there are a number of reasons to abandon the traditional audience-facing configuration in favour of a scheme where the soloist faces backwards towards the piano. But rather than arguing this point in the abstract, let’s consider it in the context of this month’s featured session, which serves as rather a neat case-study.
The soloist in question was the talented classical mezzo-soprano Camilla Francesca Bull (http://camillabull.com), ably accompanied by pianist Beatrice Menz, and my task was to record four arias for Camilla’s publicity purposes. The venue was Munich’s Mastermix Studios, which I’d recommended to the musicians on account of its in-house Bösendorfer grand piano and top-notch collection of microphones and preamps, although the medium-sized live room did also dictate that we’d have to use digital processing to generate any desired concert-hall reverberation at mixdown.
Recording Setup: Stage Versus Studio
The first, and arguably most important, reason for choosing any studio setup is that it helps the performers, and in this instance turning Camilla to face the piano improved the musicians’ experience on two counts: firstly, each performer was now projecting their sound directly at the other, giving them a better idea of what the microphones would be picking up; and, secondly, the players now had direct eye contact without having to move anything but their eyeballs. (This latter issue has technical ramifications too, of course, as it’s much more difficult to capture a consistent timbre from an audience-facing soloist who has to keep turning round to see their accompanist.) Admittedly, some performers may take a few minutes to acclimatise to this kind of layout, but in my experience they usually end up preferring it that way pretty swiftly — and Camilla and Beatrice took to it like ducks to water!
From an audio-engineering standpoint, having the performers either side of a stereo mic rig presents further advantages, because both soloist and accompanist can be freely repositioned relative to this array to optimise the balance, depth and stereo positioning of each sound source. So, for example, I wanted to centre Camilla in the stereo image, but didn’t have to stand her directly in front of the piano to do that — a performing position where she would have felt overwhelmed by the piano sound and I’d have had the devil’s own job with piano spill on any vocal spot mic! On a practical note, though, it proved much more convenient to move my mics than move the piano in this case, as I was rigging the mics around the performers’ pre-recording rehearsal, so my game-plan was to find a main-rig position to suit the piano first, and then to place Camilla in relation to that.
The Main Stereo Rig
 In order to find promising positions for his main stereo mic rig, Mike grabbed a ladder, asked the studio owner to play the instrument, and then simply navigated by ear.As usual on my sessions, time was rather limited, so I deferred to the studio owner Stefan Gienger (a fine pianist himself) when it came to choosing a position for the piano. He also helpfully tickled the ivories for me while I grabbed a step-ladder to hunt for promising main-rig miking positions by ear, which meant that I already had a significant head start once the musicians arrived. Although I often like the sound of piano mics placed right along the line of the instrument’s lid, that position seemed a little shrill here, so I decided instead to centre my main mic pair a couple of feet around towards the tail. The miking height was also a crucial factor, with even a foot of movement either way making profound differences to the timbre. I find myself increasingly gravitating towards spaced pairs of omnis for stereo recording in acoustic styles, partly because of the appealing stereo width and decorrelation you get from spaced-pair techniques in general, but also because I’m a fan of the clearer off-axis response and naturally extended low end that’s typical of omnidirectional designs.
On this session I put up a pair of Mastermix’s Neumann U87s in this role. Rather than setting up these main mics on a stereo bar, though, I deliberately opted for separate large counterweighted boom stands so that I could place one on either side of the performers, thereby avoiding obstructing the sight line between them. Intuitively, the most obvious setup for these mic stands might seem to involve extending the boom arms diagonally upwards towards the mic position, but instead I chose to extend the stand’s vertical column all the way to the miking height, such that the boom arms then reached across horizontally. One reason for this was to make sure that the boom arm’s heavy metal counterweight was well out of harm’s way. (You really don’t want one of those colliding with the back of your head, believe me!) But this configuration also meant that I could easily rotate the boom arms if I wanted to favour either performer with the mics’ brighter on-axis tonality. As it turned out, I didn’t need this facility in the end, but there’s never any harm in thinking ahead like this when time’s of the essence.
 Despite the small forest of microphones, care was taken to ensure a clear sight line between the performers in order to facilitate their musical communication.There’s only so much you can do to guess miking positions just by listening in the live room, however, because mics don’t respond exactly the same way as our ears. I’d already tried to compensate for the greater directionality of my hearing (compared with omni mics) by aiming for a head position with a slightly over-dry sound while doing my initial reconnaissance, and luck was clearly on my side too, as both the general timbre and the wet/dry balance of the main pair passed muster for me straight away. Only the stereo image felt a fraction too wide, based on a preliminary inter-mic spacing of about two feet, so I nudged the mics about six inches closer together to address that. It’s worth pointing out that stereo width is rather a matter of personal taste, though, and I imagine plenty of engineers would happily have left things as they were. But in this instance I wanted to ensure decent mono compatibility, given that I knew these recordings would be posted online, and therefore might well be played back via single-speaker mobile devices. Placing Camilla in relation to the mic rig was extremely straightforward, keeping her equidistant from the mics (to maintain her central stereo image) while experimenting briefly with her front-back placement to refine the ensemble balance and the amount of room sound.
Omni Close Mics For Piano
By this point the sound was already pretty respectable. Indeed, had session time been even scarcer I could probably have created a decent mix with those mics alone. Nevertheless, I did still want to add close mics to the setup, so that I’d have the option of refining the musical balance after the fact. To this end, I’d already line-checked a half-dozen other mics prior to the musicians’ arrival.
 In order to give better audibility of the piano’s higher register, the instrument’s spot microphones were moved lower down, bringing them closer to the upper strings.
For the piano, I’d readied a spaced pair of AKG C414EBs, switched to their omni polar pattern. Although a lot of recordists would instinctively use cardioid-family mics for this, in order to minimise vocal spill, I personally prefer using omnis wherever possible when close-miking large instruments, to catch a more holistic picture of their frequency dispersion. Yes, you get more spill with omnis, but it usually sounds more benign than you’d expect with cardioids, because omnis tend to have a smoother off-axis frequency response.
Given that I was after a fairly conservative stereo spread overall for this project, I only spaced the two piano mics about eight inches apart to ensure that the instrument’s image wouldn’t extend more than about two-thirds of the way across the stereo panorama, despite my close-miking from directly above the ‘crook’ of the piano casing. A starting position midway between the casing and the lid favoured the lower register too much, so I lowered the mics about 12 inches to bring them closer to the upper strings, which gave a more even balance.
Vocal Mic Shootout
For Camilla, I’d prepared a line-up of four different spot mics. Three of these were large-diaphragm condensers (a supercardioid Neumann U47 FET, a Neumann U67 in cardioid mode, and a cardioid Schoeps V4U), while the fourth was the trusty little Superlux R102 ribbon mic that has bailed me out of harshness problems on many a previous session. I wasn’t planning to use all of those in the mix — apart from anything, that would have been unwise on grounds of comb-filtering interactions between them. Rather, I effectively wanted to do a vocal-mic shootout on the hoof, selecting whichever model most suited Camilla’s voice, but was nevertheless planning to record all four mics so that I’d have the option to reassess my selection at mixdown.
 Mike set up a selection of different vocal spot microphones, not to combine their signals, but so that he could quickly evaluate which would be most suitable for Camilla’s voice.
Although it’s common practice to mic chart-style singers quite close in the studio, this approach is rarely advisable for opera singers, because they’re specifically trained to project their sound over much greater distances. Generating that kind of acoustic power involves capitalising on the resonant characteristics of the head and torso, so if you just mic up the vocalist’s mouth your recorded timbre will likely be thin and lacking body. That said, I actually managed to overcompensate on this session at the outset, with all my vocal mics originally placed around three feet away from Camilla. While this gave a well-balance tone, I felt that the amount of room sound they captured at this distance would compromise my ability to adjust the vocal balance, so I ended up moving them in by nine to 12 inches for a drier result.
 from picking up too much spill from the accompanist, it was switched to its figure-of-eight polar pattern so that its rejection zone would be directed more towards the piano.") To prevent one of the vocal spot mics (a Neumann U67) from picking up too much spill from the accompanist, it was switched to its figure-of-eight polar pattern so that its rejection zone would be directed more towards the piano.I then used the 10 minutes of setup time that remained to try to get the most appealing sound from each of the mics by refining its positioning. Again, to avoid obstructing sight lines I placed the mics slightly to one side, with both Neumann mics to Camilla’s left and the other two mics to her right. The V4U sounded very respectable straight away, and the Superlux only required one move to find a similarly promising location. The U47 FET left a lot to be desired, though, even after a couple of position changes, so I moved it over to Camilla’s other side and eventually had a little more joy with it there. The U67, on the other hand, I liked a lot where it was, but found that it was picking up more piano spill than I’d have liked, and I had to switch to its figure-of-eight polar pattern to achieve a significant improvement there, given the mic’s physical orientation.
To prevent one of the vocal spot mics (a Neumann U67) from picking up too much spill from the accompanist, it was switched to its figure-of-eight polar pattern so that its rejection zone would be directed more towards the piano.I then used the 10 minutes of setup time that remained to try to get the most appealing sound from each of the mics by refining its positioning. Again, to avoid obstructing sight lines I placed the mics slightly to one side, with both Neumann mics to Camilla’s left and the other two mics to her right. The V4U sounded very respectable straight away, and the Superlux only required one move to find a similarly promising location. The U47 FET left a lot to be desired, though, even after a couple of position changes, so I moved it over to Camilla’s other side and eventually had a little more joy with it there. The U67, on the other hand, I liked a lot where it was, but found that it was picking up more piano spill than I’d have liked, and I had to switch to its figure-of-eight polar pattern to achieve a significant improvement there, given the mic’s physical orientation.
The Proof Of The Recording Is In The Mixing
Once the setup was complete, the rest of the recording process was plain sailing, with a handful of takes for each piece providing plenty of worthy material for the editing stage. Following the session, I compiled the master takes from my notes of the performers’ preferences, and after a couple of small revisions there we were ready to proceed to mixdown.
Now, I always do my best to maximise the quality of my recordings during the tracking process, but nonetheless I never feel I can really judge the success (or otherwise!) of my mic techniques until I actually try to build a final mix out of them. In this instance, the good news was that my basic timbral decisions for the mics seemed to hold water, which meant that the dry mix came together without the need for any per-channel mix processing at all. I’d made a point of referencing a few commercial recordings in the Mastermix control room at the very start of the tracking session, which I imagine helped in ‘calibrating’ my ears to how Stefan’s different sets of speakers sounded in that monitoring environment.
 A plan of the whole eight-mic setup used in this month’s featured session.Less welcome was the discovery that my favourite-sounding vocal spot mic was suffering from dynamic tonal variations, which made it more or less unusable as an ensemble-balancing aid. Thinking back to the session setup, the reason for this rapidly dawned on me. As I was finishing setting up the vocal microphones, Camilla availed herself of a music stand. This was fairly sturdily built, so I immediately discussed with her the importance of angling it to avoid strong reflections into any of the spot mics, in order to avoid unwanted comb-filtering artifacts. What should also have set off my alarm bells, though, was that she positioned the stand about 30 degrees to the right-hand side of her sight line to Beatrice. This meant she had to turn her head slightly whenever she switched her attention between reading the score and watching her accompanist. While this didn’t appreciably affect the tone of the mics around the music stand, it did make a significant difference to the sound picked up from the U67’s location on her left-hand side. Fortunately, my second-choice mic here, the Schoeps V4U, only needed a couple of decibels of low shelving boost below 400Hz to step into the breach.
The other minor mixing challenge that arose from my choice of mic techniques was that introducing the spot microphones into the mix made the recorded ambience from the tracking room at Mastermix appear rather narrow. It stands to reason, of course, as the piano mics were too close to each other to give a full-width image, and the vocal spot mic was mono. This didn’t turn out to be too tricky to remedy, though, given that I was planning to add a healthy dose of digitally generated reverb anyway. All I had to do was use Voxengo’s freeware MSED plug-in to take out a couple of decibels of Middle signal from the reverb effect (courtesy of the ‘Medium Rich Hall 2’ preset of Lexicon’s LXP Native plug-in) and that helped give a more even spread of ambience across the final panorama.
Once those technical issues had been resolved, the mix could proceed to the fine balancing stage, where I rode the piano and spot-mic faders to optimise the musical balance and lyric intelligibility throughout each piece. As a final touch, I also applied a dynamic EQ over the full mix to tame a couple of vocal resonances (1.2 and 7.2 kHz) that occasionally became a touch piercing for certain vowels in Camilla’s higher register.
Win-Win Studio Scenarios
Broadly speaking, the art of recording is usually the art of compromise, with tracking engineers developing ever more elaborate technological workarounds to accommodate the needs of the performers. Occasionally, though, recordists can have their cake and eat it too, and the studio setup I’ve described this month is one of those rarities, inasmuch as it was as helpful for the performers as it was for me. So don’t be afraid to deviate from traditional performance layouts in the studio the next time you record an ensemble — you may discover a similar win-win scenario that way.
Full Stick Or Short Stick?
A grand piano can be a bit of a beast in terms of volume, and a powerful concert instrument can sometimes overwhelm soloists, even under the fingers of a sensitive accompanist. In concert situations, a popular solution is to use a shorter stick to prop up the piano lid, so that it’s only open about a foot. Unfortunately, though, this strategy also has knock-on effects for the piano’s timbre, so I’d generally advise against it if at all possible in recording situations. You may get the balance you want, but no-one’s likely to be thrilled with the tone.
Here again, the studio setup described in this month’s column can make life easier for the engineer if the piano’s eating the soloist for breakfast, because you can set up cardioid spot mics for the soloist with their rear rejection nulls pointing at the piano for maximum spill-reduction, and then use the resulting low-spill vocal signal to redress the level imbalance.
Avoiding Noisy Page Turns
Noisy page turns can be a real pain in the neck on classical sessions, but to their credit Camilla and Beatrice had done their best to banish them by Sellotaping photocopies of the sheet music together into long multi-page strips that, for the most part, obviated the need for page turns at all. However, one of the arias was considerably longer and more complicated than the others, so that even the grand piano’s wide music stand was unable to accommodate the necessary page count. So what we did in this case was record the piece in two sections, with several bars of overlap between them, allowing me to stitch the two sections together at the editing stage without any page-turn noises.
Lesson Learned!
If you’re a regular follower of the Session Notes articles, you may have seen my article in SOS April 2017 about recording a choir at this very same studio. Following that tracking date I was kicking myself for not using enough suspension shockmounts, since footfall thuds on some of the mic signals subsequently caused me a few mixdown difficulties. So I came fully tooled-up for Camilla’s session and, as expected, once all the mics were shockmounted (except the U47 FET, which has a built-in standmount), her recordings ended up as clean as a whistle in this regard.
Listen Online!
Mike has made available a number of audio examples from this session, so you can hear for yourself what he’s describing in the article. You can find them here:
Download | 160 MB