Recording a band is tough enough in the studio, but working on location adds another whole level of complexity. So here's how to overcome the inevitable setup gremlins and fix some of the most common problems at the mixdown stage.
 Over the past few years, home recording has tended to move away from recording bands playing together, and it's probably fair to say that, in most cases, the process instead focuses on building up MIDI and audio tracks in stages, usually one track at a time. Nevertheless, this paradigm breaks down when you need to record a band or group of musicians who need to play together in order to create the necessary musical interaction. Being realistic, ensemble music evolved from musicians playing together, so it's no surprise that it often suffers quite badly when you attempt to break it down and then record it a part at a time. The question is, how can you record a typical band using typical home recording equipment?
The Gear You Need
Interestingly, the recording equipment need not be expensive or sophisticated, though you will need sufficient good-quality, suitable microphones and probably an analogue mixer of some kind. Most of the skill and effort goes into miking the various sound sources, and that doesn't really change whether you're recording a live performance straight to stereo or whether you're recording every guitar, drum and cymbal on its own track.
When recording multiple performers in the same space, the biggest problem is usually spill or sound leakage from the louder instruments into microphones set up to record other instruments or voices. For example, the drums and electric guitar invariably pick up on the vocal mic and electric guitars tend to be picked up by drum overhead mics. If the room is large enough and you have access to acoustic screens, the levels of spill may not be a problem — a degree of spill may even contribute to the sound of the recording, as is evident from listening to some early pop material where it was common to record what was in effect a complete live performance in one take. There are photographs of some of the Elvis Presley recording sessions where he can be seen singing relatively close to the drum kit, but, as a rule, this is not recommended!
Today, even commercial studios tend to have far less space than the gymnasium-sized studios used in the '50s and '60s, so vocalists are often placed in a sound-attenuating booth with a glass or perspex window that allows them to remain in visual contact with the rest of the musicians. Using a vocal booth eliminates the spill problem, but introduces the need for both the singer and the band members to use headphone monitoring so that they can hear each other.
In the home studio, vocal booths are an uncommon luxury, which leaves you with only a couple of practical options, the first of which is to let the singer record along with the rest of the band so as to get the right band 'feel', then replace the vocal part afterwards — the level of spill on the original vocal track will almost certainly be unacceptably high. This is not an uncommon way of working and, in most cases, won't ruin the feel of the performance, though you will sometimes come across singers who can't deliver the goods as well when overdubbing as they can in live performance. If this is the case, you need to try option two.
Using A Separate Booth
This second option involves having the singer perform at the same time as the musicians, but in a different room so as to improve the isolation. In my own studio (where I have a window between my studio and a utility room that doubles as a recording space) I often resort to recording the singer in the control room with the band in the utility room, which has the same benefits as working with a vocal booth. The main limitation is that any recording equipment (and people) in the control room have to be pretty quiet so as not to pick up on the vocal mic. Note that a high degree of vocal separation is absolutely essential if you plan to use pitch correction (such as Antares Auto-Tune) on the finished track.
If you don't have the luxury of two adjacent rooms as I do, you can at least run a long mic lead to a kitchen, hallway or bedroom and record the vocals and/or acoustic instruments from there, though you lose the line-of-sight communication between the singer and the band, which may be desirable for providing visual cues. A low-cost closed-circuit TV system (a complete small monochrome security system with monitor costs around as much as a good effects pedal!) might be a viable addition to your studio if this is a regular recording situation for you, otherwise you either have to work within the limitations you have or transfer the project to a larger venue, at least at the tracking stage.
Changing Rooms
A bigger venue could mean a larger studio, but most modern recording equipment is so compact that you might easily adjourn to a village hall, school, or community centre and record the tracks there with the benefit of greater physical spacing between the band members and the singer. Indeed, by using such a large space, you can go back to the traditional scenario where everyone plays at once in the same room. You may get away without having to provide any additional isolation at all, though improvising sound absorbers out of blankets, mattresses or whatever to separate the band members (well, at least their instruments/amplifiers) from each other and especially from the singer can help lower the spill further. A foldback speaker can be used to provide the band with some vocal to use as a guide, but try to keep this as quiet as possible and ensure that the mics are arranged so as to keep their least sensitive axes pointed towards the monitor where possible. Spill into drum mics isn't usually a problem except for distance/ambience mics, and the same is true of close-miked guitar and bass amps.
Don't expect absorbers to bring about a huge increase in separation, but even a few decibels can make all the difference. Should you want to make something more permanent for this purpose, a sheet of plywood backed with foam tiles and fitted with a couple of 'feet' works reasonably well, and it has the benefit that you can reverse it to provide a more reflective environment where you need to liven up the sound of drums or acoustic instruments.
I've done my share of recording in schools and village halls, and there are a few practical details worth passing on. The first is this: don't assume that, because you're close-miking most things, the room acoustics don't matter. Not only does a very reverberant room exaggerate spill problems by reflecting sound where you don't want it to go, but you'll also nearly always find that the sound from the drum overheads is awful. You may have read about recording drums in live spaces, but there are good-sounding spaces and bad-sounding ones! Furthermore, some types of music don't suit very live drums, so if you have a choice then pick a venue that offers more than bare walls and a solid wooden floor. Carpeted halls or social clubs with medium-height ceilings often work better than tall and reflective halls.
I recently worked on a project where I hired out my mobile recording rig to a local semi-electric ceilidh band to record an album in a church hall, and I was faced with exactly the problems I've just mentioned, specifically a very reverberant sound on the drum overheads. The deal was that I would mix the album after they recorded it and, as it turned out, this session provided another very valuable lesson. Because the band were unfamiliar with recording, I set everything up for them and checked the levels and the sound before leaving them to record their songs. All they had to do was hit Record, Play and Stop. The violin was fitted with a pickup and was fed via a graphic EQ pedal, but I took a DI split from the output of the pedal using a DI box before it went into the amplifier. It sounded fine when I was setting up, but when I came to check the tapes after the recording, I noticed the violin becoming progressively more distorted as the session wore on. It was certainly too distorted to use, so I asked the violin player when he'd last changed the battery in his EQ pedal. He replied that it seemed to be completely flat by the end of the session, so he'd changed it then — but he hadn't noticed the distorted sound caused by the dying battery when monitoring via his combo amp. The outcome was that, because of that dead battery, we had to spend another few hours rerecording all the violin parts back in my studio before we could mix the album.
Getting Into The Details
 Figure 1. From the polar patterns superimposed on the mics above, you can see that a cardioid mic provides most rejection of sounds arriving from the rear, while hypercardioid mics have two rejection nulls off axis.The previous few paragraphs have covered the basic setup options, and stressed that you also have to consider spill between instruments, not just instrument amplifiers and drums leaking into vocal mics. Now let's move on to vocals, which are the trickiest part of ensemble recording. Assuming you're going to record the vocal at the same time as the band, and in the same room, you need to think about using sound absorbers to reduce the degree of spill, as discussed in the previous section. The machinations of the inverse square law being as they are, the smaller the room, the harder you have to work to keep the spill down to an acceptable level.
The first stage of this is choosing a suitable directional microphone that can be used up close, with a pop shield of course. If you aim the least sensitive part of the mic (the back in the case of a cardioid) at the rest of the band and then use absorbers behind, at the sides of and above the singer, you'll get the best possible compromise between isolation and line-of-sight communication. Also keep in mind that, if you use a hypercardioid mic, its deaf spot isn't directly behind, but somewhere between the rear axis and 90 degrees, as shown in Figure 1. Your mic handbook should include a polar plot that will show you exactly where the area of least sensitivity lies.
Close-miked drums seldom suffer serious spill from other instruments, but putting half-height absorbers between the drum kit and the other instruments/amplifiers can help stop the drums spilling where they're not welcome. In smaller rooms (or rooms with unfortunate acoustics) you may need to bring the overhead mics closer to avoid picking up spill, but in most cases the miking of the drums will follow the textbook method: close dynamic mics on each drum around a couple of inches from the head (inside the shell in the case of a kick drum with a hole in the front head), a small-diaphragm capacitor mic to one side of and a little above the hi-hats, and a pair of overhead capacitor mics to capture the cymbals and stereo ambience. The kick drum will usually need damping with a folded blanket, but if you're after that big John Bonham sound, you may prefer to use a complete front head and back the mic off a foot or two from the front head to give the sound room to develop.
 Some dense fabric or a cushion in the kick drum can help to damp the sound.Photo: Richard EcclestoneA second mic close to the batter head might improve the attack of the sound, though you should try inverting the phase of this mic relative to the front mic, as that will produce a more solid sound in most cases. Some engineers also like to use a second mic below the snare drum, in which case you should again experiment with the relative phases of the mics to see what sounds best. In theory, the two mics should be set so that one is out of phase with the other, but theory and practical results don't always agree, so try both options.
While spill into the drum mics (other than the overheads) might not be a serious problem, you should position the individual mics so that the drums don't spill into each other's mics more than they have to (for example, point the hi-hat mic away from the snare drum rather than directly at it). Also keep an ear open for that bane of live recording, the snare drum that rattles when the bass is playing. Some books on recording (and this probably includes some of mine!) advocate trying things like retuning the snare drum, sticking tape on the snare heads or even taping coins to the underside of the snare head, but in my experience this does little to alleviate buzzing and only ruins the sound of a well-tuned snare drum. The only complete solution is to relocate the source of the problem, in this case the bass speaker, at a greater distance from the drum kit, or to reduce the level of the bass amplifier.
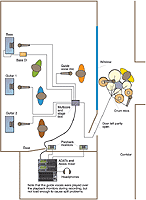 Figure 2. The setup for recording a school band on location. By locating the drums in the corridor and positioning mics carefully in the main room, spill was kept to manageable levels.A recent situation where I set up a band to record was where I got involved with a young band called Backwash, who were winners of a regional schools Battle Of The Bands contest (I was conscripted onto the judging panel), and we decided to try recording everything except the vocals at their school. We did record a guide vocal, but this was later replaced in the studio. The classroom normally used for music teaching was pretty large and had an en suite recording studio, though I opted to take a couple of ADATs plus my own Alesis 3204 mixer because it's a system I'm familiar with. I set up my system inside the school's control room, which kept most of the noise out, but because the studio's monitors had a burnt-out tweeter on one side, I did all my monitoring via headphones. To get a reasonable amount of drum separation, I asked the band to set up the drum kit in the corridor, which was separated from the classroom by a glass wall. This provided good line-of-sight between the players, and leaving the door ajar allowed enough sound in and out to avoid the need for headphone monitoring. The result was that we achieved extremely good separation without interfering too much with the way the band usually played together.
Electric Guitars
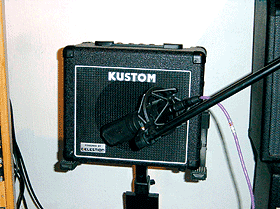 A small 1x12 combo can create a good sound for recording guitar without making so much noise that spill becomes problematic.It's often better to record the electric guitar using a small amplifier that's working hard, rather than using a large stage rig at low volume. This way you'll get a more dynamic sound that conveys an impression of loudness, while at the same time not making so much noise that spill becomes a complete nightmare.
A small 1x12 valve combo makes an ideal recording amp for just about any electric guitar style and, provided that you have some long cables, there's no reason not to site it in the next room or even in a cupboard, along with its microphone, and then use the headphone monitoring system to ensure everyone can hear it. I've recorded with guitar amplifiers and their mics buried under piles of rugs, hidden behind sofas, stuck out in the hallway — all kinds of places — but as long as the player can hear the sound over headphones (or via the control room monitors if he plays in the control room), it doesn't matter. A more elegant solution is to use an enclosed speaker in a box, complete with correctly positioned mic, as the best of these sound almost identical to miking up the amp's own cabinet.
 If your acoustic guitar has a pickup output, this can often be used in place of miking up where spill levels are high.Photo: Mark EwingIn our Turkish Studio SOS article a few issues back, we ended up moving everything out of the studio room except the acoustic guitars and vocals. In fact it's easy to get separation when recording at home, because there are usually several different rooms you can use at the same time — what's more challenging is finding a solution where the players/singers can still see each other while performing and can hear each other adequately via the headphone monitoring system.
If you're lucky enough to have a good acoustic space to work in, along with good-sounding instruments, you can approach the mix pretty much as you would a studio recording. However, because of the effect of spill and room acoustics, its sometimes necessary to work a little harder when mixing something recorded on location. In the case of the school recording mentioned a little earlier, I hedged my bets with the bass guitar by recording both the miked cabinet and a DI, but still had to apply some pretty stiff compression to even up the sound, and you have to balance the use of compression with the knowledge that every decibel of gain reduction you use equates to a decibel rise in any low-level spill and noise present on that track.
Gates seldom produce good results in situations where the level of spill is anything other than minimal, and it's also a lot harder to gate the individual elements of a drum kit when the recording has been made in a reflective environment, as the school corridor proved to be. In this instance, I tried using a frequency-conscious gate on the kick drum while mixing, but couldn't get a clean enough result because the drummer played a number of low-level kick beats amongst the loud ones, and the gate would often remove these along with the other spill. In the end, the drum mix sounded better without a gate.
As it turned out, the drum tracks sounded pretty good, with the possible exception of the kick drum, where a combination of tuning, beater type and playing style produced a less distinct sound than I'd usually want for their type of music. As I transferred everything from the ADATs into Emagic's Logic Audio prior to mixing, I was able to try a few plug-ins to create a better sound, and some of those ideas are worth exploring here as they're not necessarily what you'd immediately think of when processing kick drums.
The first thing I tried was adding some kind of distortion to emphasise the higher harmonics, and after trying all Logic's different overdrive/distortion plug-ins, I found Bitcrusher the most useful, though you have to be careful not to overdo it. After this I used Logic's own Exciter plug-in to emphasise the click of the sound. This stiffened up the sound significantly, but I still wasn't getting the definition I wanted, so I decided to try adding early reflections using Logic's Platinumverb with the early reflections/reverb balance set so that almost the entire effect comprised early reflections. By juggling with the diffusion and room size (using quite small room settings), I discovered that it was possible to tune the effect of the early reflections so that they reinforced the kick drum in a fairly natural way. Once added to the rest of the kit, including such kick drum spill as had found its way onto the other drum mics, the result was far closer to what I wanted, so sometimes these drastic measures can pay off. Interestingly, because of the tonal changes I could create using these plug-ins, conventional EQ proved unnecessary on the kick track — though I tried it of course.
The other trick that helped clean up the drum sound was to use a low-cut filter plug-in to remove excessive low end from the overhead mics. You can often take out quite a lot of low end without compromising the sound, as the 'weight' of the drums usually comes from the close mics. Furthermore, I found that using a very light dose of Logic's Exciter with the frequency set to around 2.5kHz helped restore a little definition to the cymbals. As a finishing touch, I used a little short plate reverb on the whole kit except for the kick drum, and that really helped bring it to life.
Salvaging A Limp Kick Drum
There is no substitute for getting sounds right at source, but when you're dealing with live or location recordings you sometimes have no choice in the matter. On one mixing job I did a few months ago, the kick drum sound was somewhat indistinct and the track also had more crosstalk from the other drums than I would have expected, which lead me to believe that the mic was inappropriately positioned inside the drum. There was so much crosstalk that my frequency-conscious noise gate just didn't want to know, and no matter how much EQ I applied I couldn't get a good attack to the sound. Whatever the cause, my job was to try to find a solution, and though I could improve the sound using a combination of plug-ins, I still wasn't happy with the end result.
 The SPL Transient Designer can be useful for salvaging limp drum recordings, because its effect isn't very level dependent, unlike most other dynamics processes.Photo: Mark EwingSo I decided to borrow an SPL Transient Designer to see if that would do the trick. I've reviewed the Transient Designer in Sound On Sound, so I know how effective it can be, but this was my first chance to use one on an actual project — and a difficult one at that.
For those unfamiliar with the unit, it's a rack processor that uses compression and expansion to modify the attack and decay characteristics of a percussive sound, but where it differs from regular dynamics processors is that it automatically works over a wide range of signal levels rather than relying on an adjustable threshold. That means both loud and quiet beats get essentially the same treatment. The design has also been simplified so that there are only two knobs to adjust, one to set the attack character and one the decay/sustain. Any sound can have its attack changed from soft to hard, while the decay can be adjusted from short and tight to long and ringy.
Presented with the rogue kick drum track, setting the Attack control to around the three o'clock position and the Sustain knob to around nine o'clock produced a sound that was infinitely more usable than the one I started out with. The attack now had click and definition, while the decay time was shortened to create a more punchy sound. As a bonus, the expansion process used in shortening the decay time also reduced the level of the crosstalk. Although the sound heard in isolation still wasn't perfect, when it was mixed in with the sound from the overheads, it worked a treat. My only regret is that SPL don't currently do the Transient Designer as a VST plug-in!
Final Mixing Tweaks
The problem I have with modern pop/rock styles (technical rather than artistic you understand!) is that many songs seem to feature two heavily distorted guitars playing at the same time throughout most of the song. The school band I recorded certainly did! Though it may work OK live, two distorted guitars playing chords is a recipe for sonic confusion on record, and as the guitars inhabit mainly the mid-range, they can also conflict with the vocals as well as each other. To tighten and separate the guitar sounds, I processed one of them using conventional compression while the other was fed through Steinberg's Warp virtual guitar amp plug-in set to its clean channel setting — I didn't need more distortion! By adjusting Warp's tone controls and trying the different cabinet models, I managed to create more contrast between the two guitar parts and also removed a little fizziness that was present courtesy of the solid-state amp the guitarist was using.
From what I've written here, you've probably deduced that recording bands relies on observing practical rules relating to spill and separation, but then you also have to think on your feet, anticipate problems, and come up with solutions based on what you can get your hands on at the time. Furthermore, whatever you do mustn't interfere with the band's ability to give their best performance. Because most of us now have some kind of stereo editing software, it pays to capture two or three takes of each song so as to allow you the opportunity of compiling one ultimate take later. In nearly all cases you'll want to record the vocals as a fresh overdub in the studio prior to mixing, so make sure that you don't get a noticeable amount of guide vocal spill on any of your other instruments at the recording stage. Acoustic guitars are particularly vulnerable to spill problems, so if you're recording them along with the band, a pickup system is usually the best option. Alternatively, you can replace the acoustic guitar parts along with the vocals when you get back to the studio.
Also be aware that there may be more 'fixing it in the mix' than you might normally be comfortable with, but the more effort you put into getting the original recording right, the easier mixing will be. Whatever the difficulties, recording bands gives you a chance to experiment with 'real' recording, which has become something of a forgotten art since people started recording things a part at a time. I can't recommend it too highly as a means of gaining a lot of recording experience in a short time!