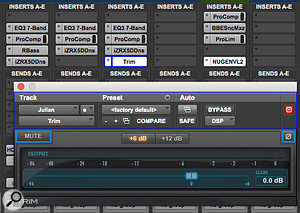
 In the HD-only Trim automation mode, faders turn gold, and can be used to apply offsets to any existing level automation.
These small tips could make a big difference to your Pro Tools experience!
In this month’s workshop, rather than discuss a single Pro Tools feature in detail, I thought I’d compile some of the smaller tips that I’ve accumulated over the years. However experienced you are with the program, I find there are always new tricks to learn!
- Make Edit Selections On The Fly
Sometimes it is easier or more appropriate to make selections whilst playing, rather than auditioning the material before placing the cursor. To make selections on the fly, put Pro Tools into Play, and when the playback cursor reaches the spot you want to mark as your ‘in’ point, hit the down arrow key on the keyboard. (I’m talking about the arrow or cursor keys that are usually in a block of four to the right of the Return and Shift keys.) When you want to mark the ‘out’ point, hit the up arrow key. Don’t worry if you are a little inaccurate — it’s easy enough to Shift-drag with the Selector Tool to tidy up the selection.
Those who already use these shortcuts might see this as basic Pro Tools operation, but in my experience, many people learn Pro Tools using the mouse and neglect the time-saving potential of keyboard control. To help me remember that the down arrow is the in point and the up arrow the out point, I think of a tape head coming down onto the tape at the beginning of a drop in and up again and the end of the drop in.
- Trim Read Mode To Rebalance A Mix (HD Only)
If you own an HD system, you should definitely take the time to learn one of the few HD-only features left other than surround: the HD-only advanced automation options. Some of them can be intimidating to newcomers, but here is a really helpful tip that doesn’t require in-depth understanding.
No doubt we’ve all found that it becomes more difficult to rebalance a mix once volume automation is in place and Pro Tools has taken control of the faders. However, if you are working on an HD rig, you can automate yet still keep control of your faders using the Read Trim feature. Trim mode works in combination with the other automation modes (Read, Touch, Latch, Touch/Latch and Write) and is useful when you want to preserve all of your volume automation moves, but need to make levels a bit louder or softer to balance a mix. The easiest way to incorporate it into your mix is to automate levels using conventional track automation, and as soon as you feel that you need to adjust relative levels between your automated tracks, drop into Read Trim.
To do this, click on the track automation button as usual: on an HD System you will see an additional option at the bottom of the contextual menu called Trim. When you select Trim, both the track fader and the Automation button will turn gold. In Read Trim mode, volume faders are disengaged from the main automation playlist, so although the normal volume automation is still there and working, you won’t see the faders following it. The faders now follow an additional layer of automation called Trim, if any has been written. You can move a Trim fader during playback to audition new Trim values, but when the Trim fader is released, it returns to any previously written Trim automation values.
However, if a track does not contain Trim automation, you can move a Trim fader during playback and it will retain its position until the track is removed from Trim mode, or if you manually coalesce the Trim level. When this mode is enabled, non-trimmable controls (all controls other than track volume and send level) behave as if they are in standard Read mode, so again, no automation data is written. This means you can use the conventional automation (when the faders are grey) for track automation, and get a free set of Trim (gold) faders on top to adjust relative levels. Don’t worry about consolidating Trim automation into the normal automation until you’re ready. You can determine how the Trim automation will be coalesced (merged) into the normal automation from the Automation section of the Mixing tab in the Pro Tools HD Preferences window.
- Trim To Rebalance A Mix For Non-HD Users
 Poor man’s Trim mode: use the fader in the Trim plug-in to modify an automated mix balance.The advanced automation features described above are only available in Pro Tools HD. But there is a tip that enables non-HD users to be able to do something similar: insert an instance of a Trim plug-in in the last insert slot on the track, and then use the fader on the Trim plug-in to achieve a similar outcome. You can, of course, automate the Trim fader in the Trim plug-in to mimic Trim automation, too. The only downside is you cannot coalesce or merge this automation data with the channel’s volume automation, as you can with the Trim Read function on Pro Tools HD.
- Dismiss Undo Queue Warnings
When you are clearing clips from the clip list, which I do on a regular basis, you often find yourself clicking OK many times over as you dismiss each dialogue box for each file. A really neat tip is to Alt-click the first one: do so, and it will be the first and only dialogue box that will need dismissing.
- Restore Edit Selection
Ever had the situation when you have been editing, you’ve hit Stop, and your edit selection has inexplicably vanished? If you have Timeline Insertion (Play Start Marker) Follows Playback selected in the Transport section of the Operation Tab in Pro Tools Preferences, this will happen every time, and it’s easy to enable it unintentionally by hitting the ‘N’ key with the Keyboard Command Focus active. However, knowing why it happened still won’t bring back your edit selection, and nor will Undo, as it isn’t in the undo queue. However, if you hit Command+Alt+Z (Mac) or Ctrl+Alt+Z (Windows) then hey presto! Your lost edit selection will be restored. Before and after: meters can be made double-width by clicking on them with all modifier keys held down.
- Fat Meters
Do you struggle to see the track meters in Pro Tools clearly enough? If so, here is a neat quick tip which can make the meter display wider. Hold down all three modifiers (a move affectionately known as the ‘powerclaw’ by some and the ‘three fingered salute’ by others) and click on the meter: it will double in width. Easy! If you like it, use it; if you don’t, just change it back.
- Clear Clip Lights
I don’t know about you, but I don’t like leaving my track metering clip lights lit. Once I’ve noticed them, I want to clear them. If you are fortunate enough to have an Icon control surface, it is easy to hit the Clear Clips button whenever necessary, but if you don’t happen to have a D-Control lying around, you’re not stuck with clicking the meters individually. Just use Alt+C to clear clip lights from your meters in one hit.
- Using Clip Groups As Markers
Anyone who has used Avid Media Composer may have wished to be able to migrate over to Pro Tools the far more comprehensive marker facilities in Media Composer. Multiple marker rulers with colour-codeable markers make staying organised more straightforward. However, as we all know, Pro Tools only has one Marker ruler, so if you want to create alternative markers, you can’t — or can you?
![]() Running out of space on the Pro Tools marker track? Use clip groups to create your own!What Pro Tools does have is a feature called clip groups, and oddly, these don’t have to contain clips! That may seem slightly counter-intuitive, but what it means is that by just by making an edit selection on an empty track and hitting Command+Alt+G (Mac) or Ctrl+Alt+G (Windows) an ‘empty’ clip group can be created. This can be treated like any clip on the timeline, but because it contains nothing it doesn’t increase the size of the session. So, by creating additional tracks for empty clip groups, you can use them as markers to de-clutter your marker ruler.
Running out of space on the Pro Tools marker track? Use clip groups to create your own!What Pro Tools does have is a feature called clip groups, and oddly, these don’t have to contain clips! That may seem slightly counter-intuitive, but what it means is that by just by making an edit selection on an empty track and hitting Command+Alt+G (Mac) or Ctrl+Alt+G (Windows) an ‘empty’ clip group can be created. This can be treated like any clip on the timeline, but because it contains nothing it doesn’t increase the size of the session. So, by creating additional tracks for empty clip groups, you can use them as markers to de-clutter your marker ruler.
For instance, you might use this approach to mark out sections of a song. By creating edit selections for the various sections and creating clip groups, you can then rename the clip groups, colour them and use the Tab key (with Tab to Transients disabled) to navigate between the clip group boundaries. Alternatively, you could mark out comments on the timeline by dropping clip groups and renaming them ‘bass fluff’, ‘BV late’ and so forth.


