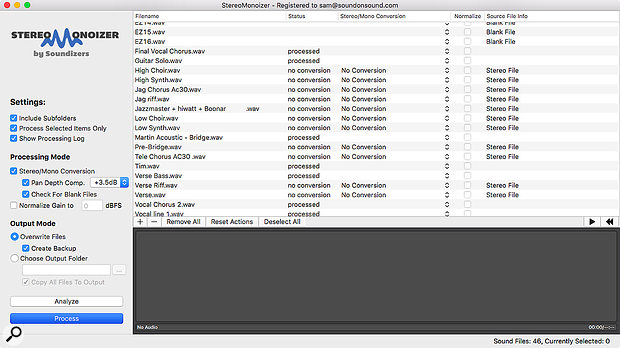
 StereoMonoizer from Soundizers is invaluable for preparing sessions that have been exported from other DAWs.
A little planning can help you get up and running quickly with mix projects transferred from other DAWs.
If you’re a mix engineer who uses Pro Tools, chances are you’ll get sent mix projects that originate in other recording packages. Getting this material in a state where you can even begin to work on it often feels like running a race just to get to the starting line, so it’s useful to think about the most efficient ways of turning a collection of WAV files into a mix-ready Pro Tools session.
Hopefully, the person sending the project will be savvy enough with the operation of their own DAW to have exported each element of their arrangement to an individual, unprocessed 24-bit audio file spanning the entire duration of the song. Assuming this is the case, there are two possible strategies available for rebuilding this arrangement for mixing within Pro Tools, and which one is the more appropriate will depend on several different factors.
Pre-flight Checks
Before weighing up those options, however, there are a couple of steps that I always go through before even opening Pro Tools. Most DAWs now make it fairly easy to automate the process of batch exporting individual tracks as separate audio files, but in doing so, they have a wasteful habit of exporting mono parts to stereo files. Retaining these as stereo tracks in Pro Tools has no benefits that I can think of, clutters up your session and wastes system resources, so when I receive a collection of audio files to mix, the first thing I’ll do is run them through Soundizers’ invaluable StereoMonoizer utility (shown above). This can scan a batch of files, automatically detect whether the underlying audio in any stereo files is really mono, even if it’s not panned centrally, and save mono versions.
The other besetting sin of automated track export functions is that they often seem to generate very long and cumbersome filenames, for instance by prepending the date, project name, artist biography and medical history of the producer’s canary to the start of every track! If these immensely long filenames get inherited by Pro Tools tracks, they’ll be truncated to an apparently random series of characters, and it’ll be impossible to tell what track is what in the Mix window. Often, a minute’s work with a batch file-renaming utility in Windows or Mac OS will save you an awful lot of manual track naming further down the line.
Get In!
Once you’re confident that your collection of WAV files is ready to import, the question of which import strategy to adopt arises. In essence, there are two basic approaches. One is to start with a session that is empty of audio tracks, and use the ‘New Track’ option in the Import Audio dialogue to import each file directly to a newly created track within the Edit window. The other is to start with a template session containing lots and lots of pre-made tracks, and import the audio to the Clip List, whence each file can be dragged onto the appropriate track in the arrangement.
 You are at a crossroads... which way will you jump?Each strategy has its own pros and cons, and much will depend on the nature of the project. Perhaps the biggest advantage of the New Track option is that it gives you a session that can be played back immediately, so within seconds of hitting the Done button, you can be auditioning the project to check that all is as it should be. By contrast, with the Clip List approach, you don’t even get to hear the raw unmixed session in its entirety until the end of the process.
To balance out this bonus, however, there are also quite a few limitations to the New Track approach. One is that, as already mentioned, the tracks that Pro Tools creates to accommodate each file will automatically inherit the filename as the track name. Even if the person who created the project has been thoughtful about naming his or her original tracks, and diligent in exporting them without auto-generated waffle, the chances are you’ll need to spend some time editing track names to reflect your own preferences.
Another name-related limitation is that if you import all the files in one go, they’ll be ordered alphabetically in your Pro Tools session rather than in any sensible musical arrangement. This means you need to drag the track headers around in the Mix or Edit window in order to, say, have all your drum kit tracks together at the top of the session.
Finally, another potential issue with this approach is that an automatically created New Track is just that: it doesn’t belong to any Groups, it doesn’t feed into any busses, and it doesn’t have any sends or inserts instantiated as standard. So, once you’ve imported all your audio tracks and checked that the raw project plays back as you expect it to, you can be in for a fair bit of work setting up routing, processing and so on.
Second Guessing
The strengths and weaknesses of the Clip List approach are, up to a point, the other way around. It is less immediate, and its success depends on your having sufficiently well-developed template sessions to accommodate all the many and various projects that might come your way. That said, it’s not necessary for the template session to match the mix project perfectly on a track-by-track basis; better to have the session include, say, four or five tom mic tracks and simply delete any that aren’t needed at the mix, while if the project happens to include an instrument you haven’t anticipated in your template, it’s not much trouble to create the odd extra track.
Whether the extra hassle of having to drag lots of separate files out of the Clip List and onto pre-made tracks is worthwhile really depends on your attitude to templates. At one end of the spectrum, consider Billy Decker, profiled in SOS January 2018’s Inside Track feature. By importing his audio files into template sessions where absolutely everything is pre-configured, including not only plug-in chains and auxiliary effects but things like sample replacement for drum kits, Decker is able to mix phenomenally fast. Templates can also be invaluable for anyone who frequently uses complex processing setups, especially if you need to incorporate large quantities of outboard gear.
The flip side of this is that this degree of uniformity in session setup and processing isn’t always achievable or desirable. For example, Billy Decker’s process pretty much assumes that recorded kick and snare drum sounds, the foundation of the mix, will be replaced by the same small selection of samples. If that doesn’t appeal to you or your client, or if you’re working with music that doesn’t have a conventional drum kit as its rhythmic centrepiece, a template based around drum samples won’t be very useful. And those of us not working in the same elevated levels of the music business as Decker will often find that there is simply too much variation between recorded sounds between projects for a template to serve as anything more than a vague starting point. Over-reliance on templates can lead you into a mixing ‘rut’, and tempt you to apply unnecessary or unsuitable processing just because it happens to be included in the template.
Bit By Bit
 Rather than import all the audio from this mix project in one go, I’ve selected only the drum tracks...Although Billy Decker’s approach clearly works for him, then, my own feeling is that he is something of a special case rather than an example we can all follow. For this reason, I personally tend to use the New Track approach rather than importing audio into template sessions. Nevertheless, there are ways in which you can incorporate elements of the template way of working into this approach.
  ...which now show up as a single bloc within the Edit window, highlighted and ready to be grouped.
First of all, you don’t need to import all the audio files in one go, and there are advantages to doing it in multiple stages. Let’s suppose that the project you’ve been asked to mix contains eight drum tracks, a bass DI and cab mic, six guitar tracks, a lead vocal and eight backing vocal tracks. If you start by selecting and importing only the drum files, these will become the first eight audio tracks in your session. Once you’ve imported a selection of files to new tracks, you’ll see that those new tracks are highlighted in the Edit and Mix windows, meaning that they form the current selection. So, having created these drum tracks, you can then hit Command+G to group them; you can Shift+Option-click on one of their output selectors to route them all to a bus; you can Shift+Option-click on a slot to create a send or insert on all of those tracks, and so on. Then, once you have your drums grouped and routed to your satisfaction, you can move on to the bass tracks, or whatever you want to follow them in your session.
Second, there are other ways to incorporate pre-made elements from other sessions besides using templates. One is the familiar Import Session Data command, while the other is Track Presets. These have been present in semi-official form since Pro Tools 10, but it’s only in the latest Pro Tools 2018 that they have become an official, fully documented feature. Their scope has also been expanded tremendously, and we’ll look at how to get the best from them in a future Pro Tools workshop.


