Some of the new features in Pro Tools 10 aren't immediately obvious — but they can be invaluable once you know how to use them.
Now that we've all got Pro Tools 10 up and running, and, I hope, have overcome the pitfalls described in the last couple of workshops, it's time to get to grips with some of its new features.
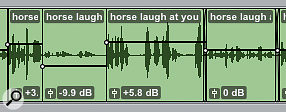
The post‑production community has been clamouring for clip‑based gain, as found in some other DAWs, for ages, and now we have it. In essence, clip‑based gain is like an additional layer of volume automation that is internal to clips (or regions, as they used to be known). It can be static, applying a fixed gain-change to a complete clip, or dynamic, incorporating level changes just like conventional automation. Clip gain is applied in real time on playback and is not rendered unless you want it to be. Clip-based gain in Pro Tools 10 can be used simply to change the level of an entire clip (above) or dynamically as a form of volume automation (below)
To access clip‑based gain, you need to display the little fader icon in all clips. You do this by toggling Clip Gain Info in the Clip sub-menu in the View menu.
Clip gain has a complete range of ‑144dB to +36dB, although a figure is only displayed when you use static gain; a graphical display of clip gain called the Clip Gain Line is also visible at track heights of Small and above. Right‑clicking the fader icon gives you a series of options: Bypass Clip Gain, Clear Clip Gain, Render Clip Gain or Hide Clip Gain Line. To create dynamic clip gain, you can add breakpoints using the shortcut Ctrl-Shift-E (Mac) or Start-Shift-E (Windows). You can also add breakpoints when you have the Smart Tools enabled by using the Command (Ctrl) key, as you would do with standard volume automation. When you create crossfades between two clips, this is done relative to the existing clip gain for each clip, so for the duration of the crossfade, two automation lines are visible. Where two clips are crossfaded, both their gain lines are visible.
Clip‑based gain is applied pre‑fader and before the channel insert points. The key point about it is that clip gain settings stay with the clip (region), so when you move, copy and paste clips, their clip gain settings come too. Also, clip gain settings from an AAF file now come into Pro Tools as clip gain, rather than being converted to fader automation. Unfortunately, this feature doesn't work for OMF, but it does mean that interoperability with Avid's Media Composer has improved.
There are plenty of uses for clip‑based gain. It can be used to 'embed' volume rides into a clip where you want them to be pre‑insert, or you might want to move a clip around within a session; dynamic clip gain also provides a forensic way to clean up audio tracks, by ducking unwanted spill and so on. So although it was the post‑production community that asked for it, the music industry is loving it too.
Real‑time Fades
Along with clip‑based gain, Avid have introduced real‑time fades in Pro Tools 10: fades and crossfades are now no longer stored on disk but calculated on the fly. When opening a session created in Pro Tools 9 or lower, Pro Tools 10 still uses real‑time fades: the Fade Files folder in the session folder is neither deleted nor used. New fades created in the session do not generate any new rendered fade files in this folder. If such a session is then saved in Pro Tools 10 and reopened in an earlier version, any newly created or edited fades will need to be rendered (regenerated) and saved in the session's Fade Files folder. If Pro Tools throws up the Missing Files dialogue and asks about missing fade files, select the 'Regenerate Missing Fades Without Searching' option and click OK.
Universal Export
Pro Tools 10 now enables you to export any selected tracks in a session as a new session. This feature is especially useful in collaborative situations: if you are working collaboratively, you could export specific tracks for your colleague to work on and create a new session that you can then share. Previously, if you wanted to transfer only some of the tracks from a session, you needed to use Import Session Data within the destination session, and select tracks to import from your source session. Now can do it the other way as well, although sessions created this way cannot be opened in Pro Tools 9 and earlier.
To export selected tracks as a new session, select the tracks you want to export and choose File / Export / Selected Tracks As New Session. In the Save Session Copy dialogue, configure the Session Format and Session Parameters settings and options as desired, verify that the Selected Tracks Only option is enabled, and configure the Items to Copy settings and options as desired. You can also enable the Main Playlist Only option if you don't want to include any of the alternate playlists associated with any of the selected tracks in the new session. Click OK and the Save dialogue opens, where you can name and save your new session containing only the selected tracks from the source session.
AudioSuite Improvements
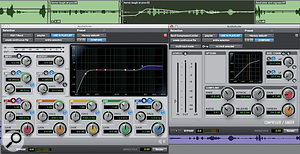
Pro Tools 10 also offers improvements for working with AudioSuite plug‑ins. One is the ability to open multiple AudioSuite plug‑in windows. This uses the same Target feature we are used to with RTAS and TDM plug‑ins. You can see in the large screenshot that the EQ7 plug‑in has its Target on and the Dynamics plug‑in does not. In Pro Tools 10, it's possible to have multiple AudioSuite windows open at once.
In older versions of Pro Tools, AudioSuite processing only affected the current edit selection and created a new file of the exact same length. The resulting region (clip) could not be trimmed out beyond the processed selection. However, with Pro Tools 10, the resulting rendered clip can be trimmed out to the specified handle length, or even up to the whole file referenced by the original clip (if the Whole File option is selected before rendering). The handle length is set in the numerical field at the lower right of the plug‑in window, next to the Render button: once you have selected your handle options, simply click on the Render button to process the clip. You can also set up a default handle length in the AudioSuite section of Pro Tools 10 Preferences.
A related improvement is that fades and crossfades can now be preserved with AudioSuite rendering. This means that you can render an Edit selection with AudioSuite processing and still be able to edit any fades and crossfades afterward. The table on this page explains the different options.
Note that certain AudioSuite plug‑ins do not support AudioSuite handles in the rendered file. These plug‑ins include BNR, Duplicate, NoNoise, Pitch Shift, Sound Replacer, Time Compression and Expansion, Time Shift, Vari‑Fi and X‑Form. The AudioSuite Handle controls should be greyed out and unavailable, but in practice this isn't always the case: the Vari‑Fi plug‑in, for example, doesn't disable the handles option, but if you use Vari‑Fi with the handles on, it will start the processing before the highlighted section, and carries on processing after by the handles amount, which will mean you won't get the effect you were expecting. So take care with these plug‑ins and make sure the handles feature is turned off. A few AudioSuite plug-ins, like Vari-Fi, allow you to enter a handle length, but don't work as expected when you do so. Also take note that Destructive recording and Destructive Punch recording are not supported for AudioSuite‑rendered clips with handles.
Pro Tools 10 also preserves clip metadata for AudioSuite rendered clips under certain conditions (see accompanying table). This is especially useful when working with clips imported from field recorders and with AAF sequences exported from Media Composer.
Mixed Audio Formats
Pro Tools 10 now allows you to bring different formats into Pro Tools and use them in a session, so WAV and AIFF files can now co‑exist in the same session. Pro Tools 10 now also supports interleaved files natively. In earlier versions, if you imported a stereo interleaved file into Pro Tools, you wouldn't get the option to Add it to the session: Pro Tools would only offer you the option to Convert to separate L and R files. In Pro Tools 10, you get the option to Add or Copy such files. This does mean being careful if you're used to the old way of working. I am aware of a number of users getting caught out by this feature and, thinking they had converted the source files, deleting them. They subsequently opened their sessions to find Pro Tools complaining that it couldn't find the files, because they had been Added and not Converted. You should thus take care, when importing files into a session, that you don't fall into this trap too.
AudioSuite Rendering Options In PT10
| File Mode | Rendering Mode | Handle Behaviour | Whole File | Fades | Clip Gain | Metadata |
| Overwrite file | Clip by clip | No handles | Unavailable | Preserved | Preserved | Preserved |
| Overwrite file | Entire selection | No handles | Unavailable | Rendered | Rendered | Preserved |
| Individual files | Clip by clip | Handles created | Available | Preserved | Preserved | Preserved |
| Individual files | Entire selection | No handles | Unavailable | Rendered | Rendered | Preserved |
| Continuous file | Clip by clip | Handles created at the beginning and end of the new continuous file | Unavailable | Rendered | Rendered | Not preserved |
| Continuous file | Entire selection | Handles created at the beginning and end of the new continuous file | Unavailable | Rendered | Rendered | Not preserved |


