 The computer program Acoustic X by Pilchner‑Schoustal works out the room mode distribution from your room dimensions. Check out the web site www.pilchner.com/acoustic‑x/soft_welcome.htm
PART 3: Paul White looks at how you can calculate how much studio acoustic treatment you really need. This is the third article in a five‑part series.
Last month we discussed acoustic absorbers in some depth, but since a successfully designed control room will use a combination of absorption, geometry and scattering to produce the desired acoustic environment, it would be wrong to regard absorbers as the sole solution to the design problem. Absorbers are important, however, in controlling the reverb decay time of the room. Other surface treatments may be devised for the diffusion or scattering of sound in order to further randomise the reflections arriving at the listener, and this important area will be covered later in the series.
Most of us will be familiar with reverberation, both as an artificial and as a natural effect. It occurs in all normal rooms, to the extent that music or speech sounds unnatural without it, but in a studio control‑room environment, reverb characteristics need to be controlled within fairly close limits if the music produced in the room is to be evaluated with any accuracy.
Reverberation is created whenever sound energy is fed into a room and the room modes discussed the month before last are excited. When the source of energy is removed, the reverberation will decay at a rate determined by the geometry and absorbency of the room and its contents. Excessive low‑frequency reverberation related to one dominating mode can cause serious problems for the engineer. The danger is that you may attempt to correct your mix using EQ to compensate for the apparent bass boost, but then when you play back your mix on a properly balanced hi‑fi system, the result sounds bass‑light. Furthermore, excessive reverb time at one frequency can cause notes to hang on, generally blurring the sound and making it more difficult to concentrate on fine details.
T60
Reverberation dies away exponentially, so some way of defining decay time in a repeatable and measurable fashion is required. Reverb time is conventionally defined as the time taken for a sound to die away to one thousandth of its original sound level; the resulting figure is called T60 (also known as RT60), because the reverb time is measured to the point where the sound has decayed by 60dB. The ideal reverb time varies depending on the room size and the type of material being auditioned, though for a control room it's likely to be around 0.3 seconds. In the studio area, an optimum reverb time for speech might be somewhere between 0.2 and 0.5 seconds, whereas classical music might require between 0.6 and 0.8 seconds of reverberation to add life and body to the performance. A typical living room has a T60 of around 0.5 seconds, and — unless you're going to spend a lot of money on studio design — that's not a bad figure to aim for in a project studio control room. Some people would disagree with me on this point, but I feel that unless you're doing the job properly, using qualified designers who have access to the correct measuring equipment, you can easily make the listening environment much worse by trying to do too much.
In a poorly designed control room, problems arise because the T60 tends to be different at different frequencies, though it's normally OK to accept a longer T60 at lower frequencies, as is typical of a furnished domestic room. The main thing to bear in mind is that if the room isn't designed with low‑frequency reproduction in mind, it's invariably safer to use nearfield monitors with a limited low‑end response. Studio design ideals are subject to changes in fashion, and no doubt the current interest in surround monitoring will complicate the issue still further, but the current consensus seems to be that, for small studio control rooms, we should aim for as constant a reverb time as possible up to 8kHz or beyond. Though a slight rise of reverb time at lower frequencies is permissible, it should not be excessive.
If the room isn't designed with low‑frequency reproduction in mind, it's invariably safer to use nearfield monitors with a limited low‑end response.
Sabine

The maths needed to calculate reverb time or T60 is fairly straightforward using the formula devised by WC Sabine at the turn of the century, though this formula is more accurate when applied to larger rooms than to small ones. There is a more accurate and rather more complicated formula attributed to Eyring, but in order to illustrate the basic principles, Sabine will serve quite adequately. Sabine's formula states that:
T60 = 0.05xV
STxAave
where T60 is the reverb time in seconds, 'V' is the volume of the room in cubic ft, 'ST' is the total surface area of the room in square feet and 'Aave' is the average absorption coefficient of the surfaces within the room. Imperial measurements are used here, but the metric equivalent is:
T60 = 0.161xV
STxAave
where the volume is measured in cubic metres, and the surface area in square metres.
If the room is to be furnished, the surface areas, volumes and materials of the furniture should really be included in the calculations, but unless you're putting a lot of furniture into a small room it's easier to do your calculations based on the empty room, and then assume that adding any soft furnishings later will only improve things. It's possible to obtain tables of absorption coefficients relating to all the commonly used building, decorating and furnishing materials (check a good builders' supply company and get leaflets on specific materials for details), but a few useful ones gleaned from various textbooks are included below. Keep in mind that these can only be regarded as approximate, as no two manufacturers' products are identical.
Here Comes The Science
 Small nearfield monitors like Spirit's Absolute Zeros are more suited to the project studio environment than larger speakers typically used in commercial installations.
Multiplying the total surface area of the room by the average absorption coefficient for the surface materials tells us how absorbent the room is, and this figure is expressed as so many absorption units — called 'Sabines'. Simply put, we can consider each area of different surface material separately, calculate the number of Sabines it contributes, and then add up all the Sabines for the room to give us the bottom line for the simple equation shown earlier. For example, assume that the absorption coefficient for concrete at 125Hz is about 0.01, which isn't very high. Five hundred square feet of concrete surface, such as a floor, would give us 500 x 0.01 = 5 Sabines of absorption. Add on the number of Sabines due to plaster walls, panel absorbers or whatever, and you end up with the total number of Sabines for the room at 125Hz.
Ultimately, the only real imperative is that the room should work for creating mixes that sound 'right' when played on other systems outside the studio.
To complicate the issue slightly, the absorption coefficient for a given material varies with frequency, but it isn't practical to do a different set of calculations for every possible audio frequency. Instead, we rationalise the audio spectrum to six discrete frequency values, at one octave intervals, from 125Hz up to 4kHz. Even so, that means working through the formula six times with six sets of values to give us six T60 times, one for each octave. Once this has been done, the figures tell us at which frequencies we have either too much or too little absorption. Then it's down to pencilling in a trap, a carpet or a few acoustic tiles, and then going through the sums again to see if things are better. Anyone capable of using a spreadsheet program should be able to automate this tedious calculation, but a simple calculator is quite good enough. Earlier in the series I mentioned a software package called Acoustic X, by Pilchner‑Schoustal (see screen shot, left), that does all this for you. It also contains an extensive library of materials and their coefficients, so it could make the job a lot easier.
One limitation of Sabine's equation is that it assumes a perfectly diffused soundfield, which small rooms invariably don't have, and it also ignores any sound absorption due to the air within the room. That's another good reason why any result arrived at on this basis should be treated as a guide rather than as a rigorous analysis. Acoustic consultants make a good living out of weighing the results of these and similar calculations against reality, then applying their experience and expertise to come up with something that will actually work.
Distributed Absorption
It's good practice to try to balance the properties of facing walls, rather than calculating that you need a certain amount of trapping for the whole room and then sticking it all in one place. What's more, tuned trapping designed to combat specific room modes must go on the wall relevant to those modes. For example, if you have a mode which is due to the length of the room, the trapping must go on the end walls, not the side walls. When treating facing surfaces, it's most effective to distribute the absorptive material between them, rather than putting everything on one wall and leaving the other reflective; in the case of side walls, this is essential to maintain a nominally symmetrical listening environment. However, it's not always possible to treat opposing surfaces in exactly the same way, the floor/ceiling pair being the most obvious example. If the floor is carpeted, it will absorb the higher frequencies very efficiently but will hardly affect the bass or lower mid‑range at all. One answer might be to mount bass traps in the ceiling to absorb the bass but to reflect back the mid and higher frequencies absorbed by the carpet.
Studio design ideals are subject to changes in fashion, and no doubt the current interest in surround monitoring will complicate the issue still further.
Decisions about where to place absorbers will also be influenced by the underlying philosophy of the room. There are at least two types of LEDE (Live End Dead End) control room, there are rooms that rely heavily on scattering to diffuse reflections, and there are very dead rooms driven by huge monitoring systems. Indeed, there are so many design options that there will be a separate article covering that topic later in the series, so don't start sawing things up just yet. Ultimately, the only real imperative is that the room should work for creating mixes that sound 'right' when played on other systems outside the studio. Indeed, it is sometimes argued that, as most music is listened to in a domestic living room, we should model our control rooms on living rooms, but the reality is that if we're to produce really good recordings, we need a monitoring environment that's a little better than that enjoyed by the listener. Whichever approach you take, the room must be as acoustically symmetrical as possible about the monitor system, and any large windows in the side walls should be balanced by areas having similar acoustic properties on the opposite wall.
The design techniques are the same for the studio area as for the control room, though you may decide on a longer T60 for the studio, depending on the type of music you wish to record. Speech requires a fairly dry environment, whereas acoustic instruments thrive in a more lively setting.
Doing The Sums
Before getting down to working out the trapping for your room, you should decide on the basic room philosophy. Most small studios use a combination of diffusion and geometry to keep early reflections from the speakers away from the listening position, combined with trapping and diffusion on the rear wall, to prevent strong reflections from bouncing directly back to the 'sweet spot'. However, this is not the only approach, and the ideal solution will depend to some extent on the shape and size of your room.
Once you've decided on a layout for your room:
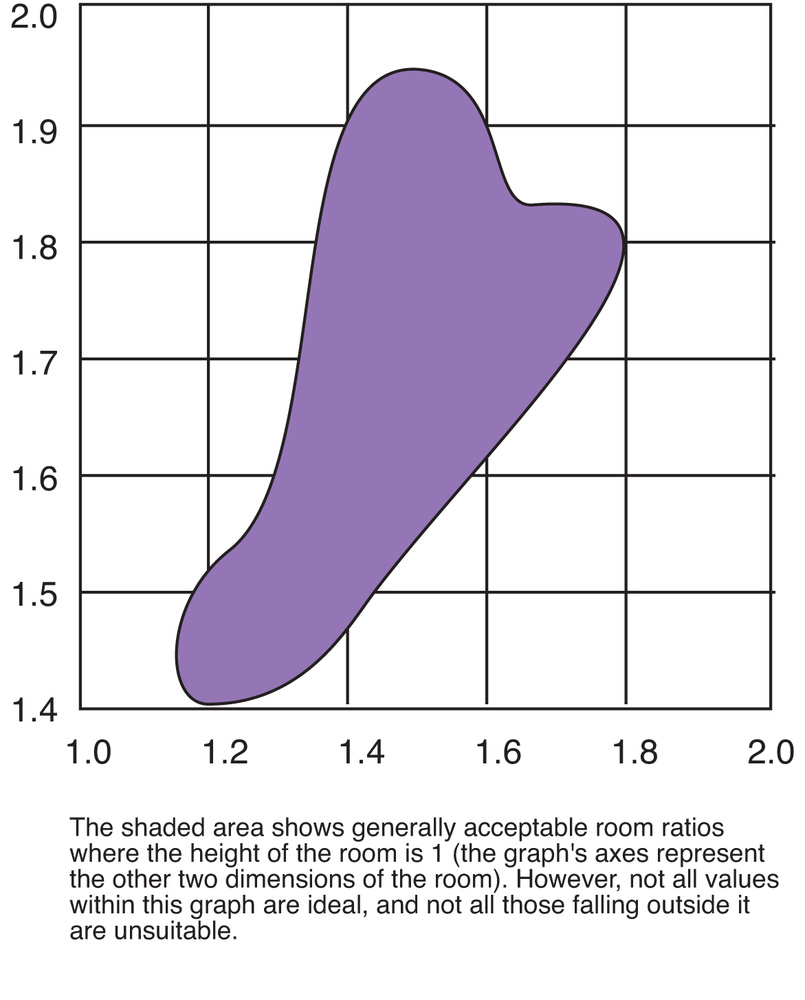
- Check the room dimensions to see if they fall inside Bolt's area (see the graph above, first shown in the July '98 issue, for more details).
- If they don't, plot out your main room modes and find out where trouble spots are likely to occur, so that you can employ some extra trapping if necessary. Even if the dimensions fall inside Bolt's graph, it's a good idea to calculate the room modes anyway, as you can still end up with trouble spots, especially in small rooms where the low‑frequency modes are more widely spaced.
- Next, decide very carefully on what floor covering is to be used, as this will have a significant effect on the overall acoustics, due to the large area involved. At this point, you could use Sabine's formula to work out the T60s for the room as it currently is, at the standard frequencies of 125Hz, 250Hz, 500Hz, 1kHz, 2kHz and 4kHz. This will probably reveal an excessively long T60 at 125Hz, though if the walls are hard and reflective you'll probably find the room is very live in the mid‑range too.
- With the help of the Sabine formula and a table of absorption coefficients for your room materials, you should be able to arrive at the areas of treatment that will be required to get the T60 close to your target figure at all six frequencies, though don't forget that tuned traps need to go on the walls relevant to the modes they're trying to compensate for. The best way to do this is to calculate how many Sabines you need to provide at each frequency and then distribute them according to the room philosophy and the most dominant room modes. Any surfaces not occupied by doors, shelves, windows, equipment and so on may be used to distribute your acoustic absorbers. Don't panic, though, because in a typical domestic room the amount of acoustic treatment needed isn't usually that great — it's not as if you have to cover all the available wall space with traps.
The procedure of calculating the amount of absorption required at each of the six standard frequencies sounds more complicated than it is, but it can be time consuming. What's more, the result is only going to be an approximation, due to the limitations of Sabine's equation when applied to small rooms, not to mention the uncertain absorption coefficients of various materials. Furthermore, the overall effect of the same area of absorbent material will be different depending on whether the material is concentrated in one place or distributed around the room. As a rule, distributed absorption works more effectively, but careful listening or specialised measurement is the only real way to determine whether you have a successful result.
Flutter Echo
Flutter echo is a distinctive ringing sound caused by echoes bouncing back and forth between hard, parallel surfaces following a percussive sound such as a hand clap. To minimise flutter echoes, which can plague even a studio having a perfect T60 across the band, certain precautions should be taken. If you're building from scratch, facing walls can be made out of parallel by at least 1 in 10, but if this isn't possible, some form of mid/high absorber can be applied to one or both walls to reduce the problem. In many cases, a pair of acoustic foam tiles fixed to the side walls on either side of the engineering position, as shown in the diagram here, will be all that's needed.
Note that some of the absorbers discussed last month, such as the panel trap, the Helmholz resonator and the slatted absorber, have flat surfaces which are reflective at mid and high frequencies. Consequently, when positioning these it's a good idea either to face them with acoustic foam or not to have them opposite each other across a parallel room. Alternatively, panel traps can be constructed with a sloping surface, where the average depth is maintained by making the halfway depth equal to the calculated value. Padded door surfaces can also be beneficial; one of the popular methods is to fit 2‑inch foam to the door, then cover this with upholstery‑quality vinyl or fabric which is fixed by tacks to give a quilted appearance.
Absorbing Reading: Some Useful Absorption Coefficients
Dimensions are given in imperial or metric, as originally published.
| Material | 125Hz | 250Hz | 500Hz | 1kHz | 2kHz | 4kHz |
| 50mm Acoustic Foam | 0.08 | 0.25 | 0.6 | 0.9 | 0.95 | 0.9 |
| 100mm Acoustic Foam | 0.2 | 0.7 | 0.99 | 0.99 | 0.99 | 0.99 |
| 50mm Mineral Wool (Med Density) | 0.2 | 0.45 | 0.7 | 0.8 | 0.8 | 0.8 |
| Plaster on brick | 0.013 | 0.015 | 0.02 | 0.03 | 0.04 | 0.05 |
| Cotton drapes draped to half area. 15oz/sq yd | 0.07 | 0.37 | 0.49 | 0.81 | 0.65 | 0.54 |
| Foam backed carpet on concrete | 0.05 | 0.16 | 0.44 | 0.7 | 0.6 | 0.4 |
| Heavy carpet + heavy foam underlay on concrete | 0.15 | 0.25 | 0.5 | 0.6 | 0.7 | 0.8 |
| Coarse concrete | 0.36 | 0.44 | 0.31 | 0.29 | 0.39 | 0.25 |
| Painted concrete | 0.01 | 0.05 | 0.06 | 0.07 | 0.09 | 0.08 |
| Wood floor | 0.15 | 0.11 | 0.10 | 0.07 | 0.06 | 0.07 |
| Window glass | 0.35 | 0.25 | 0.18 | 0.12 | 0.07 | 0.04 |
| Plate glass | 0.18 | 0.06 | 0.04 | 0.03 | 0.02 | 0.02 |
| 6mm glass | 0.1 | 0.06 | 0.04 | 0.03 | 0.02 | 0.02 |
| Plaster on brick | 0.013 | 0.015 | 0.02 | 0.03 | 0.04 | 0.05 |
| 9mm Plasterboard over 20mm air gap | 0.3 | 0.2 | 0.15 | 0.05 | 0.05 | 0.05 |
| Brickwork | 0.05 | 0.04 | 0.02 | 0.04 | 0.05 | 0.05 |
| Vinyl flooring | 0.03 | 0.04 | 0.05 | 0.04 | 0.05 | 0.05 |
| Breeze block | 0.25 | 0.40 | 0.6 | 0.5 | 0.75 | 0.5 |
| LF panel absorber | 0.28 | 0.22 | 0.17 | 0.09 | 0.10 | 0.11 |
| Perforated Helmholz absorber, 4‑inch depth, mineral wool damping, 0.79% perforation. | 0.4 | 0.84 | 0.4 | 0.16 | 0.14 | 0.12 |
| Perforated Helmholz absorber,8‑inch depth, mineral wool damping, 0.79% perforation. | 0.98 | 0.88 | 0.52 | 0.21 | 0.16 | 0.14 |
| Broad‑band absorber, 1‑inch fibreglass slab at mouth of 7‑inch deep cavity | 0.67 | 0.98 | 0.98 | 0.93 | 0.98 | 0.96 |
| Padded seat (unoccupied) | 0.1 | 0.2 | 0.25 | 0.3 | 0.4 | 0.3 |
Acoustics In The Real World
Few project studios are professionally designed and, to be perfectly honest, even if you apply the basic formulae to calculate the amount of absorbent trapping you need to add, the results are unlikely to be precisely right. Part of the problem is that materials never seem to behave exactly as their textbook values suggest, and it's also well known that the way in which absorbent material is distributed on the room's surface has a profound effect on the outcome. Even so, a mathematical analysis of the requirements should get you into the right ball‑park, though I must emphasise again that the final design should be verified by measurement, after which further adjustments may be needed.
If the thought of wading through a load of calculations fills you with foreboding, don't worry, because there are more empirical approaches to acoustic design that can be applied by following very general and well‑proven principles, and these will be covered later. Fortunately, you can tell a lot about the acoustics of a room by listening to speech and music in that room, and even if the design isn't quite as good as you might have hoped for, the human hearing system is capable of compensating for a multitude of sins providing it has some form of reference, such as well mixed commercial music played over the same monitors.
Though you wouldn't go designing a professional studio using only instinct and listening tests, you'd be surprised at how much you can improve the performance of a typical home studio by adhering to a few simple guidelines. One of the reasons why this works is that the smaller monitors used in project studios don't have the same extended bass as the main monitors used in typical commercial installations, so there is less low‑frequency energy produced to excite the room where its T60 is longer than might be desirable. In addition, smaller monitors can be used closer to the engineer, so the ratio of direct to reverberant sound is higher, meaning that the room acoustics have less of an effect on the perceived sound.