When you're trying to achive a tight, commercial hip–hop sound, you might need to resort to some heavy processing — but not on every track...
 When hip–hop collective Pocket Lips sent in their track 'Rock Show' for Mix Rescue, they were pretty happy with the way their tracking sessions had gone: drums, bass, keyboard, and scratching had been recorded together to get a live vibe, and the arrangment had been completed with further vocal and instrumental overdubs. However, they wanted more of a pop feel to the sound, and hadn't been able to get things sounding tight and upfront enough.
Editing For A More Upfront Sound
 The live hip–hop collective Pocket Lips had recorded the main body of their song 'Rock Show' as a single take, and although this gave a great live vibe, it also left some timing issues to be dealt with at the editing stage.As usual with Mix Rescue tracks, the reasons for this weren't just to do with mixing technique, and in this case some of the malaise was down to their recording method. Now don't get me wrong — doing live takes as a band is great for getting a vibe going, and works fine for some styles, but it's almost impossible in this way to get the rhythm tight enough to compete with the precision of most commercial urban and pop releases.
Fortunately, the band had been able to keep decent separation between the recorded parts while they were tracking, and spill and phase relationships imposed very few editing restrictions — so I exercised the audio scissors to tighten things up a bit. When working with good live drumming like this, quantising everything to your sequencer's grid will kill the groove stone–dead, so I left the drums well alone. Instead, I used them as a reference point for editing the timing of many of the other parts, starting with the bass and then slotting in the turntables, keyboards and vocals on top, one at a time.
I dealt with techniques for editing timing in quite a bit of detail for SOS October 2008's Mix Rescue, so I won't go into all that again here. What I will add, though, is that this editing accounted for about half the overall mixing time, and I tried to get all of it out of the way before getting into any serious mixing decisions: editing and mixing are mentally very different tasks, and it's easy to get bogged down in one to the detriment of the other when you try to do them at the same time.
 during the song's double snare–hit drum hook.") One of the techniques for making the important sounds more upfront was editing out competing sounds in the background to reduce frequency–masking effects. You can see one example of this technique in this screen shot where Mike has edited a gap into all the bass tracks (bottom, in red red) during the song's double snare–hit drum hook.While I was at it, I took the opportunity to mute various things so that getting an upfront sound would be easier. Let me explain how this works. In most busy mixes, the listener's ear is constantly 'refocusing' on different parts as they all jockey for attention. To take a visual analogy, it's a bit like watching a football match. While you're focusing on the player in possession, the other players are only in your peripheral vision — and are seen in less detail. When the ball's passed to another player, you shift your focus to him instead, and it's then the first player's turn to be in your peripheral vision.
One of the techniques for making the important sounds more upfront was editing out competing sounds in the background to reduce frequency–masking effects. You can see one example of this technique in this screen shot where Mike has edited a gap into all the bass tracks (bottom, in red red) during the song's double snare–hit drum hook.While I was at it, I took the opportunity to mute various things so that getting an upfront sound would be easier. Let me explain how this works. In most busy mixes, the listener's ear is constantly 'refocusing' on different parts as they all jockey for attention. To take a visual analogy, it's a bit like watching a football match. While you're focusing on the player in possession, the other players are only in your peripheral vision — and are seen in less detail. When the ball's passed to another player, you shift your focus to him instead, and it's then the first player's turn to be in your peripheral vision.
Where this analogy breaks down, though, is that audio parts to which you're not specifically paying attention will still, to some extent, obscure the sound your ear is focused on, making that less clearly audible than it might be. If you can switch off some of the competing parts while they're psychologically in the background like this, you'll usually find that the foreground stuff sounds more upfront. What's more, non–technical listeners rarely notice if you briefly drop out some background parts — because their attention is, of course, directed at the sounds at the front of the mix.
But what did I actually do here in practice? Well, there were several features I wanted to highlight. The first was the characteristic and hooky double snare–hits at the ends of phrases in the drum part, so I dropped out the bass and synth parts to make these jump a little bit forward every time. A few vocal moments also benefited from a similar approach — some of Freya Pocket's 'Maxed Out' vocals, for example, and the first 'Pow!' from Pete Pocket in the run–up to the third rapped verse.
Drums: Punch & Crunch
 Although the drum recordings covered 11 tracks, the amount of mixing work these individual tracks required was quite small. However, some overall processing was then used on the whole kit to give it a warmer and more underground sound: parallel compression using Buzzroom's Grancomp, and some heavy saturation from Jeroen Breebaart's Ferox tape–emulation plug–in.With the main bulk of the editing out of the way, I could get back to the proper mixing. The drums seemed to me to be really important to the mix, so I began work there. The recordings were already pretty good, so in the first instance I was able to put together a reasonable balance of the kit with nothing more than some polarity inversion and high–pass filtering on each of the mics: a 20Hz cut on the two kick mics; 50Hz on the snare; around 100Hz on the overheads, under–snare and crash (the latter both polarity–inverted); around 300Hz on the ride and floor tom; and around 550Hz on the rack tom, which was also polarity–inverted.
Quickly fading in some of the other parts against this rough balance, though, swiftly demonstrated that the snare would need a helping hand if it was going to compete with the general sonic mayhem of the production as a whole — although it had lots of attack, there wasn't much in the way of aggression or sustain. Dialling in some tube distortion and limiting, courtesy of Silverspike's Ruby Tube, immediately gave the sound more attitude and hold, but this was at the expense of some attack, so I compensated for that with Stillwell Audio's Transient Monster (which works in a similar way to SPL's well–known Transient Designer). The same company's Vibe EQ (which is my current favourite 'character' equaliser) was used to mould the sound further, with a boost of around 5dB at 820Hz for body, and another 6dB of high–shelving boost above 8kHz to sharpen the edge. Finally, a little Aphex–style high–end psychoacoustic enhancement topped things off, bringing the sound further forward than any EQ tends to be able to do on its own.
 The heavy processing I was now using on the snare's close mic inevitably also had an effect on the other instruments spilling into that mic, but luckily these side–effects, for the most part, turned out to be beneficial to the overall drum sound. However, the hi–hat was now being pulled much higher in the mix by the action of Ruby Tube's limiter, so I turned down the hi–hat's close mic, to keep it from eating the rest of the kit for breakfast!
At this point the drums were holding together as an instrument, but still had a rather brittle, digital feel, and I felt that something crunchier and more underground was required to fit the hip–hop frame of reference. So, bussing all the drums to a single track in Reaper, I applied some parallel compression (using Buzzroom's freeware Grancomp plug–in, which I merrily hammered to 12dB gain reduction at a 2:1 ratio, but only mixed in at a fairly low level) and then smacked them hard into the end–stops of Jeroen Breebaart's Ferox tape-emulation plug-in. This really fattened things up, and rounded the hat and cymbal transients in a very nice way. I had to tweak the snare processing after adding the tape saturation, though, as it was losing a touch too much snap.
Balancing Bass Parts
 The filtered bass–synth part needed heavy treatment with a series of plug–ins before it would hold its place consistently in the mix: Silverspike's Ruby Tube, Stillwell Audio's Vibe EQ and 1973, and Buzzroom's BuzMaxi3.Quite a lot of the Mix Rescue tracks I've encountered have had more than one bass part, and that can cause very inconsistent levels at the very lowest frequencies, as parts inevitably drift in and out of phase with each other. 'Rock Show' had three different bass parts for most of the song: a tremendous, overdriven, filtered synth that was buried in the background of the original mix; a supporting rhythmic sub–bass synth; and a bass guitar, recorded through both a cab and a DI. Given the dedicated sub–bass part, there was no need for that information from any other source, so I high–pass filtered the other parts straight away to avoid that most common bass–layering pitfall.
However, there were plenty of other concerns to tackle. The rhythmic element of the sub–bass part was not at all in time with the drums. Chickening out of the kind of note–by–note editing that I'd have needed to do to pull the notes into line, I low–pass filtered at 100Hz instead, to reduce the audibility of the few higher–frequency transients, and then ducked the sub–bass level by a couple of decibels between the kick–drum hits, to make the bass rhythm appear to follow the drums more closely. The ducking was implemented using Reaper's Reagate plug–in, with its side-chain input fed from the kick–drum track. Although Reagate doesn't have the traditional 'range' control, it does allow you to mix in the ungated signal with the gated signal to similarly soften the gating action.
The filter sweeps of the other synth were causing mix–balance problems, on account of the resultant dramatic shifts in harmonic content. In these situations I usually compress the part heavily, often across multiple frequency–bands, and in light of the already powerful drum parts here I pushed this concept as far as I ever have, crushing the channel with about 20dB of limiting from Buzzroom's multi–band BuzMaxi3 limiter.
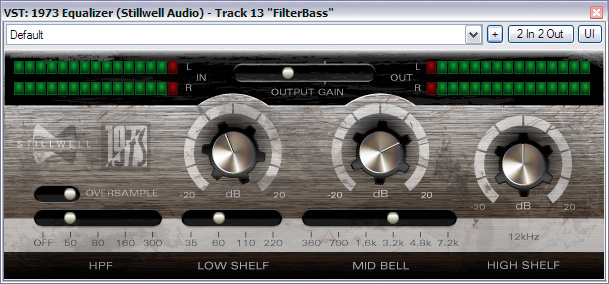
 This did a good job both of solidly anchoring the level and of flattening out the worst frequency–domain peaks, but there was still a long way to go. As it stood, the drums were psychoacoustically masking all the synth's higher frequencies and making it sound tame and muffled, so I decided to dramatically boost those to get them to cut through more clearly. Vibe EQ again did the honours with 4dB cuts at 110Hz with the low shelf, and at 820Hz with the mid peak, as well as 7dB of high–shelf boost at 2.5kHz upwards. This certainly helped to bring the sound forward, but I still wanted more bite, so added some extra distortion from another instance of Ruby Tube and a brutal 9dB peaking boost at 3.2kHz from Stillwell Audio's emulated Neve EQ plug–in, 1973. This amounted to a lot of heavy processing — and much more than I'd recommend using most of the time — but I felt that it was justified in the context of this particular mix.
Listening to the two bass guitar parts, the cab track seemed to have a much more appealing character to it, so I didn't even use the DI in the end. I often tend to use DI tracks to provide a more predictable low end, but that was already coming from the sub–bass synth anyway. Primarily it was the guitar/amp combination's mid–range that I thought was most likely to carry through this mix, so I cut away everything below 350Hz using ReaEQ and boosted a 16dB peak at 1.1kHz, using the more characterful Antress Modern Booster EQ (apparently modelled on early SSL console EQ, which adds a nice kind of grit with big boosts). This whittled–down sound slotted into the mix pretty well, although it stepped on the toes of the filtered synth until I dipped 7dB out of the guitar in the disputed area (around 3kHz).
Mixing Rap Vocals
 Both of the main rapped vocal parts had been done on trusty Shure SM58s, so I guessed they'd take more EQ work than normal and turned to my URS Console Strip Pro plug–in, which is very flexible in this role. Obviously, both voices needed something slightly different, but there were a number of points of similarity. First of all, there was a lot of wind–blasting and popping going on, due both to the handheld mics and the high–energy delivery, so high–pass filtering was essential to avoid loads of useless sub–bass information leaking, unnoticed, into the mix. Turnover frequencies of 69Hz and 98Hz respectively were ample, and didn't change the tone a whole lot.
The SM58, like most dynamic mics, isn't as detailed at the extreme high end as a typical studio vocal condenser, so my next stop was dialling in some 'air' with a few decibels of high–shelving boost at 17kHz, although both the slope of the shelf response and the amount of boost varied between the two parts. The next thing I noticed was that the mid–range wasn't yet coming through well enough in the context of the mix, leaving the vocals sounding a bit soft — which wasn't a good thing.
 The horn–section sample that characterises the middle section of 'Rock Show' was sounding rather one–dimensional and lifeless, so Mike processed it with Silverspike's Room Machine 844 plug–in to simulate a real room environment for it — you can see the final mix settings in this screenshot.A dose of peaking boost at around 1kHz helped a lot with that. Initially I just used the URS's '1951' Pultec EQ emulation, but once I was getting into the right ballpark I began flipping the different bands to other models, to see what might work best in each case. As I'd expected, at the high end the Pultec was my preferred choice (it's great at brightening a sound without showing any strain), but the mid–range boost certainly benefited from a change on both vocals, to the markedly less polite '1970' (Neve 1073) and '1980' (SSL E–series) options respectively. Finally, I upped the transformer–input stage model's character setting to make the sound a bit larger than life — I can never seem to get enough of transformers! This is one of the things I really like about Console Strip Pro: it sounds good however much you use it, but gives lots of subtle tone–shaping options to play with on those occasions where you have the time to harvest a few more of the diminishing returns.
 No traditional send reverbs were used on the Pocket Lips mix. Instead, Mike used two simple delay effects for the purpose of blending the vocals, one of which, Blue Noise's Mountain Echo simulated tape delay, can be seen here as used in the final remix.De–essing was an essential because of the extra high–end (Digital Fishphones' Spitfish to the rescue, as usual), following which I compressed both vocals heavily, aiming to maximise the audibility of the lyrics. The URS plug–in's Urei 1176 model in its 'All Buttons' mode was an important part of the recipe (that one's always a stalwart when it comes to hurricane–force vocals), but I also followed that up with George Yohng's W1 limiter (apparently a Waves L1–inspired algorithm), to pin the levels fairly comprehensively throughout. Nonetheless, the vocals required plenty of fader automation in the final stages of the mix, because some of the vocal syllables weren't delivered with quite the same attack as others, and little level boosts were necessary to maintain the rhythmic momentum.
For the numerous rapped backing–vocal parts, mostly it was a case of high–pass filtering across the board and some judicious dynamics processing from W1 or Dirtsqueeze, although I also used Ruby Tube or MDA's Combo plug–in on some tracks to make them slightly 'rowdier'. Processing the female vocal parts followed similar lines, although the high–pass filter was set higher, at about 670Hz, and I relied on MDA's simple Limiter plug–in for most of the dynamics processing.
Synths & Decks
 Here you can see the extent of the final vocal arrangement — by multing different phrases to different tracks, Mike was able to use varied processing to improve the contrasts between song sections.The remaining synth parts comprised a separate Korg bass during the middle section, and another synth drone during the choruses. The former needed no processing, although I muted the separate sub–bass track during that section to avoid low–frequency problems. The synth drone also had quite a lot of low end in it, but I high–pass filtered it fairly savagely, leaving only the most audible upper range, and phased the result with one of Reaper's Jesusonic guitar effects to give it a greater sense of movement.
The decks parts were interesting to work with, because they don't have as much prominence in most music as they have here. Scratch DJ'ing actually has quite a lot of dynamic range, and I found the tracks all needed a good deal of evening out before I could find a suitable fader level for each one. For most of them I ended up trying out the new Rocket compressor from Stillwell Audio at 20:1, dialling in its most ridiculously fast attack time, and setting its release just shy of the point of distortion, to really tweak up the smaller details in the tracks.
 In order to bring out as much detail as possible in the scratch DJ parts, Mike turned to Stillwell Audio's fast–acting new The Rocket compressor, and compressed heavily at a 20:1 ratio.The turntable tracks included the sampled phrase that forms the backbone of the song's middle section, and because this was more pivotal to the sound as a whole I spent a little more time dealing with that. The main problem was that it was in mono, and it seemed to me that it wanted to feel a bit wider in the mix, so I pulled up an instance of Silverspike's Room Machine 844 to try to give it a bit more space. This specialised reverb simulates the effect of playing your sound in a room and then recording it through a stereo pair of mics, and tends to work really well when you need some feeling of real space around an otherwise dead–sounding sample or close–mic, but without any obvious reverb tail.
As usual, it came up trumps here, and really helped pull the sample together with the drum sound. I kept the room–size and miking–distance settings fairly low, and balanced the amount of damping in the simulated room using the 'wet' effect–level control. This, and some hefty gain–reduction and saturation from Reaper's built–in Dirtsqueeze plug–in, helped make things nice and solid–sounding, while a little of Reaper's Exciter pushed the sound forward in the mix without my having to fade it up too far.
Loud & Proud
Once all the tracks were beginning to pull together, I popped another Console Strip Pro into the master bus and selected my favourite SSL bus compressor preset, adjusting the threshold and ratio controls to get a bit of gain bounce. This took too much of the low end out of the kick drum, though, so I increased the attack time up to 35ms to let more of the front end of the drum waveforms through, and high–pass filtered the compressor's side–chain at 40Hz, to make it less sensitive to the sub–bass.
There remained only a bit of automation work to guide the listener's ear towards the most important parts of the mix: the drum fills, exposed bass moments, little backing vocal phrases, and so on. In some mixes this isn't really necessary, but where everything's fighting to be right in the listener's face, you need a little 'crowd control' to prevent things getting confused. It's important to remember that you can only start doing this kind of work once you can hear the results in the context of any gain changes being created by the master bus compressor: if you tackle this automation before you compress the master bus, you're likely to have to redo a lot more of it once the compressor is in line.
 Referencing the mix against some tracks from NERD and Jay Z showed that the mix needed more extreme high–end, and a little less of the sibilance region. I tackled that by switching in the EQ on my master–bus instance of Console Strip Pro. A low–resonance 5dB high–shelving boost at 20kHz, and a 2.5dB cut at 6.6kHz, balanced the overall tonality more appropriately. I could, of course, have EQ'd the individual tracks to achieve these changes, but why do this with lots of lower–quality EQ plug–ins when you can make a better–sounding job of it with a single high–quality processor on the main output?
The final stage was to push the track to an appropriate loudness level, which I did by combining a few decibels of straight clipping with four decibels of limiting from BuzMaxi3. Using clipping to take some of the strain off the limiter is very common in commercial releases in this kind of style, as it tends to keep a punchier sound, albeit at the expense of slight timbral side–effects on the drums.
Necessary Force
 It might be easy to come away from this article with an impression that heavy processing is a good thing in its own right, but that's not the case. Sure, there are times when heavy EQ, compression, and distortion have a role to play in achieving particular sounds, but you need to be careful to maintain the contrasts between different sounds — otherwise everything will become a mush. So, although there were a fair few smoking plug–ins by the end of this mix, a third of the track count in my mix actually used only Reaper's internal high/low–pass filters, and each of the more heavily mangled sounds was focused into specific time and frequency regions to try to keep the conflicts between them to a minimum.
As well as writing for SOS, Mike Senior runs Cambridge Music Technology (www.cambridge–mt.com), offering intensive one–day studio courses focusing on the techniques of the world's most famous producers.
Reverb... What Reverb?
Some SOS readers seem automatically to add reverb while mixing, as a kind of reflex action, but this approach doesn't often suit modern high–energy rock or urban styles, where there's little space in the mix for reverb, and the immediacy of the sounds can be compromised by it. When we interviewed Craig Bauer back in SOS February 2006, for example, he commented about Kanye West's aversion to using reverb at all, and Neal Avron also mentioned in SOS January 2008 that he'd felt that there was little space for reverbs in the modern rock sound of Fall Out Boy.
Similarly, for this Pocket Lips mix, I didn't actually use any traditional reverb send effects at all. Some of the backing vocals did need something to blend them together, but a couple of delays were more than adequate for this task, the first a longer feedback delay (the length of which I adjusted during the track to provide a few spot effects as well) and the second a simple, low–feedback, tape–style slapback from Blue Noise's Mountain Echo.
Take Two: Re–recording After The Mix
If you've already listened to my remix on the SOS web site, you may have noticed some parts that aren't in the original mix. The reason for this is that, when I first sent a first draft of my remix off to the band, the more upfront sound spotlighted some elements of the original performances that individual band members weren't happy with — specifically some of the scratch DJ parts and female backing vocals — so they went away and re–recorded those sections. Although this involved rebuilding the remix to some extent to reach the final result, some great new parts were added at this stage, so it was very much worth the effort. It does underline, though, that if you want to make the best use of your mixing time you should make sure you're happy with your performances, even if you don't think that they'll be very audible — because otherwise the balance of the final mix may bring skeletons out of the closet.
Rescued This Month
Pocket Lips are a retro hip–hop collective whose members have all washed up in Cambridge from every part of the UK. The line–up comprises Pete Pocket, Freya Pocket and Mullet Boy (vocals); Mr Margaret Scratcher (scratching/samples); Ben Piper (drums); Geoff 'Stereo' Pocket (bass); and Riggaz (synths). Following successful supporting gigs with Mr Hudson and I Blame Coco, they're concentrating on building up their own profile with a UK tour.
Remix Reactions
Here's what Pocket Lips said on hearing the new mix: "Mike, you are truly a wizard. The mix sounds great — it feels as much fun as when we're playing live through a big PA! The most surprising thing is the more prominent Virus–synth track that we had all but left out of the original mix, and that has changed the whole song dramatically into the pop tune that we were originally trying to put together. When we first heard it we thought you'd added it yourself, and it was only later that we remembered having laid that particular track down!
"The inclusion of the 'Banned from the rock show' BVs parts has also beefed the track up, making it sound a great deal more professional. We've had the opportunity to play the tracks side by side over a large PA since getting them, and the SOS mix sounds decidedly more precise and slick. We're very happy, and will be posting this as our main mix version very soon!"
You can hear before and after mixes, as well as some of the multitrack files, online at www.soundonsound.com/sos/dec08/articles/mixrescueaudio.htm