 Two methods were used to rebalance the cymbals against an overbearing hi–hat in the overhead microphones: firstly the cymbal onsets were ridden up in level using fader automation; and, secondly, additional heavily compressed cymbal samples were layered in to add extra ‘tail’ to each hit.
Malenky Slovos: There are times when achieving a satisfying mix requires a lot of creative input — not to mention some extreme effects!
When reader Andrea Imberciadori emailed me for help with a mix he’d done for his band, many of his concerns were things I frequently hear from home–studio users. Not only was he struggling to avoid clutter and muddiness in the balance as a whole, but he was also having difficulties controlling the low end and retaining vocal clarity. In addition, the choruses felt disappointingly lacking in impact, while the more experimental textures elsewhere weren’t yet coming across as engaging or immersive enough. Listening to his latest mix version, and comparing it with a handful of commercial reference tracks nominated by the band (in particular a couple of cuts from Interpol’s first record), I shared his concerns, and also felt that the drums didn’t yet have the required combination of punch and aggression. So I agreed to remix the project in my Cockos Reaper DAW system, to see if we could come up with a more satisfactory result.
Preliminary Drum Balancing
I’d usually start a rock mix with the drums anyway, but I felt it was doubly important in this case, because it seemed as if the drums needed most work to compete with the reference sonics. The drummer’s instrument had been captured with no fewer than 11 mics, the majority of which required very little balancing work: some high–pass filtering to counteract proximity effect and reduce LF kick spill on the close snare and tom mics; a low–pass filter to take some edge off the kick drum’s beater ‘click’; and a couple of narrow notches to de–emphasise unhelpful pitched resonances on the snare and floor tom.
The first real mixing challenge was the hi–hat, which dominated the rest of the kit instruments in the overhead mics, especially during the song’s choruses, where the drummer was riding the open hat. The first ramification of this was that setting the overheads fader for a sensible hi–hat level left the crash cymbals sounding too weak. In the absence of any cymbal close mics, one way to tackle this is to push up each crash hit by automating the overheads level. However, that only provided half a solution here, because an open hi–hat hit usually arrived within a quarter note of each cymbal crash, so I had to fade the overheads back down well before the cymbal crash had finished its decay. The rest of the fix involved layering in some heavily compressed additional cymbal samples underneath the live performance to reconstitute the missing sense of sustain.
 The overhead tracks were heavily compressed with Stillwell Audio’s The Rocket compressor, but this left the cymbals feeling slightly harsh, so ToneBooster’s Ferox analogue tape emulation was also applied to smooth off the HF timbre.
 Settling for a lower overheads level than I’d have liked also created problems for the snare sound, because I now had to rely more heavily on the close mics. While the ubiquitous over/under dual–miking strategy the band had adopted did a respectable job of catching the opening section of each drum’s sound, the problem with close–miking is that the sustain phase of the captured sound comprises mainly resonances from the skin and shell, rather than the noisier timbre of a room–reflection tail. The simplest solution would have been to replace the snare close mics with a triggered sample, but I usually try to avoid that, if only because it tends to be a bit of a high–risk strategy whenever the client’s already been living with the original sound for a while. Instead, I opted to gate out the less appealing resonant sustain from the live snare tracks, and replace that with synthesized reflections using Christian Knufinke’s SIR2 convolution engine. To avoid an obvious ‘reverb’ sound, though, I faded out the impulse response after about 130ms using SIR2’s envelope controls, and then applied a 24dB/octave high–pass filter at 550Hz to isolate just the high frequencies.
Punch & Aggression
That said, I did still choose to trigger an additional snare–drum sample — but for a different reason. Comparing my basic drum balance with the reference mixes, I noticed that the Interpol snare sound had a certain low–mid-range ‘thud’ that kept the drum sounding punchy despite direct competition from thick electric–guitar textures higher up the mid-range. I first attempted to draw this character out of the Malenky Slovos drum tracks using EQ, but when my gain settings started heading north of 12dB, I took this as a sign that equalisation wasn’t really the answer. Finding an appropriate sample took some doing, but eventually I tracked down something promising in an old Loopmasters loop library from live drum & bass drummer KJ Sawka — when it comes to samples, you never quite know where you’re going to strike gold! Once I’d chopped the snare out of the loop, I triggered it from Reaper’s bundled sample–player plug–in, ReaSamplOmatic5000, and then bounced it down as audio so that I could ensure a consistent phase–match between the waveforms of the sample and the live track. I never leave sample–trigger plug–ins running live, because if their timing varies even a minuscule amount from pass to pass, the shifting phase interaction between the sample and the live tracks makes the combined snare tone impossible to nail down reliably.
By this point, I’d built a reasonable ‘foundation’ balance of the live kit using just EQ and some supplementary samples but, unsurprisingly, without any compression this sounded rather tame! I didn’t just ladle heavy compression onto the drum bus, though, because it’s very difficult to do that without overly compromising the kit’s transient attack. Instead, I reserved the main compression ‘crush’ for the overheads channels, hammering them into Stillwell Audio’s 1176–inspired The Rocket limiter and selecting its ‘all–buttons’ mode with the maximum Impetus setting to give the ‘hairiest’ possible result!  A simulated plate–reverb impulse response was shortened in Christian Knufinke’s SIR2 and filtered with Reaper’s ReaEQ so that it could be used to add a more suitable HF sustain character to the snare close–mic signals.
 Although I liked what this did for the drum tone in a general sense, it did introduce a touch of upper–spectrum harshness that I wasn’t that fond of, even when I switched to the plug–in’s smoother–sounding oversampled ‘Decadence’ mode. The rounded highs of ToneBooster’s TB_Ferox analogue tape emulation plug–in helped here, but I had to cut a couple more decibels at 15kHz with Reaper’s ReaEQ equaliser before I was happy with the cymbal and hi–hat timbres.
Now I was able to compress the drum submix with a bit more finesse using Cytomic’s The Glue plug–in, an SSL bus compressor emulation. Using a fairly short 100ms release time, I applied another 3–4dB of gain reduction to add some extra level–pumping overall (can you ever have enough in rock?!), and then set the attack time to 3ms to allow the leading edge of each transient to pass through undetected — in effect, increasing drum attack definition across the board. For a final touch of indie raggedness, I also sent a balance of the kit through an instance of FabFilter’s Saturn plug–in, mixing in a small amount of reprehensibly grubby-sounding distortion from its Broken Tube algorithm.
Bass & Guitars Texture
 Here are the two different distortion settings Mike used for the bass guitar track. The top screen shows the harmonic–thickening patch which filled out the centre of the general guitar-and-bass texture; the bottom screen is the much more heavy–handed setup used for the aggressive bass breakdown which follow the song’s first chorus.
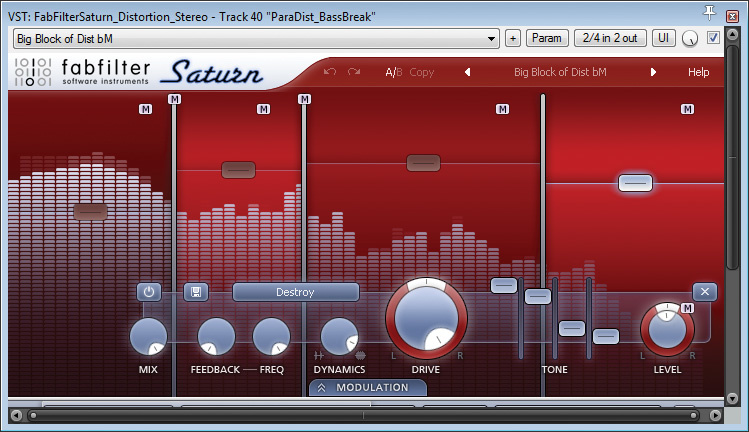 Although Andrea had encountered difficulties keeping the low end clear, I think this wasn’t actually the fault of the kick–drum or bass sounds, which actually worked quite well together in the LF region, the kick drum’s sub–100Hz ‘woof’ providing a nice foundation over which to lay the bass part’s strong 100–300 Hz harmonics. My main bass–channel processing moves were inserting a 50Hz high–pass filter to improve the kick drum’s low–octave rhythmic definition, and applying 2–3dB of 3:1 compression from Reaper’s ReaComp plug–in to even out the performance a fraction. The real low–end gremlins were the pulsating sub–250Hz components of a synth bells patch that underpinned most of the song. Although these frequencies gave a fantastic sepulchral atmosphere while the bass part was absent from the arrangement (ie. at the top and tail of the song), elsewhere they turned the whole low end of the mix to sludge! Once the malady was diagnosed, it was easily treated with an automated high–pass filter, allowing only as much low–spectrum energy through from the bells track as each section of the song would tolerate.
Next up were the two main chorus guitar layers, one an octave doubling of the other (roughly speaking), and it didn’t take much EQ to fit them together with what I already had: some high–pass filtering to keep the low end uncluttered; a moderate 6kHz cut to make one of the layers a little less abrasive; and some tonal sculpting of the lower–pitched layer with Stillwell Audio’s Vibe EQ to remove low–mid-range muddiness and bolster some tuneful 2.5kHz harmonics. Whereas Andrea had kept both these guitar parts fairly central, I decided to make more of a statement by panning them to opposite sides of the image. However, once the panning opened out beyond about half–left/right, the stereo picture began to feel a bit lop–sided — the parts weren’t simple double–tracks, after all. To widen the image further and rebalance the stereo image a little, I added a stereo 32nd–note slapback delay patch which I designed so that the left–side guitar part appeared hard right in the echo return, and vice versa.
Although this new stereo guitar presentation certainly helped the chorus make an impact, and allowed me to fade the guitars up reasonably high with little danger to vocal intelligibility, a side–effect of it was that the clean bass guitar at the centre of the panorama now felt incongruously polite–sounding, and the sense of guitar power didn’t survive well under mono listening conditions. Reaching for FabFilter’s Saturn again, I set up a distortion send for the bass part to give it more attitude — a preset based around the ‘Lead Amp’ algorithm had the mid-range thickness I was looking for, although it was too fizzy at the high end to use in its raw state until gently low–passed with ReaEQ. Nonetheless, the stereo image still felt rather hollow, so I cast around the rest of the arrangement looking for some other part that might be able to help out.
However, the only other backing parts provided for the chorus were synths. The aforementioned stereo synth bells track wasn’t going to help, and would have lost much of its atmosphere if narrowed to mono anyway. The other synth was a piercing, massively distorted patch (imagine a Cylon shaving with an angle–grinder!), and I was loath to feature it too heavily in the centre of the mix for reasons of vocal masking, eventually using stereo flanger and rotary–speaker effects to diffuse it into a more atmospheric form. After a bit of head–scratching, though, I noticed that there was one more part I could use: some distorted ukelele strumming that the band had used for the bridge between the second and third choruses. Although the chords fitted fine in the chorus, the sound was too ‘forward’ in the upper mid-range for what was musically rather an uninteresting part, so I cut the 1–2 kHz region fairly heavily with ReaEQ to slot it into the mix less obtrusively. I also used a tremolo plug-in to artificially restore some of the dynamic variation that the distortion had blotted out (see box).
Squeezing In The Vocals
We’re often on a quest for larger–than–life vocal sonics in Mix Rescue, but I felt that the chorus sections of this mix demanded the opposite: a thinner timbre designed to cut through the mix and deliver the lyrics efficiently, without sonically overshadowing the backing instruments and thereby undermining their illusion of power. Pulling off this kind of sound typically involves recessing the voice’s low–mid-range zone to make it seem subjectively ‘small’, and then emphasising the upper mid-range to maintain its presence and intelligibility. Unfortunately, the raw vocal capture had stacked the odds against Andrea, being well–endowed in the lower spectrum and short on upper mids, so it was little wonder that he’d found it difficult to make headway with it at mixdown.
For my remix, I kicked things off by high–pass filtering the vocal channel all the way up at 365Hz. I would rarely use such a high cutoff frequency for male vocals, but in this case, the high pitch register meant that the filtering mostly affected the fundamental frequencies of the notes, only cutting a couple of decibels from the first harmonics. Then I tried boosting the mid-range with an EQ peak, but it quickly became apparent that this wasn’t going to do the job. Yes, I could bring the vocal forward in the balance that way, but at the expense of an unattractively spindly and nasal timbre. The recording simply didn’t have enough mid-range harmonic density to compete with all the rich distorted timbres of the backing parts.
Well, if you can’t beat ‘em, join ‘em! Firing up an instance of FabFilter’s Saturn distortion plug–in on the vocal channel, I found a ‘Smooth Amp’ preset that seemed promising — in fact, if anything, it was too pokey in the 3kHz region, so that I had to rein that in with a 6dB peaking cut from ReaEQ. The amount of distortion was a bit too variable from moment to moment too, so I stamped on the vocal levels with a combination of The Rocket and ToneBoosters Barricade limiter, applying a big 8kHz EQ boost in the compressor’s side–chain to head off sibilance worries. Finally, I arrived at a sound which could make itself heard even at a reasonably low level in the mix. I applied similar tactics to the chorus backing vocals, and to a lesser extent also to the verse lead part — the latter ditching the limiter, substituting a more restrained Clean Tube algorithm in Saturn, and allowing a little more low mid-range to survive through the EQ.
Beyond The Choruses
Having a beefier chorus texture ‘in the bank’ gave me more leeway to play with the verse sounds, because the risk of making the verses sound bigger than the choruses was significantly reduced. The verse arrangement was also generally sparser than the chorus, and it’s always easier to find room for everything when there’s more space available. I did pull one sly little DAW–specific stunt, though, setting up a 3kHz EQ band on one of the background pads and then using Reaper’s cool Parameter Modulation function to cut that region only when the lead vocal was present — something I initially tried just for the hell of it, but which turned out to be rather effective at clarifying the voice’s presence region.
 In order to reduce flamming between a programmed EZ Drummer breakbeat and the live drums, Mike edited the EZ Drummer virtual close mics for any breakbeat events that overlapped with the drummer’s live hits.One technical concern with the verses was that the band had supplemented the live kit with a kind of programmed breakbeat from Toontrack’s EZ Drummer. I liked the basic concept behind this addition, because it added lots of nice rhythmic detail, but the problem was that many of the breakbeat hits were flamming with the live tracks, diluting the drummer’s apparent groove and punch and infusing the production with an unwelcome whiff of ‘demo’. Initially I considered trying to remedy this with timing edits, but then it struck me that allowing the two sets of drums to overlay each other might actually be making a rod for my own back, making the drummer appear to lose steam when the breakbeat disappeared at the onset of the chorus. So instead, I used my editing tools to cut away any breakbeat hit that coincided with a live drum hit, in other words leaving only those bits of the breakbeat that actually added extra rhythmic interest to the live drumming. (Or, to be more accurate, I only edited the virtual close–mic tracks from EZ Drummer — the supplied virtual room mics didn’t cause the same flamming problems.)
Andrea had already tried to give the verse’s lead vocal an unsettling nature using a rather metallic, hissy reverb patch, but I felt that this distanced him too much in the mix, as well as unduly emphasising his sibilance. Instead I used a combination of spring reverb (running as an impulse response in SIR2) for its metallic flavour, and supplemented that with a weird eighth–note reverse–delay patch from one of my favourite freeware plug–ins, GVST’s GRevDelay. Tailoring the spring reverb’s tone with EQ helped me avoid sibilance problems, and I ended up being pleased enough with the sound of it that I applied it to the chorus lead vocal too, along with a two–tap eighth–note ping–pong delay for stereo width and sustain enhancement.
As the basic balance began to come together, I also applied a few more global processes. I applied another couple of decibels of compression to the drums–plus–bass subgroup and also to the master bus (both with The Glue again), and also tweaked my mix’s overall tonality a little with FabFilter’s Pro–Q to bring it closer in line with the band’s references. In terms of global mix effects, I only really used one rather artificial–sounding reverb with high–pass filtering in its return channel to give a little bit more width and sustain to the upper octaves of the spectrum — there wasn’t really space in this mix for anything more.
Creative Additions
As the sonics began to come together, it became clearer where the arrangement might benefit from a bit of more creative input. Although the band had already taken the lead here, spicing up a number of the parts with obvious effects for variety, I felt they could have pushed further in that direction — so I picked up where they’d left off...
First, the distorted bass breakdown after the first chorus turned even nastier, courtesy of Saturn’s ‘Screaming Amp’, ‘Broken Tube’ and ‘Destroy’ distortion algorithms, and I also supported it with a big boost in the drum kit’s parallel distortion level and a trashy polyrhythmic snare delay I’d run through Softube’s Vintage Amp Room and Melda’s MMultibandAutopan and MMultibandPhaser plug–ins.  Just some of the plug–ins that were used in the remix to create a new vocal sound effects collage during the bridge between the song’s second and third choruses: Softube’s Vintage Amp Room, FabFilter’s Timeless 2, and Melda’s MRingModulator.

Next, a sample of a cat meowing, which had seemed eminently dispensable at the outset, took on a whole new lease of life as an atmospheric layer in the verses once I’d time–stretched the living daylights out of it and passed it through a chain of two FabFilter Timeless 2 plug–ins to give it stereo spread, auto–wah and a long echo tail.
For the bridge between the second and third choruses, not only did I recycle the guitar solo from the earlier bass breakdown (with a new wobular pitch–modulated delay from Timeless 2) and the cat sample from the verse (this time shifted down two octaves to transform it into a kind of lowing sauropod), but I also went wild with vocal–fed effects ‘spins’ using Timeless 2, Vintage Amp Room, and Melda’s MRingModulator plug–in.
The danger with using too many presets from the ‘Space Cadet’ folder, though, is that you can easily end up with a confusing mush, and the way I avoid this is to bounce each effect as audio, rather than letting them all run live. That way I can build up a more comprehensible special–effects texture almost like a patchwork quilt, editing out clutter so that the most interesting moments from each effects channel can always be clearly heard.
Look Out For The Fuzz!
This month’s remix demonstrates how useful some lesser–used mix effects can be. For example, the drums, bass and vocals were all distorted to some extent to improve harmonic density and presence; spring reverb and reverse delay helped the verse vocal catch the ear; and a custom–waveform tremolo patch very effectively added attack to one of the guitar parts. Likewise, don’t write off your plug–ins’ more bizarre special–effects presets as unusable, because they can often sound great as part of a carefully edited collage.
Tempo–driven Balancing
.") This month’s Mix Rescue project is the song ‘Matterplay’ from Italian indie–rock band Malenky Slovos (www.malenkyslovos.com).The most common gain–control processors used at mixdown are those designed to react to incoming signal levels — in other words things like compressors, limiters, gates, and expanders. However, from time to time you encounter a gain–control task that’s better addressed by a processor that reads your DAW’s tempo grid. For instance, in this month’s remix I wanted to enhance the attack of the rhythmic ukulele strumming during the bridge, but because the track had been heavily distorted, there was negligible level variation per strum, and hence nothing I could work on with normal dynamics processing. Fortunately, however, the strummed part was a simple eighth–note pattern and the song had been recorded to a click track, so I was able to use a tremolo plug–in (Melda’s freeware MTremolo) for the job instead. All I had to do was synchronise the tremolo waveform to the DAW’s tempo map, set its retrigger rate to eighth notes, and then design an appropriate custom waveshape to isolate just the onset of each eighth–note period. Finally, I used the plug–in’s Depth setting to create the moderate gain–pulsing effect you can hear in the remix.
This month’s Mix Rescue project is the song ‘Matterplay’ from Italian indie–rock band Malenky Slovos (www.malenkyslovos.com).The most common gain–control processors used at mixdown are those designed to react to incoming signal levels — in other words things like compressors, limiters, gates, and expanders. However, from time to time you encounter a gain–control task that’s better addressed by a processor that reads your DAW’s tempo grid. For instance, in this month’s remix I wanted to enhance the attack of the rhythmic ukulele strumming during the bridge, but because the track had been heavily distorted, there was negligible level variation per strum, and hence nothing I could work on with normal dynamics processing. Fortunately, however, the strummed part was a simple eighth–note pattern and the song had been recorded to a click track, so I was able to use a tremolo plug–in (Melda’s freeware MTremolo) for the job instead. All I had to do was synchronise the tremolo waveform to the DAW’s tempo map, set its retrigger rate to eighth notes, and then design an appropriate custom waveshape to isolate just the onset of each eighth–note period. Finally, I used the plug–in’s Depth setting to create the moderate gain–pulsing effect you can hear in the remix.
Remix Reactions
Andrea Imberciadori: “I really like it! The chorus opens up a lot more, and the bass rocks! It really drives the mix gloriously now, and the instrument’s warm, slightly saturated tone is wonderful. I love how Mike took some liberties with the material, which was exactly what I was hoping for, and his vision for the track was spot–on — all of us really liked his arrangement input. We also unanimously loved the voice treatment/presence and all the effects. Thanks Mike, for the enthusiasm and creativity!”
Rescued This Month
 This Melda MTremolo plug–in was used to add on–beat attack to a distorted ukulele’s regular eighth–note strumming pattern — something that would have been extremely difficult to do with traditional level–based dynamics processing because of a lack of level variations in the recorded track.This month’s Mix Rescue candidates are Malenky Slovos, an indie rock band hailing from La Spezia in Italy and comprising Cristian Orlandini (drums), Simone Fioravanti (bass), Andrea Imberciadori (guitars/keys), Lorenzo Eva (trumpet/guitars) and Gianluigi Sem (vocals). The song featured here is called ‘Matterplay’, co–written by Simone Fioravanti, Andrea Imberciadori and David Power.