Our engineer works the mix to get a pop-funk track competing sonically with the likes of Jamiroquai.
When Axel Roland first played me his music, it was clear he’d already put his best foot forward, supplementing his own considerable singing, keyboard-playing, and sequencing talents with judicious overdubs from other live instrumentalists, and working with a female singer to build up an engaging backing-vocal arrangement. However, his production-values benchmark was Jamiroquai — a high quality bar — and I felt that a good deal of fine-tuning would still be needed to sound competitive in that kind of company. So I suggested that I put together a mix to demonstrate the kinds of tweaks I had in mind.
Mixed This Month
![]() Lingua Funqa is the creative brainchild of Axel Roland. Graduating from the prestigious Berklee College of Music, Axel first built a career in New York as a jazz pianist and composer, releasing records under Axel’s Axiom moniker. Since 2017, however, he’s been forging a new pop-funk sound with the help of several long-time musician collaborators, and the song featured in this month’s article is his fourth single, ‘Just One Minute’.
Lingua Funqa is the creative brainchild of Axel Roland. Graduating from the prestigious Berklee College of Music, Axel first built a career in New York as a jazz pianist and composer, releasing records under Axel’s Axiom moniker. Since 2017, however, he’s been forging a new pop-funk sound with the help of several long-time musician collaborators, and the song featured in this month’s article is his fourth single, ‘Just One Minute’.
Alongside Axel’s singing, songwriting, and general production skills, it also showcases the talents of drummer Sean Rainey (recorded by Rozhan Razman at New York’s Riro Musik), violinist Benjamin Sutin, and backing vocalist May Cheung.
Drum Editing
First off, I wanted the song’s groove to feel more consistent, and began by focussing on the drums. The performance was decent enough that, had this been an indie rock song, I’d probably have left it untouched. But set against Axel’s sampled loops and multiple quantised MIDI parts (including the main bass synth), I felt it really had to be nailed to the grid. This isn’t the kind of decision I ever take lightly (not least because it can be a pain in the arse to implement!), but here it struck me as unavoidable.
While checking through the drum slices, I also attended to another important issue. In common with many classic funk and disco tunes, the drums combined a four-to-the-floor kick-drum pattern with a snare backbeat, and few drummers can maintain this without their kick and snare occasionally disagreeing about the location of beats two and four. These unwanted flams sound less punchy and tend to undermine the groove, but fortunately it’s usually not too tricky to fix them by copying and pasting more solid hits from elsewhere in the song. You just need to remember to do your edits across all the drum tracks, so no phase relationships are disturbed; otherwise your whole kit sound may fluctuate from moment to moment.
 Here you can see one of the flammed kick-snare hits that were replaced as part of the drum-editing preparation for this month’s mix.
The drum room mics also caught my ear because they suddenly changed timbre between the first and second verses. (I’m guessing a mic got knocked out of position between takes that were subsequently spliced together.) As luck would have it, the drum parts in those verses were pretty similar, so I could recreate the first verse’s pattern out of pieces of the second without any real difficulty. Something similar occurred with the guitar part, where the second chorus unaccountably sounded thinner than the others, but again it proved straightforward to swap this out.
 Axel Roland.Once the drums felt totally solid, it wasn’t too hard to bring the timing of the live instruments and vocals more closely into line with them using Reaper’s standard audio-editing tools. I spent some time, though, specifically tidying up note ends — something that project-studio folk too often overlook, in my view. For instance, editing the tails of some of the bass notes and string-section chords to coincide with prominent beats boosted the apparent energy and punch of the drums. I also made a point of experimenting with overall timing offsets on most of the rhythmic tracks to refine the groove of each in relation to the drums. I find that hard-quantised MIDI parts often seem to fit more smoothly with grid-edited drums if the former are delayed by 10 or 20 milliseconds, which is how things turned out in many cases here.
Multing Matters
The other main editing task was multing out sections of the multitrack that I felt might need separate settings. The drums, for example, had been stitched together from sets of takes featuring different snare drums. By hiving off the second snare’s close mics to separate tracks, I could better control the sound transition between song sections. A triggered snare sample track had also been provided, but the sample choice changed for the middle section, so it made sense to mult that too. Further multing allowed me to adapt its phase relationship and release characteristics for the song’s verses and choruses independently. The congas track was another obvious multing target, constructed as it was from a chain of three different-sounding loops.
 The final drum tracks were compiled from takes featuring different snare drums, so there was a clear case for multing the snare-mic signals at mixdown.
But the biggest multing job was the backing vocals. Although only eight tracks were provided, each contained several different musical ideas: harmonies supporting the lead singer; little contrapuntal lines and responses; and wordless vocal pads. Not only was it a question of separating those ideas onto their own tracks, but also of taking the opportunity to weed out some duplicated harmony notes. You see, most singers work out backing-vocal arrangements via a fairly informal process of improvisation. This can be a fun and inspiring way to work, but there’s a danger that certain pitches end up with many more voice layers than others, such that some chords feel poorly balanced internally. It’s usually easier, therefore, to fit a given group of backing vocals into your mix if you keep the amount of doubling fairly consistent from chord to chord.
This alone already doubled the backing-vocal channel-count, and I also added four bus channels for communal control of functionally similar lines. However, some of the lead-harmony singers switched between chest and head voice at a few moments, a change in tone that warranted different EQ treatment, and a number of the stereo backing-vocal files that contained just two voices panned hard left and right were easier to edit when split onto separate mono tracks. So in the end those eight tracks of backing vocals were spread over 26 channels and nine group busses! Crucially, this allowed me to finesse the sound of each element of the backing-vocal arrangement easily without avalanches of mix-automation data. So, for example, I could give the female lead-harmony lines more warmth, pan them closer towards the lead, and flatter them with hall reverb; whereas the same singer’s wordless ‘oohs’ could be differentiated using a much thinner tone, wider panning, an ethereal chorused-reverb shimmer, and some rhythmic gain pumping.
 In the upper screenshot you can see the eight stereo backing-vocal tracks that were part of the original multitrack, whereas the lower screenshot shows how Mike split and multed that audio over 26 tracks for mix purposes.
Sounding Rubbish
With the editing out of the way, I began building a static mix of the song’s climactic section (the final chorus). The Jamiroquai reference tracks Axel had provided covered a fairly broad range of different sonic approaches, so there was no clear template to follow in this respect. As such, I figured I’d follow my intuition to start with (albeit with a memory of those references at the back of my mind), and then work towards a final concept from there once I’d built a mix texture I could sensibly A/B compare with the competition.
With this in mind, I didn’t attempt to radically transform anything in the first instance, but just tried to get a respectable balance without too many fancy effects. This process was, frankly, pretty mundane for the most part: the usual phase and polarity checks; some EQ to counteract muddiness and masking; some dynamics processing to stabilise mix levels and tidy up a few trailing kick-drum resonances; some de-essing; some stereo widening on the two keyboard parts; a splash of reverb on the strings; and a couple of decibels of master-bus compression. Probably the most leftfield thing I did was boost the bass synth’s fundamental frequency with a pitch-tracking EQ band from SoundRadix’s Surfer EQ 2, because the part covered a range of more than two octaves and I was concerned that normal low-frequency EQ would only work well for a minority of the pitches. It was also tough to make the guitar tone audible enough in the mix until I’d thickened it up with parallel distortion from an old 32-bit freeware Aradaz Amp Crunch amp simulation (gently rolled off above 1.2kHz using Voxengo’s freeware linear-phase Marvel GEQ).
Things began to get more challenging once I bounced out this first mix section to do some proper comparisons within a separate Reaper project — it sounded rubbish: muffled overall tonality and congested low mids; stodgy drums and generally sluggish-sounding rhythmic elements; narrow and uninspiring stereo image; and overbearing vocal sibilance. And all these discoveries were made with Axel sat right next to me!
Now, readers of this column often complain how dispiriting mix referencing can be, and I’d like to reassure them that it gets easier with experience. But I’d be fibbing if I did. Honestly, I never know from one mix to the next how on-target my first bounce-down’s going to be. Once in a blue moon I get lucky, hit the nail squarely on the head first time round, and spend the rest of the day grinning like an idiot savant. Much more typically, however, that first bout of mix referencing results in my heaving an enormous sigh, filling a sheet of paper with barely decipherable mix-revision hieroglyphs, and then slinking off grumpily to boil the kettle. Where experience has helped, though, is that I now realise this slightly masochistic exercise is all in a good cause. Anyone can import a bunch of tracks into their DAW and use it to generate some kind of output file. That’s the easy bit. The real mixing work begins when the referencing process faces you with incontrovertible evidence that you suck, and you’re forced to react constructively!
Vetting The References
 Stylistically, Jamiroquai was the top name to compete with, but it took a while to narrow down which tracks from their many albums would be most suitable for mix-referencing in this specific case.
 For me, that meant dealing with the overall tonality first. I find it’s difficult to judge anything else before that’s fairly representative. However, that meant whittling down which of the 10 reference tracks felt most appropriate in this respect. Although there are clearly no right or wrong answers, this requires a good deal of care, because your decisions about the relevance of each reference track are pivotal to how the end result turns out. So, for instance, Axel and I quickly eliminated the Jamiroquai songs ‘Stop Don’t Panic’, ‘Love Foolosophy’, ‘You Give Me Something’, and ‘Black Capricorn Day’ because their overall tonality didn’t appeal as much as the others. The song ‘Talullah’ also seemed less useful, by virtue of being at a completely different tempo (something which impacts on many mix-effects decisions), while the arrangements of ‘Main Vein’ and ‘Dynamite’ felt significantly more stripped-back, and therefore less comparable.
Of the remaining three, ‘Time Won’t Wait’ and ‘Don’t Give Hate A Chance’ were our favourites overall, in terms of sonics, but we also referred back to the third (‘Where Do We Go From Here’) from time to time for a bit more perspective. But why not just narrow it down to just one track? Surely that’d make the mixing process much easier... Actually, I don’t recommend doing that because it encourages you to simply copy the sound of the reference track. The purpose of mix referencing is not to make your track exactly like someone else’s, but to make sure that both songs can exist in the same playlist without anyone feeling they don’t belong together. With a handful of references, you’re more likely to aim for their ‘playlist sound’, rather than fixating on creating a specific kick-drum or vocal timbre that might not suit the arrangement you’re mixing. I also like to shuffle the references periodically in the timeline to make sure I’m not always comparing, say, 1:49 in my mix with 1:49 in the references. Again, it’s about trying to shift your focus away from specific minutiae in the reference tracks and towards the bigger picture.
Back To The Mix
This reference vetting had now clarified my vision for the final mix enough that I could begin working on a remedial EQ curve using Sonimus SonEQ Pro, a favourite of mine for gentle, smooth-sounding equalisation. By the time I’d reached a more comparable tonality I’d added HF shelves of 12dB at 12kHz and 3.5dB at 16kHz, as well as cutting a couple of decibels at 100Hz, 190Hz, and 1.8kHz — I told you the first mix was off-beam! Despite this, though, the low mid-range still felt cluttered, so I returned to my mix project, transferred the Sonimus EQ settings into the master bus, and rolled my sleeves up! The bass could afford to lose 5dB at 150Hz to make space for the keyboards, and I pushed its 850Hz range a little instead. Similarly, with the Rhodes I reduced the 470Hz range in favour of more 2-3kHz. At the high end, the master-bus EQ had made the vocals harsh and very sibilant, so I replaced its former high-frequency EQ boosts with cuts at both 1.2kHz and 8kHz, as well as using Toneboosters TB Sibalance de-esser and TB Flx dynamic EQ to restrain all the noise consonants.
, Mike edited out many of the backing-vocal sibilant sounds completely.") In order to get an airy vocal sound without abrasively over-prominent consonants (or lisping artifacts from extreme de-essing), Mike edited out many of the backing-vocal sibilant sounds completely.
In order to get an airy vocal sound without abrasively over-prominent consonants (or lisping artifacts from extreme de-essing), Mike edited out many of the backing-vocal sibilant sounds completely.
The layered backing parts continued to create unpleasantly powerful ‘s’, ‘t’, and ‘f’ sounds, even when I was de-essing heavily enough to induce lisping, so I chose to mute all but a handful of those consonants entirely with edits. This sounds a little odd in isolation, but you’d never guess anything funny was going on within the full-mix texture, and it meant I could make the backing vocals sound nice and airy without the consonants drilling holes in anyone’s skull.
My other big priority was energising those drum and rhythm parts. One of my favourite recent plug-in acquisitions, Sonible’s Entropy:EQ+, came in very useful here, because of the way it can reduce pitched content. On the kick drum, this had a similar effect to taking the resonant head off, while on the congas it was like adding a load of Moongel to them after the fact — both steps in the right direction, as far as I was concerned. In a similar vein, Reaper’s built-in transient processing added attack and reduced sustain for the snare, hi-hat, congas and triangle, and gates on the over-snare mic and mono room mic restricted their contributions to just a short burst on each snare hit. Low-pass filtering one of the kick mics helped cut out its ambient snare and hi-hat spill, while high-pass filtering the stereo room mics further focussed the kick itself. Cableguys VolumeShaper.
, Sonible Entrope:EQ+ (shown here), and Toneboosters TB Flx (below).") Some of the plug-ins used to tighten and add subjective energy to drum and percussion sounds in this mix: Cableguys VolumeShaper (above), Sonible Entrope:EQ+ (shown here), and Toneboosters TB Flx (below).
Some of the plug-ins used to tighten and add subjective energy to drum and percussion sounds in this mix: Cableguys VolumeShaper (above), Sonible Entrope:EQ+ (shown here), and Toneboosters TB Flx (below). Toneboosters TB Flx.I now had the drums and percussion sounding tighter and more controlled, but I wanted them interacting more with the rest of the balance to imply greater rhythmic urgency overall. Firstly I switched to a more active master-bus compression setting, using Cytomic’s The Glue plug-in with fast attack and release times to deliver 3-5 dB of gain reduction at a 4:1 ratio. Then I used Cableguys VolumeShaper on some of the keyboard and backing-vocal tracks to enact a subtler version of that tempo-sync’ed quarter-note gain-pumping that’s commonplace in many EDM styles.
Finally, the kick and snare still needed to cut through the track better, but fading them up wasn’t the answer, because my muscly new master-bus compression fought back too hard! The most pragmatic solution was to send some of the kick and snare to a new bus, hammer it with transient processing for maximum attack, and then feed that signal directly to the DAW’s outputs, bypassing the main master-bus compressor. I also ended up brightening the whole snare sound at 3.3 and 12 kHz with Stillwell Audio’s hard-sounding Vibe EQ, in search of more ‘snap’. This was only a partial success, so I configured a 5kHz peaking filter in Toneboosters TB Flx as a super-fast upward expander, and then used a comparatively high threshold so that it added a 2dB boost at that frequency for just 10ms or so at the start of each hit.
An Illogical Progression
These measures finally managed to bring my sound into a similar ballpark as the references, and fleshing out the rest of the song was comparatively plain sailing from there, give or take a healthy dose of detailed fader automation. It would be easy, however, to draw a mistaken impression from the last few paragraphs that the work followed some kind of clear and orderly trajectory. Far from it. There was a good deal of trying plug-ins then taking them off again, overdoing settings then reining them back in, flicking vacantly through reverb presets, and — a favourite trick of mine — adjusting a plug-in’s controls with the bypass button active! Furthermore, I had to bounce out a new version of the mix at least another half-dozen times for re-referencing in order to retain any grasp on objective reality. Basically, it was four or five hours of proper graft, for much of which it felt like trying to nail jelly to the wall!
Yet it’s this kind of work that I think’s most important in bringing any mix up to standard, because what you’re fundamentally wrestling with is the most complex mixing question of all: how should my mix sound? For instance, how closely ought your snare sound to match one reference, how much another, and how much can it afford to have its own unique character? There’s no technical answer to this and a hundred similar mix questions, which means putting your own taste on the line by committing yourself to subjective judgements — with all the self-doubt and second-guessing that tends to follow on from that.
Feel The Fear... But Do It Anyway
This month, I’ve focussed on two important areas of the production process that very often prevent project studio owners from reaching their mix goals: pre-mix editing and referencing. I’ve also tried to pass on some practical tips for improving the punchiness of your rhythm parts, improving stereo interest, and adding elements of arrangement ‘ear candy’. Most of all, however, I hope I’ve been able to reassure some of you that you’re not some kind of failure if your first mix attempt misfires, or if referencing feels frustrating, intimidating, or even a bit scary. That’s all part of what mixing is about (for me, at least!), and it’s the effort of overcoming that recurrent purgatory that, more than anything, helps you build a robust skill set.
Candy For The Ears
Although Axel’s arrangement was fundamentally well thought-out, the introduction and the bridge after the first chorus both felt overly long. Indeed, had this been a pure pop production, I’d probably have halved both sections to double the speed of the arrangement build-up (keeping a better sense of momentum) and chop 30 seconds off the four-minute running time. Instead, I introduced additional ‘ear candy’ elements to better sustain the listener’s interest within the existing duration.
The lowest-risk method of doing this, in my experience, is by reworking bits of existing recorded material where possible. With pitched rhythm parts, one of my most tried-and-trusted tricks is to chop the whole part into note-length segments (most DAWs can do this at a stroke) and then to shuffle, mute, reverse, time-stretch, pitch-shift, or otherwise mangle (perhaps with per-region plug-ins) the resulting audio chunks until I get a result that feels both musically appropriate and sufficiently attention-grabbing. You can hear this most prominently on a step-sequenced vocoder part here, but it also supplied a few subtler variations into the guitar and clavinet rhythms. Pitch-shifting and time-stretching also allowed me to drop in some snippets of the chorus keyboard parts as nice little spot-effects.
Another stalwart technique of mine is using mad delay effects — you know, all those ones in the preset list designed to show off how wacky it can be, but which under normal circumstances leave you sucking your teeth. The secret to making these usable is to bounce them down as audio, so you can cherry pick only the most promising moments, and then edit, stretch/shift, and further process those audio clips until they sound their coolest. Then you repeat this process until you end up with a kind of patchwork quilt that’s not only engagingly freaky (and utterly unique), but also tailored to fit that specific musical context. This was another thing I used to spice up that aforementioned step-sequenced vocoder part.; and using a delay effect with an automated pitch-shifter in its return channel (below).") Here you can see a couple of different methods used to spice up pitched rhythm parts in this mix: muting and pitch-shifting different slices of the part (above); and using a delay effect with an automated pitch-shifter in its return channel (below).
Here you can see a couple of different methods used to spice up pitched rhythm parts in this mix: muting and pitch-shifting different slices of the part (above); and using a delay effect with an automated pitch-shifter in its return channel (below).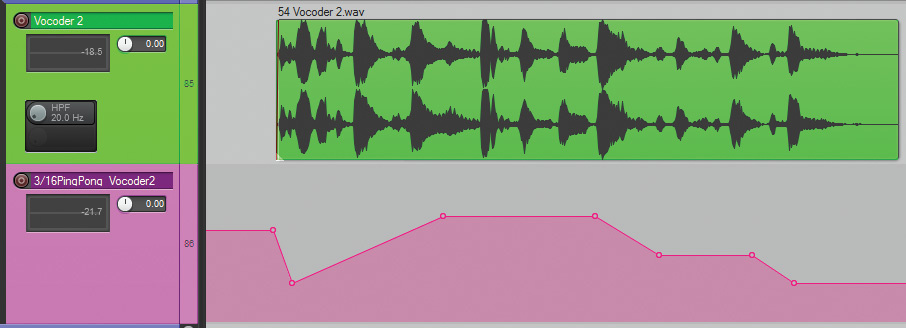
An alternative tactic is to set up a bread-and-butter tempo-sync’ed delay, but then feed that into other more characterful effects. For another of the vocoder parts, for instance, I ran its 3/16th-note ping-pong delay through a stereo phaser and a pitch-shifter, and then used Reaper’s mix automation to sweep the pitch-shifting amount, thereby generating different intervals and some entertainingly swooping artifacts between them.
You can hear another example of this approach on the introduction’s “one minute” delay spin, where I fed a 3/8th-note echo through Melda’s MWobbler filter-modulation plug-in and reduced the delay’s bit-depth such that the tone got progressively crunchier with each echo repeat.
Stereo Enhancements
 Mike used a wide variety of different widening effects to enhance the mix’s stereo interest, including Schwa’s Oligarc Phaser and Melda’s MAutoPan.
 To enhance the stereo interest, I used a bucketload of different widening effects:
- Schwa’s swirly Oligarc Phaser for one of the keyboards and a subtler Blue Cat Phaser treatment on some reverse-envelope SFX;
- Opposition-panned spring reverb with an eighth-note pre-delay for the rhythm guitar;
- An additional wide ambience reverb on the strings;
- Mda’s freeware Leslie speaker simulator for the clavinet and Melda’s MAutoPan for a filtered vocal delay spin;
- An auto-panned delay return from FabFilter Timeless, 3/16th ping-pong delay from Reaper’s ReaDelay, and Melda’s freeware MFlanger for various vocoder effects;
- GVST’s freeware GChorus for the wordless backing vocals;
- Haas-effect widening on the lead singer’s main quarter-note echo;
- And, last but not least, my trusty Harmonizer-style pitch-shifted delay patch on several of the vocal parts.
Although all these different effects are, in a sense, doing the same thing (namely widening the stereo picture), they each also have their own unique side-effects that change the character of treated parts differently.
Delays and reverbs add rhythmic complexity or distance. Flanging and chorusing colour the timbre with modulated comb-filtering. Auto-panning and ping-pong delays introduce an element of side-to-side movement. It’s by blending and contrasting nuances like these that you can really give the stereo experience extra depth and textural variety.
Reader Reaction
 Axel: “The first thing I noticed when I heard the mix for the first time (after having heard my version of the production for what seems like forever) were several small new parts, as well as bits and pieces of other parts of the production in unexpected places. Getting used to all this didn’t take long, though, and all this new creative ear candy really enhanced the whole arrangement.
"It’s a fairly busy arrangement, with obvious pitfalls of sounding messy and too dense, but Mike achieved a great level of transparency. The all-important kick drum is nice and punchy, there’s a good vocal sound and string sound, and in general a nice balance with all elements complementing each other rather than getting in each other’s way.
"Thanks so much for the great mix!”
Audio Examples, Multitracks & Project Files
You can download lots of audio examples from Mike’s mix on the SOS web site, including a number of before/after examples of specific mix elements, as well as the full mix.
Mike has also made available the multitrack audio files, his Reaper project file, and lots more screenshots of his plug-in settings. Full details can be found in the readme file that accompanies the audio examples.
Download | 386 MB