When you’re talking about bass, it’s definitely possible to have too much of a good thing!
Arc Pilot are a four-piece group from Florida who describe their music as “alternative rock”. Like so many bands these days, they have been beavering away in the home studio trying to capture their sound, but had got frustrated with how things were going. In particular, they felt that an unsatisfactory mix was preventing their song ‘Rise’ from reaching its full potential. Armed with a multitrack export and a loaded Dropbox, they got on the Mix Rescue hotline and issued a cry for help.
In the words of guitarist Jonathan Nunes, the band thought that their recording had “the right sound and feel, but it lacks the clarity and brightness/presence I think it needs”. The original mix also did not translate well to different playback systems, and had even sounded grossly distorted on one of the stereo systems they’d tried.
Big Bottom
Sometimes, the reasons why an unsatisfying mix doesn’t work can be subtle and hard to pin down. In this case, however, the biggest issue with the band’s own mix wasn’t hard to identify: the relative balance of the instruments was pretty good, but the spectral balance was heavily skewed towards the low end. There was, in other words, way too much bass — to the point where at least some stereos couldn’t play back the mix at all without distorting. There were also some other respects in which I felt the original mix could be improved on: it felt rather lacking in stereo width, there were noticeable timing issues in places, and the overall mix dynamics didn’t quite work, with the chorus sounding smaller and weaker than the verses.
 and replacement (lower) bass parts were each recorded to two tracks. Despite plenty of compression and other processing, they both required note-by-note level automation, as you can see here.") The original (upper) and replacement (lower) bass parts were each recorded to two tracks. Despite plenty of compression and other processing, they both required note-by-note level automation, as you can see here.When I downloaded the multitrack and imported the audio files into Pro Tools, it was clear that the spectral imbalance was a feature of the original recordings. The core of the band’s sound was represented by multitracked drums, numerous stacked electric guitar parts and a bass guitar recorded both through an amp/speaker combo and a DI output. As expected, the bass amp track had a very ‘flubby’, exaggerated bottom end, but I was surprised to find that nearly all the other miked sources suffered from the same problem. The guitars were all muddy and murky to a greater or lesser extent, and I still have no idea how the band managed to get so much low end out of a snare drum! To add to the fun, they had recorded very hot, so that a number of the files were clipped in places.
The original (upper) and replacement (lower) bass parts were each recorded to two tracks. Despite plenty of compression and other processing, they both required note-by-note level automation, as you can see here.When I downloaded the multitrack and imported the audio files into Pro Tools, it was clear that the spectral imbalance was a feature of the original recordings. The core of the band’s sound was represented by multitracked drums, numerous stacked electric guitar parts and a bass guitar recorded both through an amp/speaker combo and a DI output. As expected, the bass amp track had a very ‘flubby’, exaggerated bottom end, but I was surprised to find that nearly all the other miked sources suffered from the same problem. The guitars were all muddy and murky to a greater or lesser extent, and I still have no idea how the band managed to get so much low end out of a snare drum! To add to the fun, they had recorded very hot, so that a number of the files were clipped in places.
Near & Far
In time-honoured fashion, I turned my attention first to the drums. These consisted of a stereo overhead track and a mono room mic, plus a track each for three close-miked toms, a kick and the aforementioned snare drum. Fortunately, the overheads sounded good, and the snare was so prominent within them that I could afford to use its (heavily high-pass filtered) close-mic track only as a reverb feed. Less fortunately, the kick was woolly, with (you guessed it) too much low end and not enough ‘click’ or ‘thump’, while the toms were very soft, lacking definition and impact. Since almost the entire arrangement was powered along by a driving pattern on the middle of the three toms, this couldn’t easily be overlooked. As I worked on the drums, I also became aware that there was a section in the first verse where several unpleasant crackles were apparent, perhaps from a dodgy mic cable. Happily, it was easy enough to replace these with crackle-free audio from elsewhere in the song.
 This mis-miked bass cab was the cause of many of this month’s problems. My secret weapon for getting flabby kick drums into shape is the Sansamp PSA1 plug-in bundled free with Pro Tools. Though it’s ostensibly a guitar amp simulator, I find that by juggling its Buzz and Punch controls you can often transform a soggy ‘flump’ into something much more punchy and cutting. The down side of applying any distortion plug-in to a drum track, though, is that you tend to bring up both the level of any spill and any sustain or resonance in the drum, so it’s usually necessary to use a gate in front of it. In this case, Avid’s standard Expander/Gate worked fine, with Hold and Release settings of 85 and 105 milliseconds respectively allowing the initial pulse of each kick beat through before clamping down on any ringiness and snare spill.
 The kick drum required some serious processing to make it cut through the mix. Despite the alarming EQ and compression settings, it’s actually the Sansamp plug-in that is doing most of the work.
 In contrast to the bass, the guitar miking caused relatively few problems.
 used to thin out the arrangement.") Some of the many guitar parts. Visible here are both the level automation and the muting (muted regions show as greyed-out) used to thin out the arrangement.
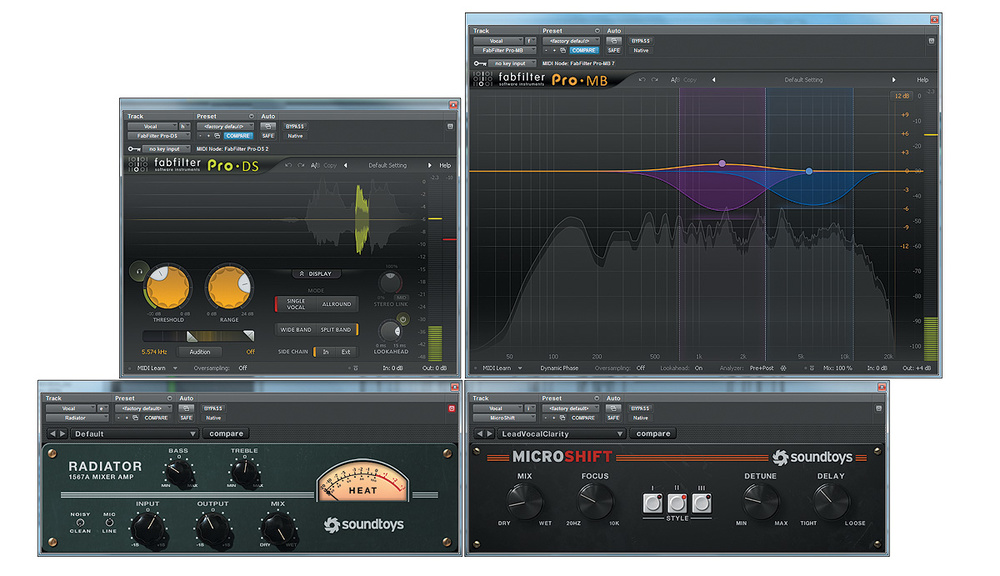
Some of the many guitar parts. Visible here are both the level automation and the muting (muted regions show as greyed-out) used to thin out the arrangement. Getting the all-important tom to man up a bit was more of a challenge. Like the kick and snare drum, it sounded way better in the overheads than through its close mic. Compared with the snare, though, both the tom and the kick drum were rather quiet in the overheads. In the end, I settled on a two-pronged approach. I used Flux’s freeware Bittersweet transient shaper, plus a large 5kHz EQ boost, to try to add impact to the close-miked tom track. I then used Fabfilter’s Pro-MB as a full-range expander across the overhead track, with its side-chain keyed from the tom and kick tracks. This allowed me to lift the level of the tom and kick in the overhead track by several dB without obvious side-effects.
. Note the ‘effect tracks’ below the main vocal track, where individual words have been copied for spot effects. These were more prominent in an earlier version of the mix.") As there was only one vocal track, it needed special care and attention (and lots of level automation). Note the ‘effect tracks’ below the main vocal track, where individual words have been copied for spot effects. These were more prominent in an earlier version of the mix. The room mic, again denuded of most of its low end, added a sense of space to the kit, but I felt that the song, with its stately tempo and strong ’80s vibe, could handle a much grander approach to reverb. Not being someone to use one plug-in when two will do, I combined liberal doses of a short ambience patch from HOFA’s IQ-Reverb on just about everything, with a small hall from Exponential Audio’s PhoenixVerb on the snare and toms.
As there was only one vocal track, it needed special care and attention (and lots of level automation). Note the ‘effect tracks’ below the main vocal track, where individual words have been copied for spot effects. These were more prominent in an earlier version of the mix. The room mic, again denuded of most of its low end, added a sense of space to the kit, but I felt that the song, with its stately tempo and strong ’80s vibe, could handle a much grander approach to reverb. Not being someone to use one plug-in when two will do, I combined liberal doses of a short ambience patch from HOFA’s IQ-Reverb on just about everything, with a small hall from Exponential Audio’s PhoenixVerb on the snare and toms.
Swing Low
And so to the bass. It’s often the case that a misjudgement early on in the recording process has consequences further down the line, and so it proved here. A very sub-heavy, bassy sound is slow to speak, so it encourages the player to play slightly ahead of the beat. Likewise, a bassist will vary his or her playing dynamics to try to achieve an even level; but the playing dynamics that produce an even level are dependent on the bass sound. The upshot is that when, at the mix stage, you make the sort of radical tonal changes that are needed to bring the sound itself into line, you find that the bass part sounds out of time and inconsistent in level. There was icing on this particular cake, too: the character of the original sound had masked the fact that the recorded part was actually clipping quite heavily on note attacks, and, of course, any attempt to emphasise the mid-range or treble frequencies at the mix made the clipping much more obvious. Oh, and did I mention that the bass was, to a great extent, the lead instrument in the arrangement?
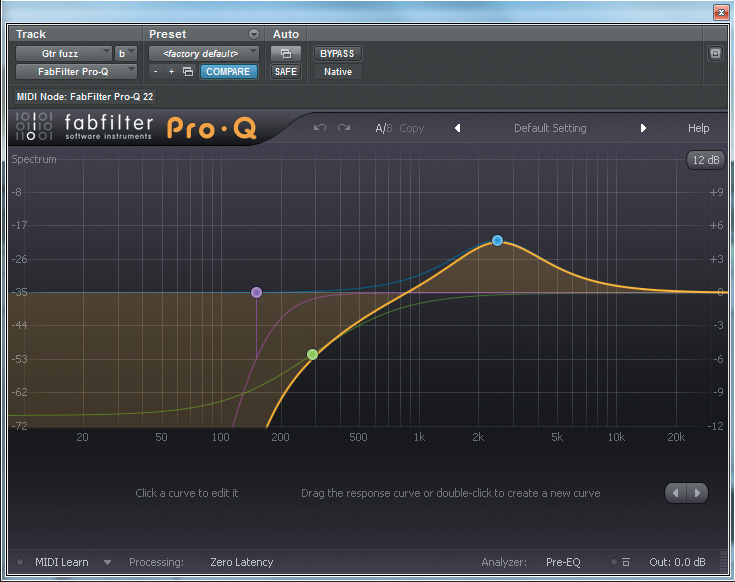
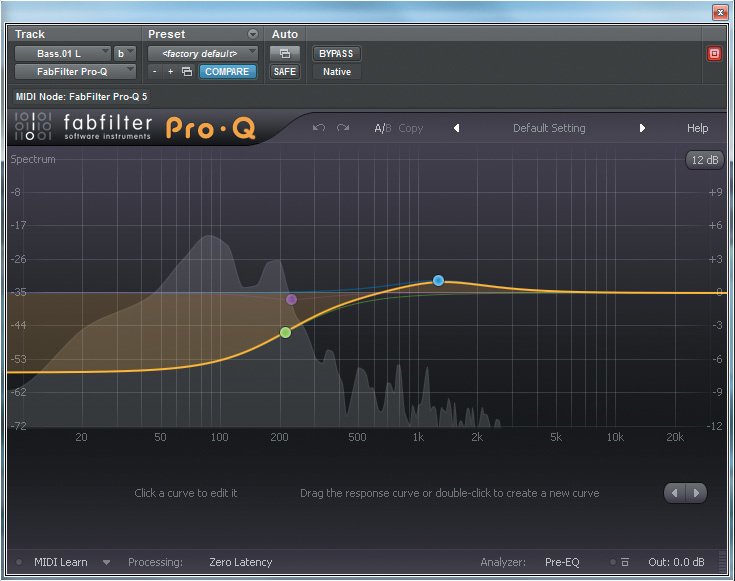
 A random sampling of EQ settings from individual tracks in the final mix. You may sense a theme emerging.I did my best to bring the bass sound into line, using an unholy combination of lots of EQ, and compression both of the multi- and single-band varieties. The clipping meant there was a limit to how much treble boost could be applied, so to bring back some life, I passed the resulting sound through Fabfilter’s Saturn multi-band distortion plug-in, which lets you apply distortion to specific frequency ranges. In this case, the idea was to restore the missing brightness and energy by saturating the low mid-range, without exacerbating the problematic higher reaches of the sound. As I’d feared, though, no amount of compression could even out the apparent level of the part, so the entire thing had to be automated on a note-by-note basis.
 After much work, I arrived at a sound which worked adequately within the context of the mix, and which suited its melodic role within the arrangement much better than the original dubtastic tone. In isolation, however, it wasn’t the prettiest of things, and there were places where the clipping was evident even within the full mix, so eventually I took up bassist Alan Rodriguez on his offer to re-track the part. The new recordings were a great improvement, and although they still required quite a lot of low-end control, and some editing for timing, they ultimately yielded a richer and more natural tone that still cut through the mix.
Sweet & Sour
By comparison, the guitars were relatively straightforward to deal with, at least in sonic terms. The original amped sound had obviously been good, so filtering away the mud with EQ left them sounding fairly healthy — but a bit over-abundant. Nearly all the parts had been double-tracked, which meant that there were places in the song where upwards of 10 guitar tracks were competing for space. A related problem was that although the verse parts did a good job of driving the song forward, some of the chorus parts sounded a bit gutless, no doubt contributing to the sense of deflation that the chorus brought with it in the original mix.
 Dealing with these issues involved several stages. First of all, I engaged in a bit of judicious pruning. Rather than having all the guitar parts firing all the time, I selectively muted sections of them, as well as adjusting their levels with automation, hoping to add clarity and increase the sense of development through the song. I also hard-panned almost all the rhythm guitar tracks, which brought a much-needed sense of width to the mix. Even then, the pile-up of similar-sounding guitar parts made some areas of the frequency spectrum sound congested, so I bussed all the guitars to a stereo aux track and applied a multi-band compressor to keep the lower mid-range under control. In addition, I beefed up some of the weaker chorus guitar parts by feeding them through distortion plug-ins such as Saturn and SoundToys’ Radiator, and also used the Bittersweet plug-in to try to emphasise the pick attack on a couple of ‘chugging’ rhythm parts. Finally, I sweetened the guitar solo and E-bow parts using, respectively, Fabfilter’s Timeless delay and SoundToys’ MicroShift thickener. Most of the guitars had been tracked with judicious amounts of amp reverb and didn’t need more, but one or two got a little extra.
 There were also several keyboard parts, mostly playing piano-like sounds which had been tracked with a lot of tempo-sync’ed delay. I am not a fan of tempo-sync’ed delay, and from an arrangement point of view I felt that the song might have been better supported by a more sustained chordal part such as a Hammond organ. I spend a happy hour or two mucking about with plug-ins such as SoundToys’ Crystallizer and Avid’s Sci-Fi, trying to turn the pianos into something more padlike, but for the most part, the band preferred the untreated sounds, so my wilder effects made an appearance only towards the end of the finished mix. On a related note, I felt that the original mix didn’t fully exploit the potential of some features in the arrangement, most notably a drop going into the third chorus. I tried to make more of a feature out of this by muting most of the parts, and creating a ‘rise’ by reversing a sustained guitar chord.
Reverb Like It’s 1984
Another feature of the arrangement — which might have been different had the band worked with a producer — was that a single lead vocal track carried the entire song, with no harmonies or backing vocals of any sort. This meant that the vocal really needed to be front and centre, especially as the verse arrangement left plenty of space for it. Fortunately, Matt Sellards’s performance was brimming with commitment, and the vocal part had escaped relatively unscathed from the flood of bass that had enveloped so many of the other tracks. However, its tone was not entirely consistent, so as well as conventional EQ and compression, I used a multi-band compressor to push the mid-range in the weedier sections and rein it in elsewhere. Another instance of SoundToys’ MicroShift helped to give it more of a commanding presence in the mix, and I added what I thought was tons of reverb and delay using Exponential Audio’s R2 and SoundToys’ EchoBoy respectively. Even this wasn’t enough for the band, though, so the final version saw the vocal positively dripping in effects!
The Finishing Touches
In an ideal world, mixes probably wouldn’t require any EQ on the master bus, but in practice I rarely find I can do without it, especially when — as in this case — the original frequency balance was a long way from the mark. However, after much toing and froing with EQ settings on the individual channels and buses, I eventually reached a situation where the master bus processing was just applying the gloss rather than doing any heavy lifting. Yet another instance of Fabfilter’s Pro-MB did most of the work, keeping the sub-200Hz region in its place and applying a controlled lift to the mid-range. I also used their Pro-L limiter to bring the overall level up to a point where it was roughly comparable to that of the original mix — not that this is easy to evaluate when the respective tonalities are so different. The band’s immediate reaction to the first mix I sent them was positive, and although they requested a number of small changes, the only major alteration was the replacement of the bass part.
 The question remains as to how the problematic spectral balance ended up being committed to disk in the first place, and how Arc Pilot can avoid tracking with too much low end in future. Part of the issue must surely be down to monitoring, and I wonder whether the problems arose partly from making tonal judgements on headphones at high volume levels (I’m sure I’m not alone in finding this extremely difficult to do accurately). Correcting it for future sessions, meanwhile, should probably involve dialling in less bass on their amps, but also miking things from a bit further away. Moving a cardioid mic a few inches further from a guitar cabinet or snare drum can do a great deal to eliminate unwanted low-end ‘flub’, as can simply choosing a different mic in the first place. And, as we all know, mixing becomes a great deal easier if you get the sounds right at source.
The Intro & The Outro
The main body of Arc Pilot’s song ‘Rise’, described in the main text, was bookended by an intro and outro that consisted mainly of entirely separate parts, recorded to their own independent tracks. I ended up mixing these sections of the song almost independently from the rest.
Most of the intro parts were layered guitar drones and swells, and once again, the problem of too much low end was readily apparent. Since there was a total of 11 parts, and the entire section was relatively short, I chose to treat them all as a single composite sound source, having first adjusted their levels and pan positions to suit. The intro was clearly intended as a gradual build, and to enhance this, I applied offline fade-ins to some of the parts. I then routed them through a stereo aux input in Pro Tools, automating a low-pass filter in SoundToys’ FilterFreak to open up gradually. As effects go, that one’s probably passed from ‘tried and tested’ to ‘horrible cliché’ by now, but in this case it did the job.
The outro boasted a modest two additional guitar parts, plus a number of others that ‘hung over’ the end of the song proper. This section ended up mixing itself almost by accident: some of the weird effects I’d created for the keyboard parts had long, evolving delays, and these became gradually audible as the rest of the song died away. The band and I both liked this effect, so in it stayed. The outro was also the only section of the final mix that used the original bass recording, as the band felt that the little closing motif had been better played first time around.
Audio Examples
To hear ‘before and after’ versions of Arc Pilot’s song ‘Rise’, along with snippets illustrating some of the treatments meted out to individual tracks, surf to sosm.ag/arcrise.
Remix Reaction
Jonathan Nunes: “The main take-away is that it’s amazing what an experienced hand (and ear) can do with music. The new mix achieves much greater clarity and separation of instruments, while enhancing dynamics throughout the song, particularly the build to the last chorus. The feedback on the original lacklustre bass recording was especially insightful, highlighting both the need to capture a fuller frequency range (given the miked multi-speaker cabinet) and controlled recording level, the latter having been drilled into us before but somehow neglected. Sam’s creative touches were a bonus, really enhancing a couple of key parts of the song. I can’t wait to read the article to know the details.”
Rescued This Month
Arc Pilot are a Florida-based alternative rock band comprised of Matt Sellards (vocals and guitars), Jonathan Nunes (guitars), Alan Rodriguez (bass) and David Craig (drums and keyboards). The foursome have been together since early 2012 and are inspired by the likes of Radiohead, the Cure, the National, U2 and Arcade Fire, among others. They are currently working on an EP for release later this year.
Audio Examples
These audio files accompany the Mix Rescue article in SOS November 2014.
01_Original_mix
02_Remix
The subject of this month’s article was a song called ‘Rise’ by Florida-based alternative rock band Arc Pilot. Here are the original mix and the remix. As you can hear, the band’s own mix was very bass-heavy.
03_Original_bass_raw
04_Original_bass_processed
The multitrack for ‘Rise’ contained two bass tracks, which you hear in turn and then together in both of these examples. The unprocessed sound is very sub-heavy, and clipping is evident on note attacks.
05_New_bass_raw
06_New_bass_processed
Towards the end of the remix process, the band sent in this re-recorded bass, again recorded to two tracks which here are heard separately and then together. The clipping is banished and the overall sound much easier to work with.
07_Drum_mics_in_turn_raw
08_Drum_mics_in_turn_processed
In these examples, you hear each drum mic in turn — kick drum, mid tom, snare drum, overheads, and room mic — followed by the full drum mix. Again, there’s a lot of unwanted mud in many of the raw files which is filtered out in the processed mix.
08_Verse_guitars_in_turn_raw
09_Verse_guitars_in_turn_processed
Four of the many guitar tracks, heard in turn and then together. Here the basic sound was good, albeit once again rather bass-heavy.
10_Vocal_chorus_raw
11_Vocal_chorus_processed
With only one vocal track in the entire song, and a strong ’80s feel to the proceedings, it was Liberty Hall on delay and reverb...