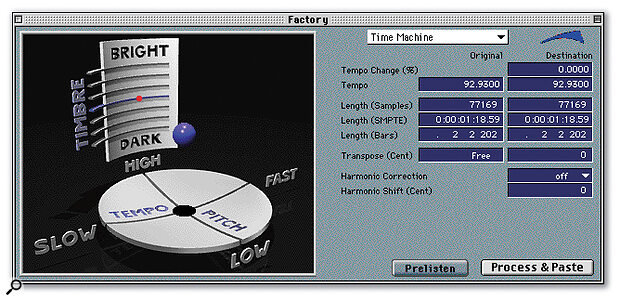
 Powerful tools for pitch and time manipulation are built into Logic itself, for example the Pitch & Time Machine (above) and the Quantize Engine (right)
This month we look at how to fix vocal tuning and timing, as well as showing how the recent Logic v4.7 upgrade improves working with Emagic's EXS24 virtual sampler.
Recording lead vocals can be a challenge at the best of times. Even if you have a performer who can sing with real feeling, many home recordists find that some sections of their vocal tracks need a little improvement in the tuning and timing stakes. Yet circumstances often conspire to prevent the problem being fixed at source. Perhaps the time available for recording runs out before you've reached a satifactory result, or the singer packs up and moves to the other side of the world before you can get them in to do some retakes. More likely, there is a unique and wonderful aspect of the performance which couldn't possibly be repeated, or you just can't face the thought of the tantrum your singer will throw when you say that the fifteenth take still isn't good enough...
In short, there are times when you want to be able to fix that lead vocal in the mix. Fortunately, Logic provides a number of functions which help you do this. In fact, you might be surprised how much of an improvement you can make if you know all the tricks.
Pitching It Right
It seems that most listeners associate poor tuning with poor performance. Certainly, if a singer is going to get away with being out of tune then they have to be able to achieve the difficult goal of persuading the listener that this is a deliberate choice, and isn't just a lack of ability. Because this is very difficult to do convincingly, it is often necessary to attempt to correct the tuning of an already recorded vocal.
The Logic feature which will be most useful to you here is the Time & Pitch Machine. This is one of the audio‑processing facilities on offer from the Factory menu of the Sample Edit window. What this allows you to do is to alter the speed and tuning of audio playback independently of each other. This is done offline, like all functions in the Sample Edit window, with changes being made to the actual audio file — so it's worth keeping backups of any audio being processed in case you make any mistakes.
All you have to do is select regions of the audio file where the tuning is a little dodgy, and simply pitch‑shift each of them up a notch or two. Although you can move the little blue floating‑ball graphic about to make parameter changes in this window, it's far better to use the comparative columns showing original speed and pitch on the left‑hand side and destination speed and pitch on the right.
The amount of pitch‑shift is controlled from the Transpose field. Note that this shows values in cents (hundredths of a semitone), which means that a value change of 100 is a semitone and 200 is a whole tone — because of this it is easy to make only minute pitch changes to the audio if you require. It is often necessary to experiment with the settings a little before you get the result you're after, and the Prelisten button helps you to do this by allowing you to audition the changes before you actually process the audio. If you feel that the side‑effects of the pitch‑shifting process become too audible in exposed vocal passages, then you could try selecting On in the Harmonic Correction field. It will take longer to process, but will often produce a more natural‑sounding result.
Of course, the above process will only change the pitch of sections of audio off‑line. If you want to correct pitching errors in a continuous manner and in real time, then you'll need to get your hands on a pitch‑correction plug‑in of some type. Easily the most well‑known of these is Antares' Autotune, which has almost certainly resulted in more impressed clients, more satisfied vocalists and more polished recordings than any other single studio device in years. If you're a Logic user who records vocals even occasionally, then you really do owe it to yourself and your studio to have this little marvel on your hard drive.
The operational aspects of this plug‑in have been covered on numerous occasions (not least in the SOS August 1997 review) so there's no point delving too deeply into them here, except to say that, like any effect or processing device, it should always be used sparingly and only to the benefit of the track. Don't just switch it on over everything simply because it's there, and use it gently where you do use it. If there are some sections of a lead vocal where the tuning bothers you, then edit these onto another track for processing, leaving the rest untouched.
Time For A Change
 For really tricky vocal fixes, you may need to use a dedicated corrective processor, such as Antares' Autotune or Synchro Arts' Vocalign Pro, alongside Logic's own facilities.
Poor timing on the part of your lead vocalist can be almost as damaging to the overall impact of your track as bad tuning. Given that the lead vocal is often one of the loudest elements in a track, it has the potential to irreparably damage the rhythmic groove of the music if inexpertly performed. So how can you sort out the timing if its dodgy?
The most immediately obvious way is by using Logic's editing tools to move sections of the performance around in the Arrange window. (This has already been covered in SOS March 2001's Logic Notes column, which dealt in detail with editing and comping of performances.) However, there are also several other tools at your disposal. For a start, there's the Time & Pitch Machine again, the time‑stretching options of which can be pressed into service for corrective purposes. A slight time‑stretch, lowering the tempo by just 0.5bpm, can be enough to make a phrase seem much more mellow and laid back, for example. Furthermore, where a corrective edit has left a gap in the vocal line, a time‑stretch of the syllable which precedes it can sometimes help to conceal the correction.
But the Time & Pitch Machine isn't the only off‑line process which can be useful here. Logic's Quantize Engine is also accessible from the Factory menu, and offers an audio process to match the quantising facilities available to MIDI parts. The easiest way to begin using this is to select the Classic Slow template from the flip menu near the top right of the window, which will fill the Granulation, Attack Range, Smooth Release and Velocity Threshold fields for you. Follow this by selecting an appropriate MIDI groove template from those available in the Basis Quantize field. Then, experiment with the setting in the Range field to get the quantisation effect you're after. You may find that setting too high a value here will give the audio an unreal, chopped quality — if you need a higher value than it allows you within a realistic sound, then try applying a more gentle setting several times, saving backups of each iteration as you go. If this still leaves you a little underwhelmed, then you can always try selecting another template. In fact, you can even try wrestling with the abstruse individual processing parameters, if you really haven't got a life...
If none of these techniques yield the results you're after, you might also consider enlisting some outside processing help in the form of the Synchro Arts Vocalign Pro application. This works by matching the timing information of a badly‑timed take to that of a guide take — the guide could either be a more accurate but less inspired outtake or could even be a track recorded specially for the purpose by a more rhythmic singer. The details of its operation are covered in the SOS July 2000 review of the Pro Tools AudioSuite version, Vocalign AS. The only slight problem with this solution is that Vocalign Pro is currently not usable within Logic itself (though Synchro Arts claim to be working on a more Logic‑integrated version). You can get around this, however, by exporting lead and guide vocals to the application as either WAV files (on the PC) or SDII files (on the Mac).
Beyond Pitch & Time
Fixing vocal performance inaccuracies is something that Logic can do well. You may have to spend a while getting your hands dirty with some editing and processing, but the results will often richly reward the time spent, rescuing spine‑tingling vocal moments which might otherwise have been technically unusable. And the more of those moments you have in your track, the closer you're going to be to a great production. Paul Farrer & Mike Senior
EXS24 Sampler Improvements In Logic v4.7

The long‑awaited v4.7 upgrade for Logic Audio Platinum is now finally available for download. While the upgrade is mostly to do with a major overhaul of the MIDI management, in order to allow hardware and software instruments to work together more effectively, another really nice improvement is the way in which it now allows the EXS24 sampler finally to categorise your samples, rather than displaying them all in one huge list. This improvement in the sampler's functionality is possible in a Logic upgrade because the EXS24's source code actually resides within Logic, not on the CD‑ROM that unlocks and authorises it.
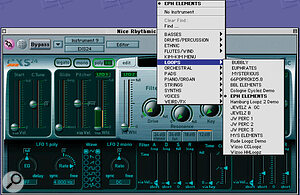
Organising your samples is very simple and is achieved by creating and naming a number of new folders within your Sampler Instruments folder, each of which will eventually contain one category of samples. You can create as many folders as you like up to the maximum supported by the computer's operating system. Where sub‑categories are needed (for example, for a Strings folder inside your Orchestral folder), you create those in the same way. Then, all that's left to do is to drag the desired 'instruments' out of the Sampler Instruments folder and into the category folders of your choice. Usefully, Mac OS Aliases or Windows Shortcuts relating to other folders can also added to the hierarchy — even the Sampler Instruments folder itself can be an alias leading to an audio folder on a different drive, if that's something you need to do.
Once you've created your folders and moved the relevant sample sets into them, the folders will appear in the sampler patch selection window in place of the usual long list. Select a folder and a menu of its contents drops down, making it much easier to locate sounds. I was a little apprehensive using this at first, because I felt that if I 'tidied up' the locations of all my samples, songs I'd already recorded wouldn't be able to find them. However (and I can only speak for the Mac version) everything worked perfectly.
There are numerous other improvements to the EXS24 in addition to this, as well as a whole raft of new stuff relating to Logic itself, so I'd recommend you visit www.emagic.de as soon as you can to download the info. Paul White


