We demystify the powerful internal routing and mixing engine within Emu's recent popular range of computer audio interfaces.
The new range of Emu soundcards (1820M, 1820, 1212M, 0404, and by the time you read this the 1616M as well) has been selling like hot cakes, but many PC musicians find various aspects of their associated Patchmix DSP utility difficult to comprehend. It's not that the mixer is difficult to use; more that it offers so many possible options that it can be difficult for the newcomer to perform even basic tasks.
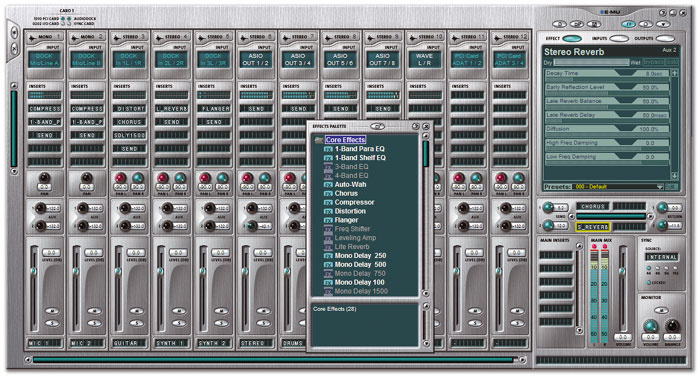
The Patchmix DSP mixer design is based on a conventional analogue mixing console, with the input channels on the left-hand side, main and monitor mix output channels on the right. These various input and output channels have inserts, aux sends, pan and level controls, mute and solo buttons, and so on, which generally makes perfect sense to most musicians who have been brought up with such mixers. However, there's a new breed of musicians who have only really experienced the virtual world of the software studio, and it's hardly surprising that they find this layout unfamiliar. So in this workshop I'll be covering the basic principles behind Patchmix and then explaining some of the more arcane operations.
Basic Mixer Features
Let's start by quickly recapping on the basic functions available. Emu have made the Patchmix DSP mixer totally configurable, so you can have as many input channels as you need, up to a maximum of sixteen in stereo — you can add extra channels at any time. I normally opt for the simplest arrangement for the task in hand in order to keep the mixer smaller on screen so that it doesn't get in the way of other windows. A label showing the channel type appears at the top of the strip, and you can drag and drop the input channels into any order in your mixer design.
Some people get confused by the fact that every channel strip is labelled as Input, whether it's being used to listen to a physical signal source plugged into one of the Emu input sockets, or carrying a playback output signal from your audio application. However, in both cases you're sending these signals through the mixer either to monitor via one or more of the physical output sockets, or to route them elsewhere using sends.
For each mixer channel you create using the New Strip function you must choose one of the available input options from a selection of Physical Sources comprising whatever input sockets your particular Emu card has on offer, such as the mono mic/line inputs, stereo line inputs, S/PDIF input, or ADAT inputs. Alternatively, you can select one of the Host Sources — either one of the sixteen stereo ASIO Output Sources (carrying stereo playback signals from your audio application), or the single stereo Windows Source for playback when you're using an application with Direct Sound or MME-WDM drivers and when playing back Windows sounds.
Below each channel strip's label is a set of six Insert slots, into which you can insert a variety of different objects (more on these later on). Next are the pan controls, followed by two aux sends, which can be used to add variable amounts of Emu's DSP effects, such as reverb or chorus, to all the channels globally. The bottom section of the channel strip comprises a strip level fader with associated text box so that you can directly enter a suitable level in decibels. The Mute button removes the output of that channel from the mix, while Solo allows you to hear it in isolation. Finally, at the bottom there's a 'scribble strip' where you can enter a descriptive name for the channel.
What's So Different About Patchmix DSP?
Some audio interfaces simply hard-wire the various driver playback channels to the physical output sockets (for example, ASIO 1/2 playback comes out of Out 1/2, ASIO 3/4 from Out 3/4, and so on), and hard-wire the various physical input sockets to the various driver inputs (In 1/2 to ASIO In 1/2, and so on) for recording. This is the way a lot of musicians want to work anyway. Those interfaces offering direct or 'zero latency' monitoring will also provide the option of routing physical input sockets direct to physical output sockets, so you can monitor the incoming signals during recording without any software delays.
The next step up in versatility is providing a dedicated hardware monitor mixer on the interface, so that you can mix together various live input signals and playback signals from your sequencer, and either use this combined stereo signal to feed a physical output — a monitor mix on headphones for performers during the recording phase, for instance — or send it to a driver input so you can record lots of signals onto one stereo track of your sequencer. This is the approach used by manufacturers such as Edirol, M Audio, and Terratec. In these cases, however, you can still completely bypass and ignore the monitor mixer by choosing the direct routing options for both physical inputs and outputs, as before.
Emu have taken rather a different graphical approach, and at first it appears that every signal must be routed through the entirety of the Patchmix DSP mixer. The secret is that, while much of the mixer is indeed dedicated to creating a monitor mix that appears on both the Main and Monitor outputs, you can also use the Insert slots in each channel to route input signals directly to your sequencer, or output signals directly to physical output sockets, as with any other audio interface. If this is all you want to do, a useful mental trick is simply to ignore all the Patchmix DSP controls below the Insert slots, as well as the mixer's entire output section (see screenshot). It may also be useful to activate the Mute buttons for these channels, so you remember that you're not listening to them through the monitor mixer but by directly routing them elsewhere.
Problem-solving Tips
One of the first difficulties experienced by many users is simply getting a sound out of the mixer when attempting to play back WAV files or soft-synth sounds. The easiest emergency advice is to load a New Session (configuration of input and output channels and routing), using the Save As option that pops up to preserve any of your own existing settings for another time, and then to choose a template from the thirty or so on offer. This will reset everything to suitable defaults, and in many cases your sound will return immediately. If you're using the 1820 or 1820M, though, many of the templates assume that you'll be using the Audiodock outputs 4L and 4R as Monitor outputs, so make sure these are what your amp/speakers are plugged into as well. If you're using the MME-WDM drivers with an application like Steinberg Wavelab, your output signal will be passing through the input channel strip marked Wave L/R, while ASIO applications will probably default to ASIO Out 1/2..") To play back stereo sounds from ASIO and MME-WDM applications, this is all you need in the Patchmix DSP mixer. Notice how the mixer output has been routed to the physical output socket named Dock Out 4 so that you hear the signals from both channels simultaneously).
To play back stereo sounds from ASIO and MME-WDM applications, this is all you need in the Patchmix DSP mixer. Notice how the mixer output has been routed to the physical output socket named Dock Out 4 so that you hear the signals from both channels simultaneously).
At this point, let me introduce you to the single most helpful hint of all. To help sort out Patchmix DSP routing problems, always put a Peak Meter in the topmost slot of each mixer channel by right-clicking on the slot and selecting 'Insert Peak Meter'. This will show you where you have active signals, even if you can't hear them due to some routing problem.
The easiest output routing is through the monitor mixer, the controls for which are on the right-hand side of the mixer window: master controls for the main and monitor outputs, read-outs of current sample rate and clock source, plus a 'TV window' above that which displays extra context-sensitive controls. You'll probably already see the Main Mix output meter twitching in time with your signal (if not, you've either pulled down the channel fader, activated its Mute button, or have some other Insert blocking the signal). Now all you need to do is make sure the output of the mixer is routed to the output socket that you're listening on.
Click on the Outputs button above the 'TV window', and then on the box marked Physical — this will display vertical strips of red and green boxes on the left, and a list of possible physical output sockets on the right, depending on the Emu card you're using. To connect the Main or Monitor output to your choice of output socket just click on the red or green box adjacent to it — you can send either of these signals to as many simultaneous physical outputs as you wish. The monitor output carries an identical signal, but with separate volume, balance, and mute controls, which is a handy when you're wanting to work on headphones.
If you want a more direct signal path without all the extra options of the monitor mixer, just activate the Mute button of the channel in question, right-click on an empty Insert slot, and select Insert Send (Output To ASIO/WAVE Or Physical Out). When the New Send Insert window appears, choose the desired physical output from the drop-down list (for example, PCI Card S/PDIF L/R, PCI Card ADAT Out 3/4, or Dock Out 3L/3R). This is the approach to use when (for instance) you want to send eight ASIO channels from Cubase SX to individual ADAT outputs — just create one stereo send for each of the four ASIO channel pairs.
Sessions & Sample Rates
You can save your own different configurations of the Patchmix DSP mixer (known as Sessions), for use with different applications and in different scenarios. For example, I've created some that incorporate the settings needed to transfer digitally to and from my portable DAT recorder. Depending on the interface model, Emu also provide a set of about thirty default Sessions covering multitrack recording and playback, ADAT transfer, guitar tuning, and a special one for use with the Emulator X Studio sampler if you have that as well.
One important thing to remember is that the Patchmix DSP mixer offers DSP effects that only run at either 44.1kHz or 48kHz sample rates. There are also several restrictions on the digital ADAT and S/PDIF connections beyond 48kHz. Because of these various fundamental internal changes, it's impossible to let software applications switch sample rates for you automatically behind the scenes. So, although with most audio interfaces you can load and play WAV files at almost any sample rate, the interface automatically accommodating you by changing its current rate behind the scenes, the Emu range (along with various others including Edirol's UA and FA ranges) require you to set the appropriate sample rate manually. If you try to play back or record at a different rate from the one currently set in the hardware, you'll either get an error message or just silence.
To set your preferred sample rate directly from the Patchmix DSP utility by choosing one of the New Sessions on offer — when you click on the New Sessions button on the mixer toolbar a dialogue screen will be launched with three main tabbed pages. If you choose one of the supplied sessions on the 44k/48k page you can decide which of the two sample rates you want on the following page, while the sessions on the 96k and 192k pages are fixed at these sample rates, and provide default sessions with no effects processing.
The eagle-eyed among you may have noticed that 22kHz, 88.2kHz, and 176kHz haven't been mentioned. This is because the Emu range doesn't currently support these sample rates at all. Although this may prove frustrating to some users, there is one advantage in not supporting 22kHz. While ASIO drivers won't convert between sample rates behind the scenes, MME-WDM ones normally will, and if you play a 22kHz system audio file, your sequencer project may end up having its sample rate changed until the next boot. With Emu's approach, the 22kHz file will simply be ignored, leaving your sequencer playback intact.
Recording Options
Next, let's say you want to record a stereo signal through a couple of the line input sockets and therefore want to route its signal to your audio application. If your chosen line input pair (Dock In 1L/1R for instance) isn't already displayed in the Patchmix DSP mixer as a stereo channel strip you first need to use the Append New Strip option to add it to the mixer. Here's a setup that will convert two mono mic inputs into a single stereo input in your sequencer.
Then you have to route it to the audio application. Right-click on one of its Insert slots, select the Insert Send (Output To ASIO/WAVE Or Physical Out) option, and then choose where you want to send it to, for example HOST ASIO In 1/2 for any application using ASIO drivers (such as Cubase or Sonar), or HOST WAVE L/R if you're sending it to an application using MME-WDM drivers. If at any time you want to refer back to this routing, just click on the Insert in question, and the connection you made will appear in the 'TV window'.
With the current Patchmix DSP version, each of the mono Dock Mic/Line inputs of the 1820/1820M models can only be routed to a stereo destination. So, although you could for instance route mono input Mic/Line A to the ASIO 1/2 inputs of your sequencer and pan it hard left so it only appears on the ASIO 1 input as a mono source, you still wouldn't be able to use ASIO 2 for a second mono input channel, since the ASIO 1/2 pair is now greyed out as an option. This can be frustrating if you're wanting to record with stereo mic pairs, or if you'd like to use the two inputs as extra stereo line inputs.
However, there's a way round this limitation, allowing you to send the two channel strips into your sequencer as a single stereo input. First, create the two channel strips for Mic/Line A and Mic/Line B, but making sure that you tick the Aux Send Pre-fader option in the New Mixer Strip dialogue. Next, pan the first strip hard left, and the second hard right, and set each of the Aux 1 send controls to 0dB — this results in the two mono signals being sent to the stereo Aux 1 bus.
Now mute the two channel strips (the pre-fader option we used earlier prevents the Aux 1 signals disappearing at this point), and move to the Aux Effects section of the mixer. Set the master Aux 1 Send to 0dB, but the master Aux 1 Return to its minimum -132dB setting. The final step is to right-click on the first master Aux 1 Insert , and select Insert Send (Output To ASIO/WAVE Or Physical Out). Choose a stereo HOST ASIO destination, and our two mono channel-strip signals will end up in the sequencer as a stereo pair. Once you're sure this routing is working, save the Session for later use.
On-line Help
 You'll find lots of posts about Emu soundcards and the Emulator X soft sampler in the SOS Web Forum, but there are other resources that cater more specifically for Emu-owning musicians. The most popular are the unofficial Emu forums, which cover all of Emu's interfaces and software, as well as dealing with integrating these products into all the major sequencers. You'll also find that Emu staff regularly put in an appearance with 'official' answers, despite the fact that these forums are not run by Emu themselves. Visit www.productionforums.com/emu/default.asp
If your Emu soundcard is one of the ones bundled with Emu's Emulator X sampler, I've also discovered two more web sites with useful information. Emus On Acid (www.emusonacid.co.uk/forum) is primarily a forum dedicated to Emu hardware samplers, but does host one for the Emulator X as well, as do the Studio-central Community Forums (http://studio-central.com/phpbb).
DSP Effects Routing
The bundled effects are roughly equivalent in quality to a mid-range hardware unit, and run internally at 32-bit resolution and 44.1kHz or 48kHz sample rates. As with an analogue mixing desk, the two aux sends come after all the Inserts, and are therefore ideal for adding effects for monitoring purposes (such as reverb during vocal recordings) when you want the recordings themselves totally dry to retain more flexibility during mixdown. This is where the functions of the Patchmix DSP mixer start to outstrip most of the competition, since you're not using any of your PC's native processing power to run the effects — you just left-click on the FX button to launch the Effects Palette window, and then drag and drop the desired effect across to an empty Insert slot in the appropriate channel.![]()
With earlier versions of the Patchmix DSP mixer it was confusing trying to add different DSP effects to multiple playback channels — the process involved creating a number of stereo output buses in your chosen multitrack audio application, routing each one to a different ASIO output, creating the appropriate ASIO channel strips in the Emu mixer, adding the effects as just described, and then routing the treated signals to physical outputs or back into the sequencer application. Thankfully version 1.6 made life far easier, and you can now access the various Emu DSP effects directly from within your chosen sequencer application as ASIO plug-ins. Just choose the plug-in marked Emu Power FX, then drag and drop one of the available DSP effects into an Insert slot in the Emu Power FX plug-in window. Some musicians have apparently experienced Emu Power FX settings disappearing when reloading Cubase songs, and a few have suffered crackling and synchronisation problems with some host applications. If this turns out to be a problem for you, then remember that there are also plenty of ways that you can use the DSP effects within the Patchmix DSP mixer.
For instance, why not add compression, distortion, or a complete chain of effects, to a guitar input in real time? The channel Inserts operate on the signal from the top to the bottom slot, so bear this in mind when setting up more complex routing. Just drag and drop the desired effects to Insert slots on the input channel you're using — remember that you can re-order them by dragging them around as well. For example, if an input channel has (from top to bottom) peak meter, send, and EQ Inserts, you'll get a clean signal sent to your audio application, but hear the EQ'd version when monitoring through the DSP mixer. Conversely, a guitar sent through an input channel with peak meter, distortion, and send Inserts will record the distorted signal as well as monitoring it.
Patchmix DSP Tips
If you think your playback signals are quieter than normal, you've probably loaded a Session containing -10dBV instead of +4dBu output levels — you can change them by clicking the Session Settings button and selecting the I/O page, where you'll find all the current settings of both inputs and outputs, including the configuration of the PCI card's optical input and output (ADAT or S/PDIF).
Don't worry if you can see signal activity on a peak meter inserted in the 1820/M Dock In 3L/3R inputs when you have nothing plugged into these jack inputs (or hear lots of hiss coming from this stereo channel through the monitor mixer). This is because the high-gain RIAA-equalised turntable (phono) preamp shares these input channels, and remains active until you plug something into the Line 3 L/R jack sockets. To remove this hiss from the monitor mixer output, just click on the channel's Mute button. Similarly, to minimise any contribution from the mic preamps when you're not using them, click on their channel Mute buttons. This will ensure that background noise levels remain as low as possible on the main mix output.
If you create a useful mixer setup, don't forget to save it for posterity with a descriptive name so you can use it again later on. This will save both time and frustration.
The Insert Test-tone/Signal Generator includes a sine-wave oscillator that I've found really handy for tuning instruments. Just temporarily insert the oscillator on any mixer channel not playing back the instrument in question and type in the desired frequency — such as 440Hz for a concert 'A'. Then you can tune the instrument to the test tone.
Emu's WDM drivers currently only support a single stereo input and output, which some musicians find incredibly restricting. However, the vast majority of professional audio applications now support ASIO-format drivers, and these do support full multitrack operation. Only those few multitrack applications that don't offer ASIO driver support (such as Adobe's Audition, previously called Cool Edit Pro) will therefore be restricted to stereo-only operation, but hopefully this will change in the future.
More Complex Signal Paths
If you want to record the mixed-down stereo output from your MIDI+Audio sequencer, plus the combined stereo mix from a set of hardware MIDI synths being triggered from MIDI tracks, it's easy using the Patchmix DSP functions. Just create your combined mix using the various input strips, and then add an Insert Send (Output To ASIO/WAVE Or Physical Out) to one of the Main Inserts to return this combined mix to a stereo input pair on your sequencer.
You can even send signals from one application to another through the mixer. For instance, if you choose the stereo MME-WDM E-DSP Wave output option in an application like Wavelab, its signal will appear in the Patchmix DSP mixer on the Wave L/R stereo playback input strip. Then, if you add an Insert Send (Output To ASIO/WAVE Or Physical Out) to one of the Host ASIO In options, this stereo signal can be recorded directly into Cubase/Nuendo or any other ASIO-compatible application.
You may instead want to patch external hardware effects into some sequencer tracks, and again Emu have made this comparatively easy — you just route the stereo signal in question to an ASIO output in your multitrack sequencer application, make sure this ASIO output appears as a channel strip in the Patchmix DSP mixer, and then choose the Insert Send/Return (Physical Output And Input) option in one of its Insert slots. Choose the physical output and input sockets to which you want to attach your external effects (including S/PDIF if your hardware effects box has digital I/O and you need a cleaner signal path that doesn't pass through A-D and D-A converters).
Another example of a complex setup that's easy to create is where a guitarist wants to record a guitar with Pod-style modelling effects, but also record it dry (in other words with no added effects) in case the sound needs to change later on. To do this on the 1820M, just plug your guitar into the Line A or B inputs, add an Insert Send (Output To ASIO/WAVE Or Physical Out) near the top of the Insert chain to any available 'Host ASIO In' to send this dry signal to your sequencer, then add an Insert Send/Return (Physical Output And Input) below it, and patch the Pod input and outputs into the chosen send and return sockets on the Audiodock I/O box. You'll be able to hear the treated (wet) signal through the Main or Monitor outputs of the Emu Patchmix DSP, but both wet and dry signals can now be simultaneously recorded in your sequencer onto separate stereo tracks.
Once you've got your head round the routing options I've discussed here, you should be able to work out plenty more to suit your individual requirements — just remember to have a peak meter inserted into each mixer channel, and then you shouldn't lose your signals ever again.