 The settings shown here will give you three repeats after the initial note with an eighth‑note spacing. The velocity decay parameter means that each successive echo will drop in volume. Try using these values to process a hi‑hat or ride cymbal pattern.
PART 3: Nicholas Rowland fades away with a few tips for creating and manipulating MIDI echoes, along with some other sequencing esoterica. This is the last article in a three‑part series.
Following on from the tips for 'MIDI composition without really trying' which I explored in the first article of this series, I now want to move on to look at some of the more esoteric MIDI manipulation facilities found on higher‑end sequencers. Well, to be honest, most of what I'm about to talk about refers specifically to features to be found on Cubase, which happens to be my sequencer of choice. Apologies and respect to anyone who drives another sequencer model. However, you should find that many of the ideas outlined here are still relevant, though obviously the mechanics of achieving the results will be different according to the program you use.
Expect Delays
Perhaps due to my background as a percussionist, I've always relied heavily on the rhythmic effect of delays when creating and mixing my own music. One of my (probably over‑used) tricks, particularly within rhythm tracks, is to manually create dub‑style echo parts using elements of the main rhythm.
In Cubase this is a simple matter of setting the appropriate quantise level and then 'painting' in the delayed notes. (When working with a straight, four‑square type of rhythm or melodic line, I tend to build these echoes around triplet or dotted note quantise values or odd‑number groupings.) You can then go to the continuous controller editor screen and edit the note velocities so that the echo fades in or out (or both) as desired. You can also crossfade different echoed instruments and generally bounce stuff all over the place. And, for that matter, you can also use continuous controllers to modify the echoes in other ways. For example, by altering the pan, reverb, attack, decay and so on you can modify the sound each time the echo repeats (if none of this makes sense, hopefully the box elsewhere on the page will provide full illumination).
Of course, this is very much a Heath Robinson approach to creating delays, but at least one thing in its favour is that fact that you can apply it using any sequencer. However, programs like Logic Audio and Cubase have their own MIDI delay modules which allow you to set up these and other more advanced effects quite easily.
...don't forget that it's always interesting to apply arpeggiated sequences to banks of drum sounds.
The key to understanding the Cubase MIDI processor is first to understand that the delay and quantise values are expressed in terms of MIDI ticks rather than musical notes — so always keep a conversion chart handy. If you look on the last page of this feature, you'll find one that I made earlier. Just ask an adult to help you with the scissors when cutting it out of the magazine! The first example screen shown here would give you three repeats after the initial note at quarter‑note spacings, with the MIDI velocity of each repeat decreasing by 16. By moving the Velocity Decrease slider to give positive values you can make each subsequent echo get louder, which is always a handy trick to keep up your sleeve for a rainy day.
The 'interesting' parameters here are Echo Decay and Note Decay. The first allows you to create staggered echoes, by adding or subtracting a specified time value with each decay. If you set the Echo Decay to very small values (something like plus or minus 1 or 2) you will find that the echoes get slightly — but only slightly — out of time as they fade away. You can use this function to add a sense of dynamics to otherwise strictly quantised parts, such as hi‑hats or tuned percussion.
With Note Decay, the MIDI processor will also change the pitch by up to 64 semitones either way with each delay. This allows you to create a number of simple up/down arpeggio effects. Note that if you want the results to be comfortable on the ear then stick to intervals of thirds, fifths or sevenths.
To transform an otherwise mundane bass line or plodding chord sequence, try copying the part to an empty track and then transposing it up by either one or two octaves (depending at what pitch the original part is playing). Then set the repeat and echo values to give you four repeats at eighth‑note intervals.with the Velocity Decrease set to ‑10 and Note Decrease at +5 (in other words so it goes up by a fifth with each echo). This gives you a kind of 'dancing' pattern over the top. (See box on page 126.)
You can be quite creative when you use the MIDI processor to trigger samples because, as we all know, when a sample gets higher or lower in pitch its speed and length also change. Try applying the MIDI processor to a spoken phrase with the Note Decay set to give you a drop of, say, two semitones with each repeat. Over six repeats the vocal will drop by an octave, which also means its speed will have halved. If you've ever heard the middle eight section of David Bowie's 'Fame' then you'll get an idea of the sort of effect that this can produce.
Cubase allows you to re‑record patterns which have been manipulated by the MIDI processor back to another track. This then gives you further options for manipulation, such as transposing it or assigning the echoed parts to a different sound than the original. You can, of course, also feed your new part back into the MIDI processor. So the simple up or down arpeggio effect can be turned into a more complex pattern, or you can create complex multi‑delay‑type sequences where the echo goes out of time and then comes back in again. For dance‑based material, where the art is to produce as many variations of the main riff as possible, the MIDI processor can be a very useful tool indeed.
See You Later, Arpeggiator
The rediscovery of older synths has done as much for the arpeggiator as a musical tool it has for those lush, organic analogue sounds. Many sequencers, including the very latest versions of Cubase, now have a dedicated arpeggiator function, so even if your keyboard hasn't, you can get in on the act. And even if your sequencer is arpeggiator‑less, there are a number of shareware/freeware programs for all platforms which create arpeggios that can then be imported into your main sequencer, usually as a MIDI file. Companies such as Keyfax (the Twiddly Bits people) also offers MIDI file disks of arpeggios which can also be easily imported into your own compositions.
Then there's the DIY approach. At the crudest level, arpeggios are simply staggered chords. So you can turn out your own arpeggio patterns using the cut‑and‑paste techniques outlined in the first article. See 'Arpeggiate!' box on page 122 for an example of how a straightforward run of chords was turned into an arpeggiated sequence.
Oh and don't forget that it's always interesting to apply arpeggiated sequences to banks of drum sounds, as you often create rhythms that you simply wouldn't have thought of if you'd just sat down and programmed them.
Let's Get Interactive
The Interactive Phrase Synthesizer (IPS) is one of Cubase's most powerful functions — so powerful, in fact, that many people won't touch it with a barge pole. At its basic level, it enables you to trigger pre‑recorded phrases in real time from a keyboard. But its many functions also allow you to modify the phrase in various ways, both as a result of what you play and through the various modulation parameters within the program itself.
In many respects, it's the ultimate anorak's sequencer, based closely on the old‑fashioned analogue‑style sequencer units which output variable pitches and rhythms using LFOs and various other modulators. These old machines were controlled by loads of knobs and basically most people just twiddled them until something interesting happened. Although the interface of the IPS is less intuitive, it's not that difficult to get to grips with. No doubt Steinberg's programmers would shoot me for saying this, but if you're interested in quickly producing variations of your original material, then you can get a long way without really knowing what you're doing. Believe me, I speak as one who only reads manuals as a last resort...
Because explaining its functions would take up the whole of the rest of this magazine, I've decided instead to give you a simple example of how the IPS was used to mangle a simple phrase — see the 'Interactive Phrases' box on page 124. It may sound a cop‑out, but I would encourage any Cubase user who hasn't yet had the courage to try it out. Then go to the manual and find out what you've actually been doing!
And So, The End Is Near...
...And that brings to an end my rantings on MIDI mangling for the masses. I'd like to think it's changed your life, but my mum always said I was an impossible dreamer. However, if it's provided any inspiration at all, I'll go to my grave a happy man. Just don't forget to credit me on your sleeve notes!
Arpeggiate!
 Step 5.
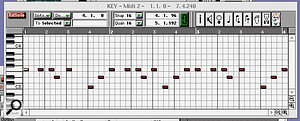
We start with a simple four‑on‑the‑floor chord sequence. By rubber‑banding the notes we can shift their positions forward to create the simple 'broken chord' arpeggio shown in step 2. The pattern is then copied to another track where, in step 3, it is transposed up by seven semitones, reversed and the notes then kicked back so they are in the right place. In step 4, we mix the patterns together. However, in this particular example, we're left with quite a lot of double notes (ie. notes copied on top of each other) and there are also a few moments where you have two different notes on the same beat. While this will sound fine with polyphonic instruments it might not be so good with monophonic synth sounds, so in step 5, I've gone in and deleted notes so that there is just one note per beat. The result is an early Tangerine Dream‑like sequence that works a treat with analogue voices.
Interactive Phrases
 Step 1.
In the words of the Cubase manual, the Interactive Phrase Sequencer allows you to "create one‑finger accompaniments, generate complicated arpeggios and more". Whatever you're trying to achieve, the IPS experience starts by loading in an existing MIDI phrase (pattern or riff) which is then used as the base material for the program to work its magic.
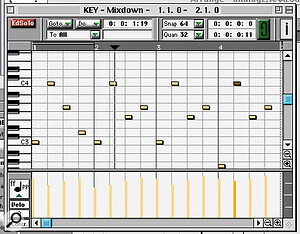
In this particular example, I started by using the normal edit page to generate a straightforward one‑bar melodic sequence as shown in Step 1. Note that the IPS will also function quite happily with drum patterns. Once the phrase is loaded into the IPS and the program made active, you'll find that when the Transpose Retrigger function is clicked, your phrase will be triggered every time you hit the note of the keyboard. It will also be automatically transposed depending on what key you hit. (Note that if you take a drum pattern, with the drum sounds assigned across the keyboard, then the effect of the transposition will be to play the rhythm with different sets of voices — a neat way of generating new rhythm patterns from old.)
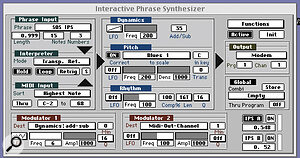
The fun comes when you start modulating the Dynamics, Pitch and Rhythm of the Phrase. In the example shown here (see step 2), the Dynamics (MIDI velocity) are subject to the effect of a downward velocity ramp which means the riff gets quieter as it plays through. Meanwhile the Pitch function forces the notes of the sequence into certain keys and scales — with variations including such exotica as Persian and Hungarian. Again you can use the LFO shapes to alter how this effect is applied in real time.
Here, though, the main change to the original phrase has been made through the Rhythm control. As you can probably see from the box, all notes have been transformed into sixteenth‑note triplets, while the rhythm itself is changed to a 16‑to‑the‑bar analogue power driver. Georgio Morodor eat your heart out!
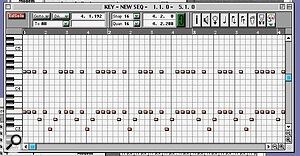
Finally, in the lower left‑hand part of the box, I've used Modulator 1 to automatically vary the amount of volume boost to the riff. The result of all this is shown in the second screen from Cubase's edit page (step 3).
This really is just scratching the surface. If you're a Cubase user then you'll know that there are not one, but two separate IPS processors, each of which can be independently programmed with a different phrase and then sent to different MIDI channels/instruments and so on. The advanced features of the program will also change the order of notes, either according to the program's internal logic, or what notes you input from the keyboard. The result is a bit like a musician jamming by trying out a combination of notes in different orders. For users of multitimbral synths, you can cycle round MIDI channels, so that, in effect, each note is sent to a different patch.
Go read that manual now!
Echo Example
 Step 2.
Sequencer screen dumps being what they are, it's easier to illustrate the Heath Robinson approach to creating delays on drum patterns. Here, this basic two‑bar kick, snare and hi‑hat pattern has been enlivened with a triplet cowbell and square click pattern which has simply been painted in. As you can see from the velocity information under the pattern, the cowbell fades in and then out of the mix. What you can't see is that the square click fades out and then back in. Cubase makes it easy to draw in velocity curves like this or indeed to manipulate other continuous controller parameters to alter sounds.
MIDI Processor Conversion Chart
 Step 3.
Cubase's MIDI processor expresses note lengths in terms of MIDI ticks. Here's a conversion table for those who've lost their manuals (or even their marbles).
PROCESSOR VALUE | NOTE LENGTH |
1 | 1/192 |
2 | 1/64 triplet |
3 | 1/64 |
4 | 1/32 triplet |
6 | 1/32 |
8 | 1/16 triplet |
12 | 1/16 |
16 | 1/8 triplet |
24 | 1/8 |
32 | 1/4 triplet |
48 | 1/4 |
64 | 1/2 triplet |
96 | 1/2 |
128 | 1/1 triplet |
192 | 1/1 |


