Hugh: It's strange. A few years ago I used tape machines almost every day, but now it is something of a special event. I still own a machine — a Studer PR99 Mark III (the pro version of the Revox B77) — which has been modified to be able to replay both half-track (professional) and quarter-track (domestic) tapes, but it gets very little use these days. Nevertheless, I still maintain it as well as I can; a routine that is hard to break! Cleaning and preventative maintenance are quick and easy to do, but ensure the longevity of the machine and maximise the quality of recordings or replays. I make a habit of cleaning the machine before I load it with tape, and then clean it again before putting it away after I have finished with it.
 Paul: The best method of cleaning I know is to use cotton buds moistened with either isopropyl alcohol (available from Studiospares or most traditional chemists), or a specialist cleaning spray such as Colclene PCS or Servisol Aero-Klene. Personally, I prefer to use the alcohol, but it is flammable, so you have to be careful how it is stored. A few years ago you could buy alcohol-soaked swabs in individual sachets, but I've not seen those on sale for a while.
Hugh: All tape sheds dust and lubricants as it plays, and the idea of cleaning is to remove this residue before it clogs up the bearings and heads, or makes the guides and rollers sticky. Some tape formulations can become very sticky after storage and if you hear unusual squeaking noises or notice the machine struggling to play or wind a tape, remove it immediately and clean the machine very thoroughly. The tape will need treating before it can be used usually by 'baking' but that's a whole topic in itself.
If the tape machine has been used for editing, there might also be wax debris from chinagraph pencil marks, and that will also need to be removed before it contaminates the tape path.
Paul: The tape heads are delicate and you should only use soft cleaning materials. Never resort to scraping stubborn dirt off with anything hard! Patience, cotton buds or lint-free cleaning cloths, and a solvent are all that are required or appropriate.
Hugh: The same cleaning regime can be applied to any fixed or rotating guides, but be especially careful on rubber rollers. The cleaning solvents can dry the rubber out, and these days getting replacements is increasingly difficult. I've always used isopropanol and never had any problems, but if you are concerned try using pure distilled water, or a very dilute solution of a mild detergent. As always, you have to be very sparing with the solvents, and never allow any to run into the bearings of rotating guides. Solvents here can attack the lubricating grease and consequently cause serious wear.
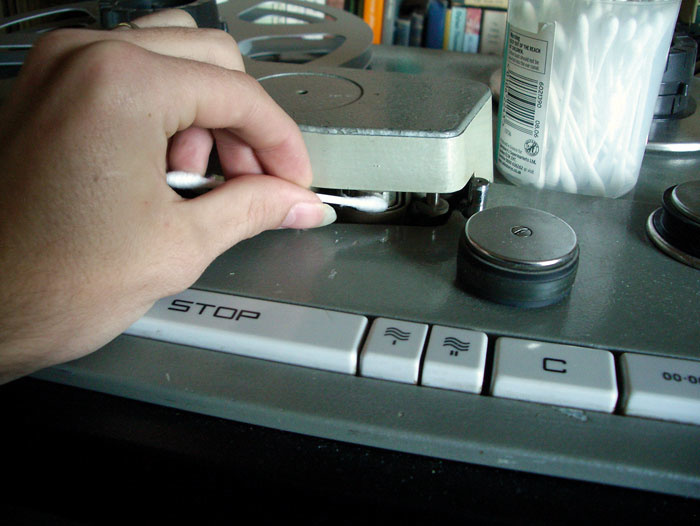 Paul: It sounds obvious, but make sure you clean the entire surface of rotating rollers which is not always as easy as it sounds and, as you clean each element of the tape path, examine the components for any signs of wear, such as flat spots or sloppy bearings. That way you should be able to have the machine serviced before the wear starts to become audible or causes damage to your precious tapes. Cleaning the tape path is something that should be done regularly at least before and after each use of the machine. Some people advocate cleaning the machine with each new tape placed on it [Like Hugh — Ed]. The other routine maintenance procedure is to demagnetise the machine, to make sure that nothing that the tape can come into contact with is magnetised at all (to prevent an increase in background noise when recording, and to avoid partial erasure of HF when playing back).
Hugh: That's true, but this isn't something that needs to be done that frequently with relatively modern machines. I demagnetise maybe once a year now, as part of an annual alignment and general service. There used to be a lot of easy-to-use demagnetisers around, but with the demise of the tape machine they are increasingly hard to find now! They all work slightly differently, so make sure you understand the correct operating procedure for the device you have. If you get it wrong you could end up magnetising the guides and heads, which would be disastrous, so be very careful.
Paul: The basic principle with all de-maggers is to build a strong alternating magnetic field very gradually near each component of the tape path, and then allow it to fall to zero again very gradually. If this is done properly, the guides and heads will retain no magnetic flux of their own. In practice, the technique is usually to bring the demagnetiser up to the start of the tape path very slowly, then move it smoothly and slowly along the path as close as possible to all guides, rollers and heads and, finally, remove it slowly to allow the magnetic field to fall to zero again.
Hugh: Some demagnetisers have electronic circuitry to ramp the field up and down for you, but most types require the operator to physically move the device slowly towards and past the guides and heads to produce the necessary build and fall. If the demagnetiser is turned on or off too close to the machine, the sudden creation or collapse of its magnetic field will magnetise all manner of things, so read the instructions and be careful!